Chapter 13
The centers, one by one
You only see the centers that are installed on your system. Here is, in short, how each one is used day to day. For setting them up, see Your media libraries and Settings & administration.
Party Games has a chapter of its own: Party Games.
Music
Plays your own music collection with a live sound visualisation. Browse via Albums, Artists, Genres, Years or Search. On the search page you can use the on-screen keyboard or just start typing on a physical keyboard - the text drops straight into the search field. A small button next to the search field switches what the search targets (everything, albums, artists or songs).
Search ignores punctuation. The on-screen keyboard has the ordinary punctuation keys (' / ! & - . , ?), so you can type "Guns N' Roses", "AC/DC" or "Wham!" exactly as the name is written - but you do not need them: acdc finds AC/DC, guns n roses finds Guns N' Roses and wham finds Wham!, just as accents are ignored (beyonce finds Beyoncé).
Tap a song to open the song window, or use Play Now, Play Next, Add All and Shuffle to build a playlist. New music you drop into your folders appears on its own - no restart needed.
The song window. The song's own cover lies behind the window as a soft, blurred colour, so the title and buttons stand out sharply on top. At the top you see the cover, the title with the star right after it (it makes the song a favourite), the artist and a quiet line with genre · year · length - plus the queue line if the song is waiting in the queue. Below come the buttons in pairs. For a song that is not in the queue, Add (the one highlighted button) and Add Similar come first, since both put something in the queue, followed by Play Now and Play Next, which touch what is playing. For a song already in the queue there is no Add, and the buttons begin with Play Now. Under a dividing line, Find more: offers Artist, Genre and Year, each a list of every song with the same artist, genre or release year. Last come the two quiet buttons Delete (only for a song in the queue) and Close, well apart so you do not hit the wrong one. You can also close with Esc or by tapping outside the window. An administrator can take Find more and Add Similar out of the window, so it only offers Add, Play Now and Play Next (see Settings & administration).
With the keyboard, the main button is selected as soon as the window opens, so Enter does the obvious thing: Add for a song that is not in the queue, otherwise the first button you may use. Delete is never selected by itself, so Enter can never remove a song by accident. Tab moves on through the buttons, then Find more, the star, and finally Delete and Close.
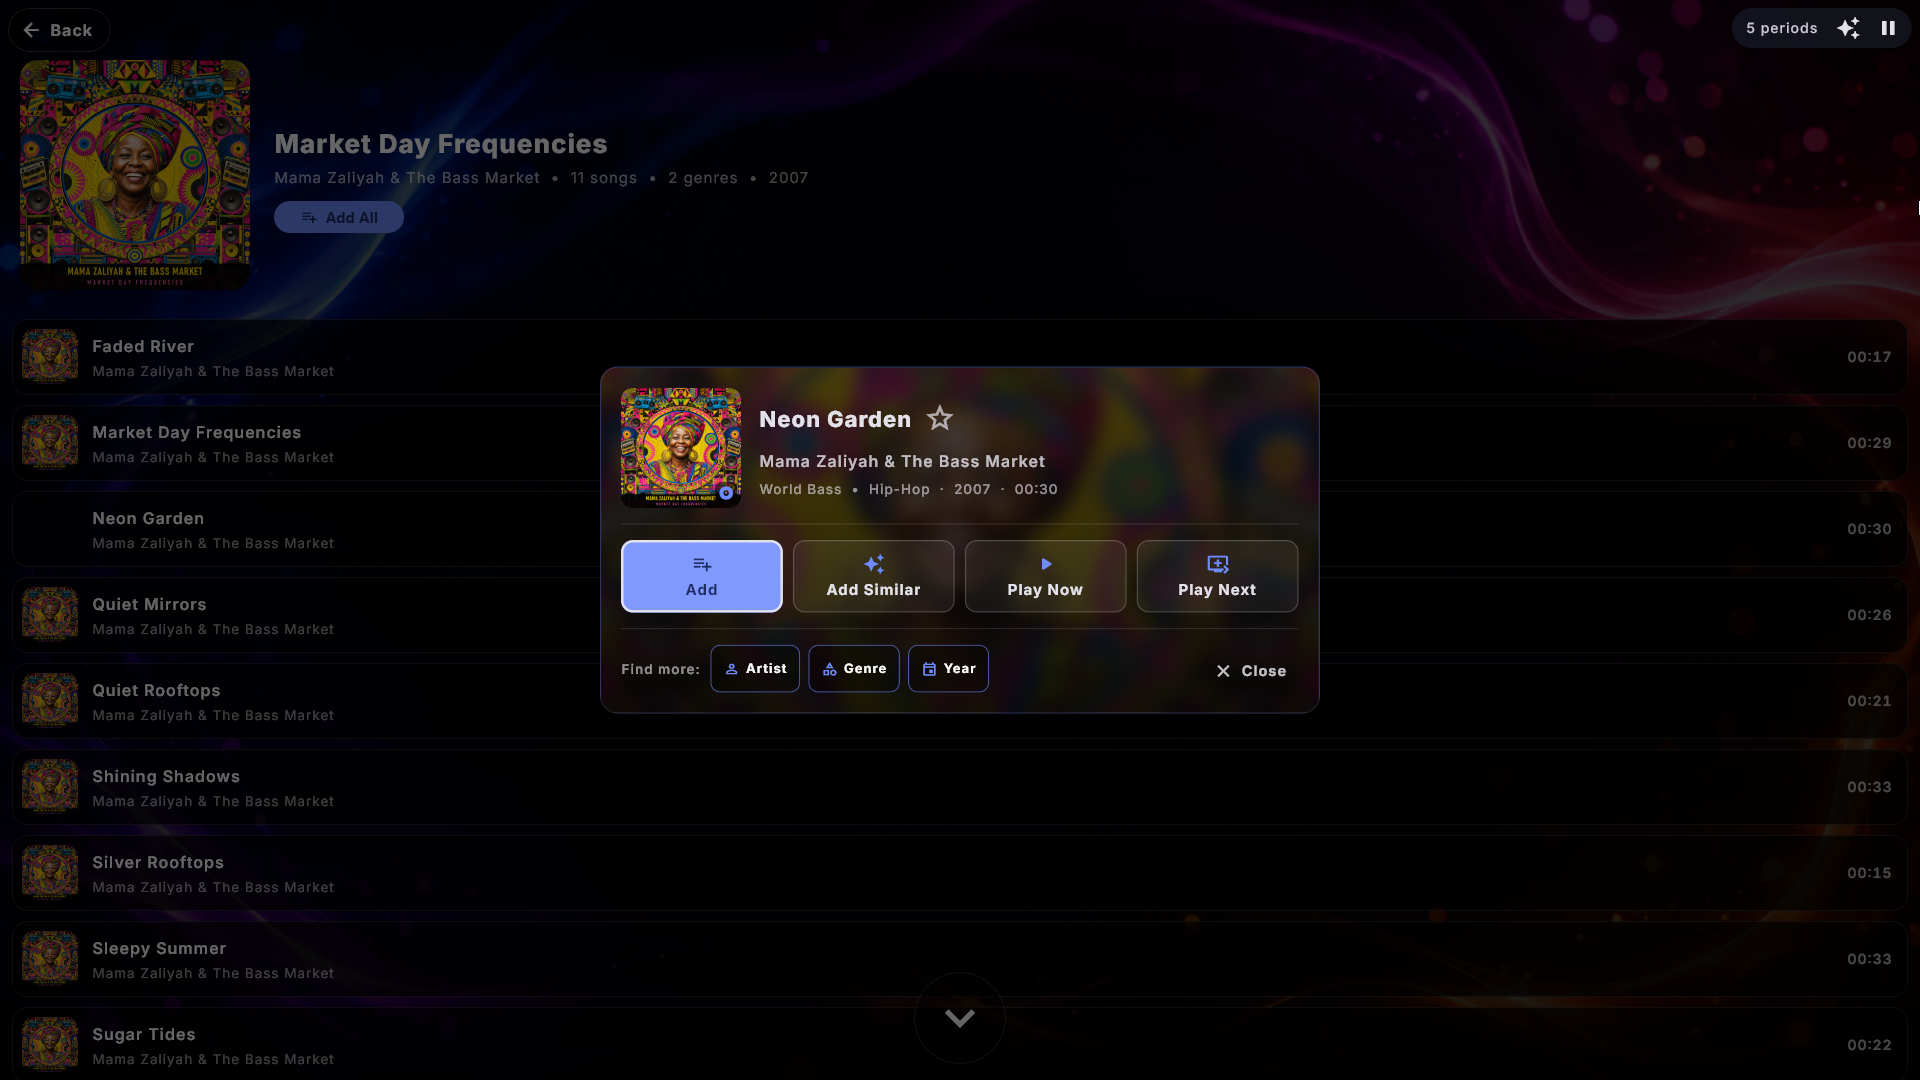
Add Similar. Add Similar in the song window puts up to ten songs that resemble the chosen one in the queue in one go - first of all songs of the same genre, then from the same decade. The songs are spread out: none from the same album as the chosen song and at most two per artist, so it never turns into the rest of the album. Only if there are not enough other songs does it top up with more by the same artist, and finally from the same album. The songs go to the back of the queue, and what is playing carries on. The song itself, songs already in the queue and songs played recently are skipped. Afterwards a short message says how many came along (for example Added 8 of 10 similar songs to the queue), or that none were found. In Party Mode or at a credit jukebox the usual rules apply to each song, and at a paid jukebox the price (1 credit per song) stands on a small line under the button's name. The button is in Music, Music Videos and Karaoke - not in Movies or YouTube. A guest in Party Mode or at a paid jukebox only sees it if the playlist has Allow Add Similar switched on.
More than one genre. A song - or a film - can be tagged with several genres at once. The song window shows them all on the line under the artist, separated by a dot, for example Pop • Rock • Christmas, instead of only the first. Press Genre under Find more and, if there is more than one, the window asks which of them you want to see (Choose genre); with a single genre the button opens it straight away. On the Genres page a song appears under every genre it carries.
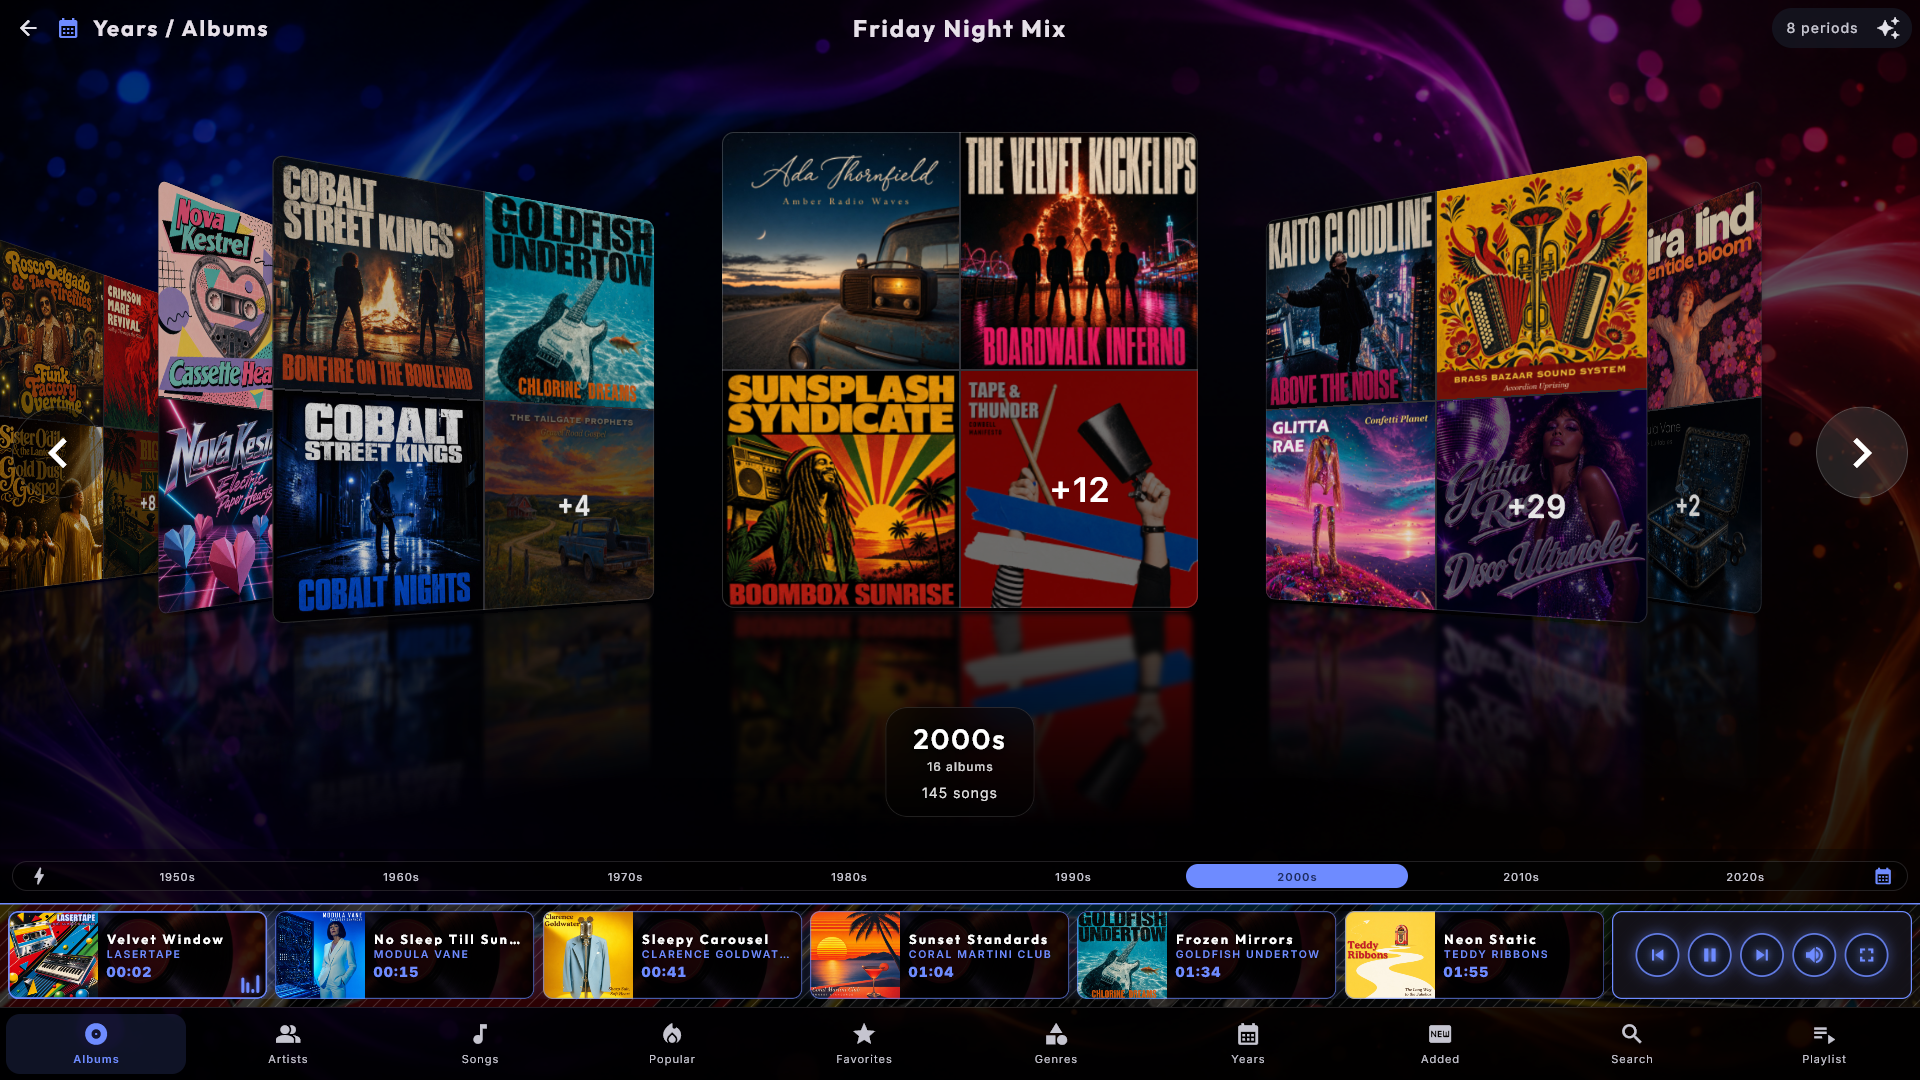
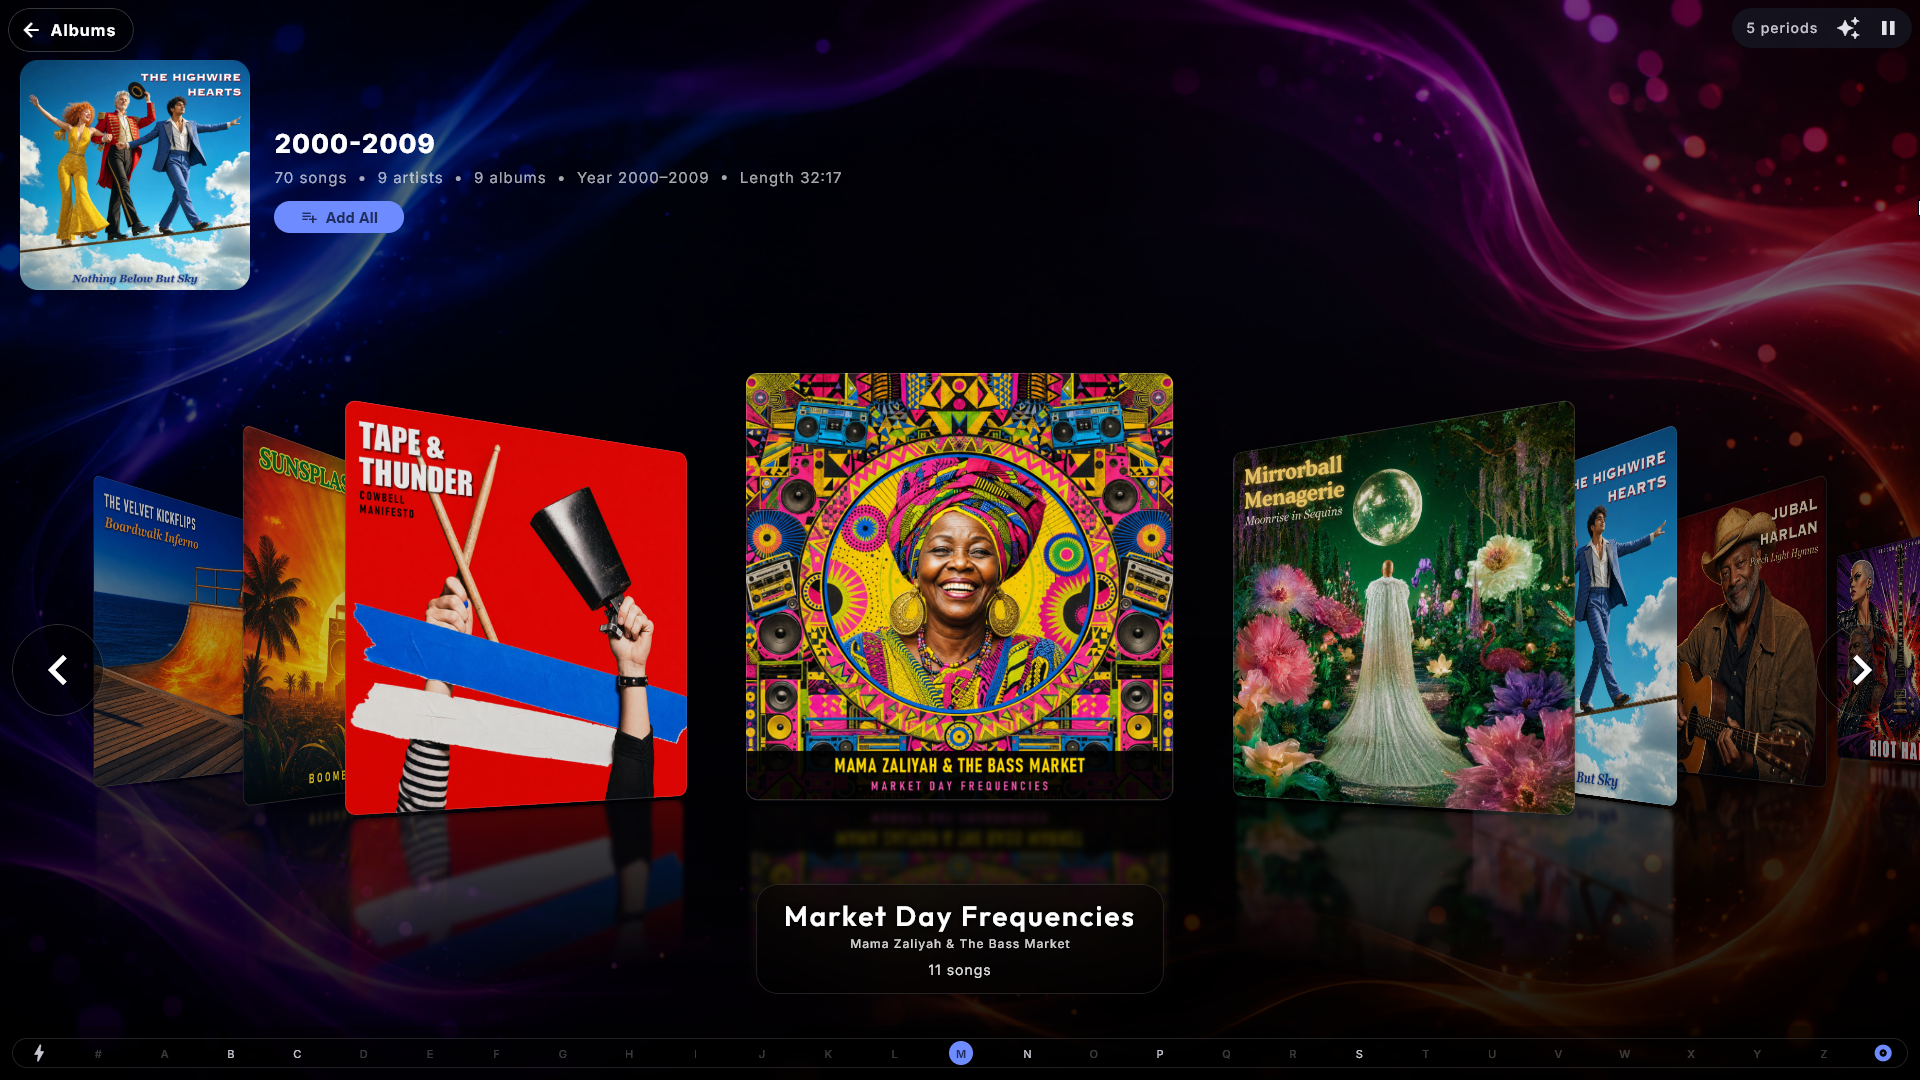
Group the browse the way you like. On the Albums page a small button sits at the end of the alphabet bar. Each press changes how the albums are grouped: one card per album (the normal view), then by artist, by genre or by decade. A grouped card shows a collage of up to four of the group's covers, and tapping it opens that artist, genre or decade. A card shows each picture only once: if several of the items share exactly the same picture, it stands there once, and if they all share it, it fills the whole card. The small "+3" in the corner only counts the items whose picture you cannot see on the card. The Songs page has its own button that reorders the list the same way without merging anything. What a guest picks with the button is always temporary: the page goes back to its starting grouping when you leave the center, switch section or the screensaver starts.
Choose how the page starts. Under the center's settings in Administration (Music, Music Videos, Movies and Karaoke are set separately), Grouping at start lets the cover page always open already grouped, for example By artist - a music video collection then starts with one card per artist instead of one per video. Guests can still press on with the button, and the page returns to your choice in the three cases above. Movies cannot start by artist (films have no artist), and By date added only works when the center's Added page is switched on. The default is No grouping.
Let the group pages open on covers. The page for an artist, a genre, a decade or a date added opens on a list of songs. Right under Grouping at start you can choose Open group pages on "Albums" ("Posters" in Movies, "Covers" in Music Videos and Karaoke), so those pages open on the covers instead. Guests can still switch with the button at the end of the letter bar, and the page is back on your choice when they leave the center or the screensaver starts. It is off by default.
The letter bar shows where a letter begins. Tap a letter, and the covers jump there: the first album (or film, video, song or game) with that letter then lights up briefly with a ring in the skin's colour, so you see at once where the letter starts, also when the page begins with the previous letter's albums. With the keyboard or a controller, the focus then stands on that cover, so Enter opens it. Sliding a finger along the bar lights nothing up. It works everywhere there is a letter bar: Music, Movies, Music Videos, Karaoke and Arcade.
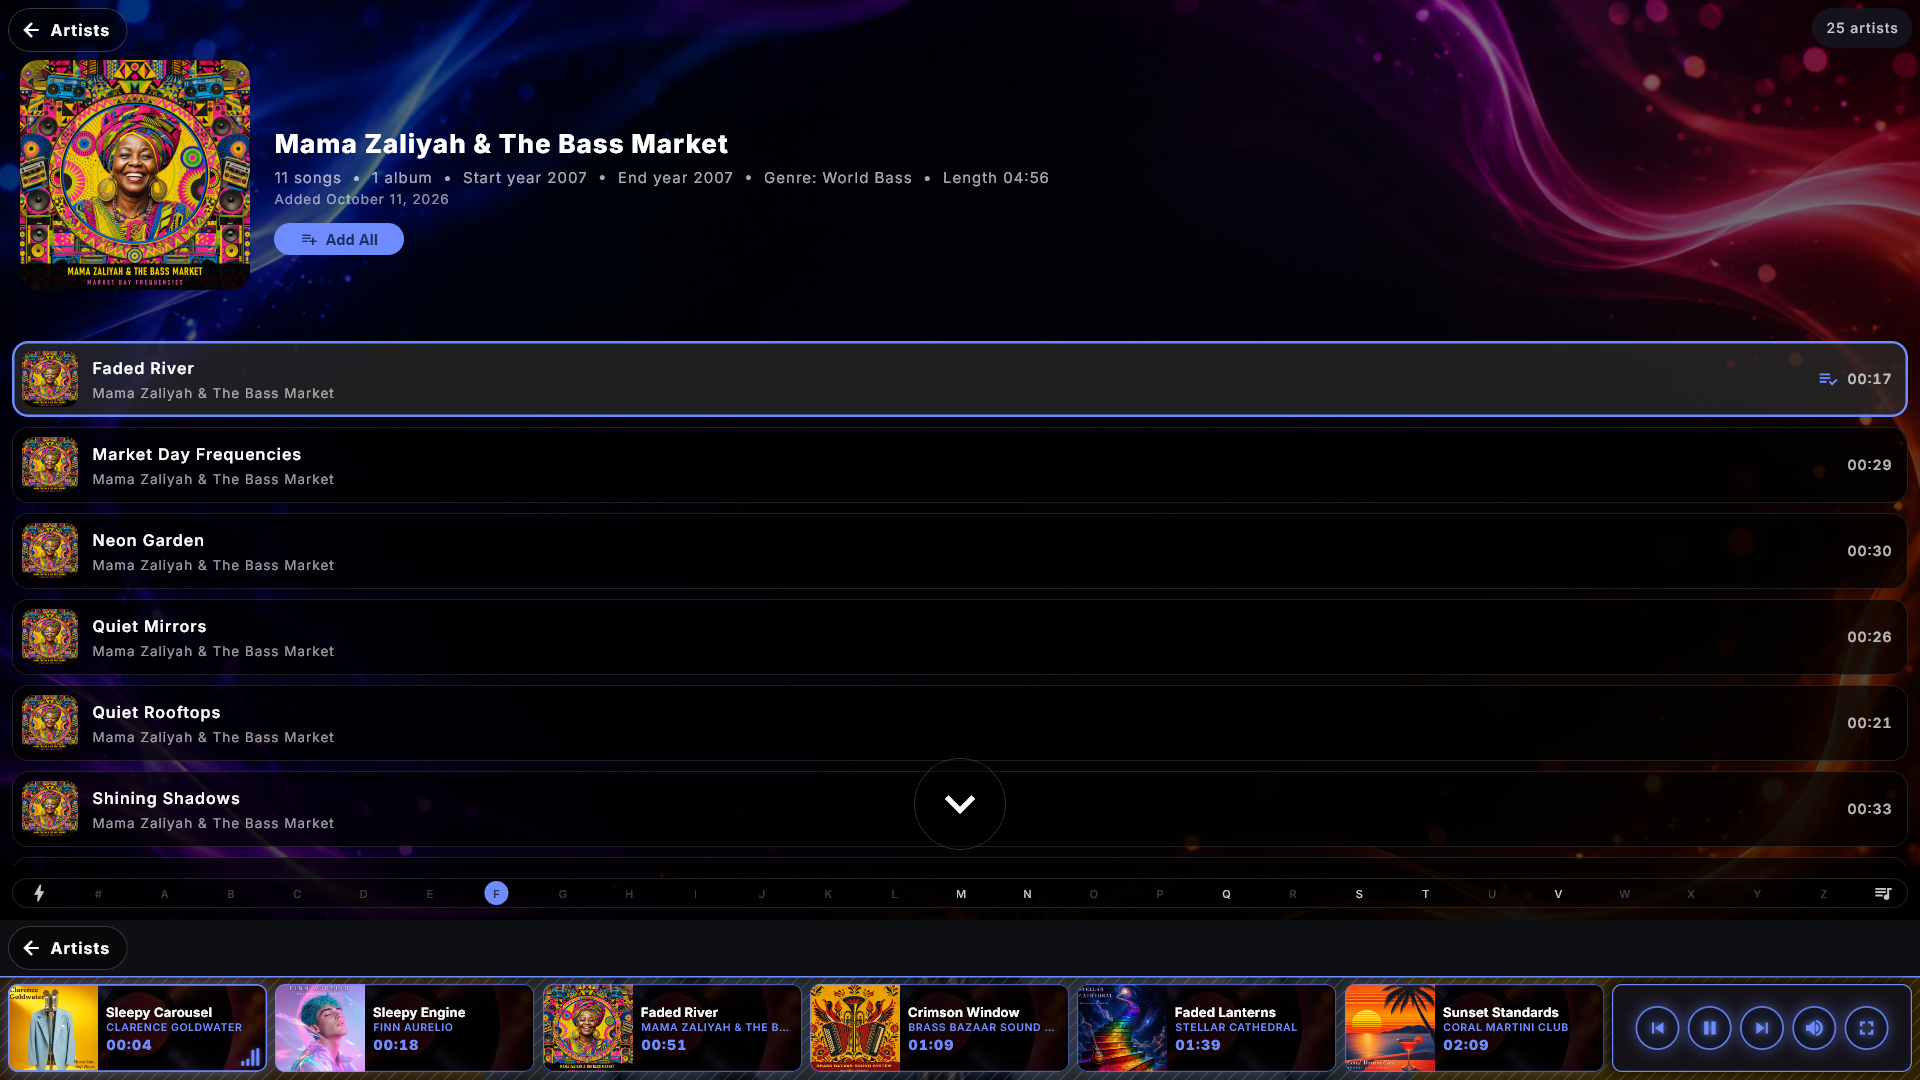
A picture and a count for every artist. Each row in Artists leads with a cover taken from one of that artist's own albums, so the list is something to recognise rather than a long column of names, and under the name it says how much you have - for example 8 albums · 96 songs. The album count only shows when it is more than one, because a single album says nothing new. The rows do not get any taller, so the list takes up exactly the space it did before. Karaoke and Music Videos each have their own artist list; there it is usually just the number of songs, because those files rarely carry an album. An administrator can switch it off for the plain list of names.
Give an artist their own picture. Put a picture called artist.jpg in the artist's folder - for example "Music\Adele\artist.jpg", next to the album folders "2015 25" and "2021 30". That picture then stands for the artist in three places: on the artist's card when the albums are grouped by artist (one picture instead of the small album covers), in the Artists list and at the top of the artist's own page. The picture may also be .jpeg, .png or .webp.
- A folder.jpg in the artist's folder (the one that holds the album folders) is used as the artist's picture too, but artist.jpg wins if both are there. A folder.jpg inside an album folder is still that album's cover.
- A picture in the music folder itself (the one you chose in Administration) is never used as an artist's picture, and an artist's picture is never used as an album's cover.
- If an artist's songs lie in several folders with a picture each, the picture that most of the artist's songs belong to is shown.
- Digital Center never fetches artist pictures from the internet: the picture only ever comes from your own files. Change the picture, and the new one shows after the library has next been read.
The picture is shown as long as Show details in the artist list is switched on. It works the same way in Karaoke; for Music Videos, see Music Videos.
"The" does not count in the order. The Rolling Stones sit under R and The Beatles under B - in the list and on the letter bar - because that is where people look. In the lists sorted by artist the name is shown the way a record shop would, "Beatles, The", so The Beatles do not look misplaced among the B's; the same goes when albums are sorted by artist and when pages are grouped by artist. Everywhere else - while the song plays, in the queue, in search and on the artist's own page - the name stands exactly as written, and search finds it as before. Only the English "The" is skipped, so names such as "Theatre of Tragedy", "Them" and "The The" stay under T. Under Artists starting with "The" in the center's settings you choose between Sort under T (as written), Sort under the next word, and Sort under the next word and show as "Beatles, The" (the default). Karaoke and Music Videos have the same setting of their own.
Popular - what the room actually plays. The bottom menu can carry a Popular view with two tabs: Recently played and Most played. Both are built from what has really been played on this machine, so it is a genuinely useful shortcut for a guest who wants "one of the ones everybody likes" without browsing. Music, Music Videos and Karaoke each keep their own list - in Karaoke the second tab is called Most sung. Songs that the always-playing fallback pulls in by itself do not count, so the list stays a picture of what people chose. An administrator can hide the view under the center's settings; the history is kept either way.
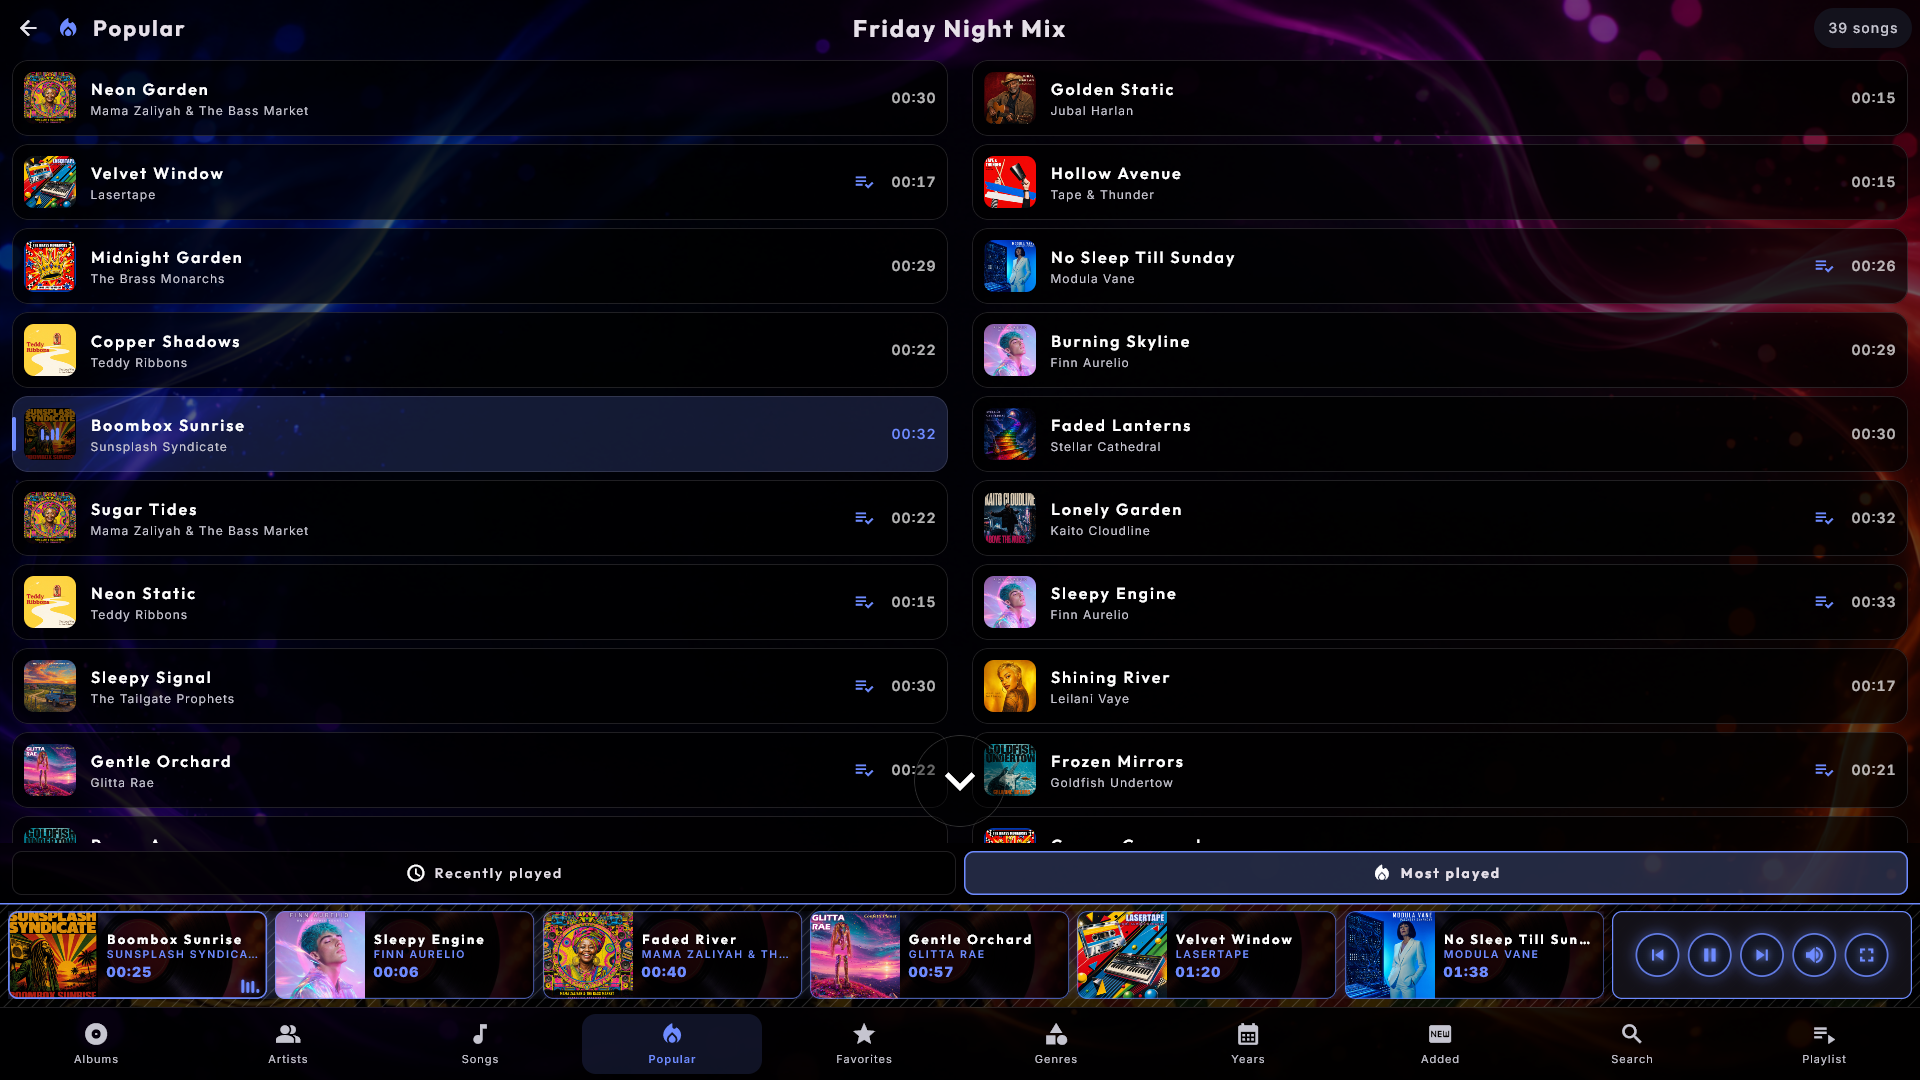
Favorites - the house's own picks. Next to Popular you find Favorites. Open a song and tap the star at the top of the window, next to the title, and the song goes to the top of the Favorites page. The star glows yellow while the song is a favourite; tap it again to take it off the list. The star is only there when the kiosk is unlocked (or an administrator is logged in), so guests in Party Mode and Credit Mode can see and play the list but not change it. Add All puts the whole list in the queue. A song that is not in the library right now (for example because a drive or another screen is switched off) is not shown, but stays on the list and turns up again by itself; songs from another screen can have a star too. Music Videos, Karaoke and Movies each have their own Favorites page. To hide the page (and the star), put out its tile under Pages in the bottom menu in the center's settings.
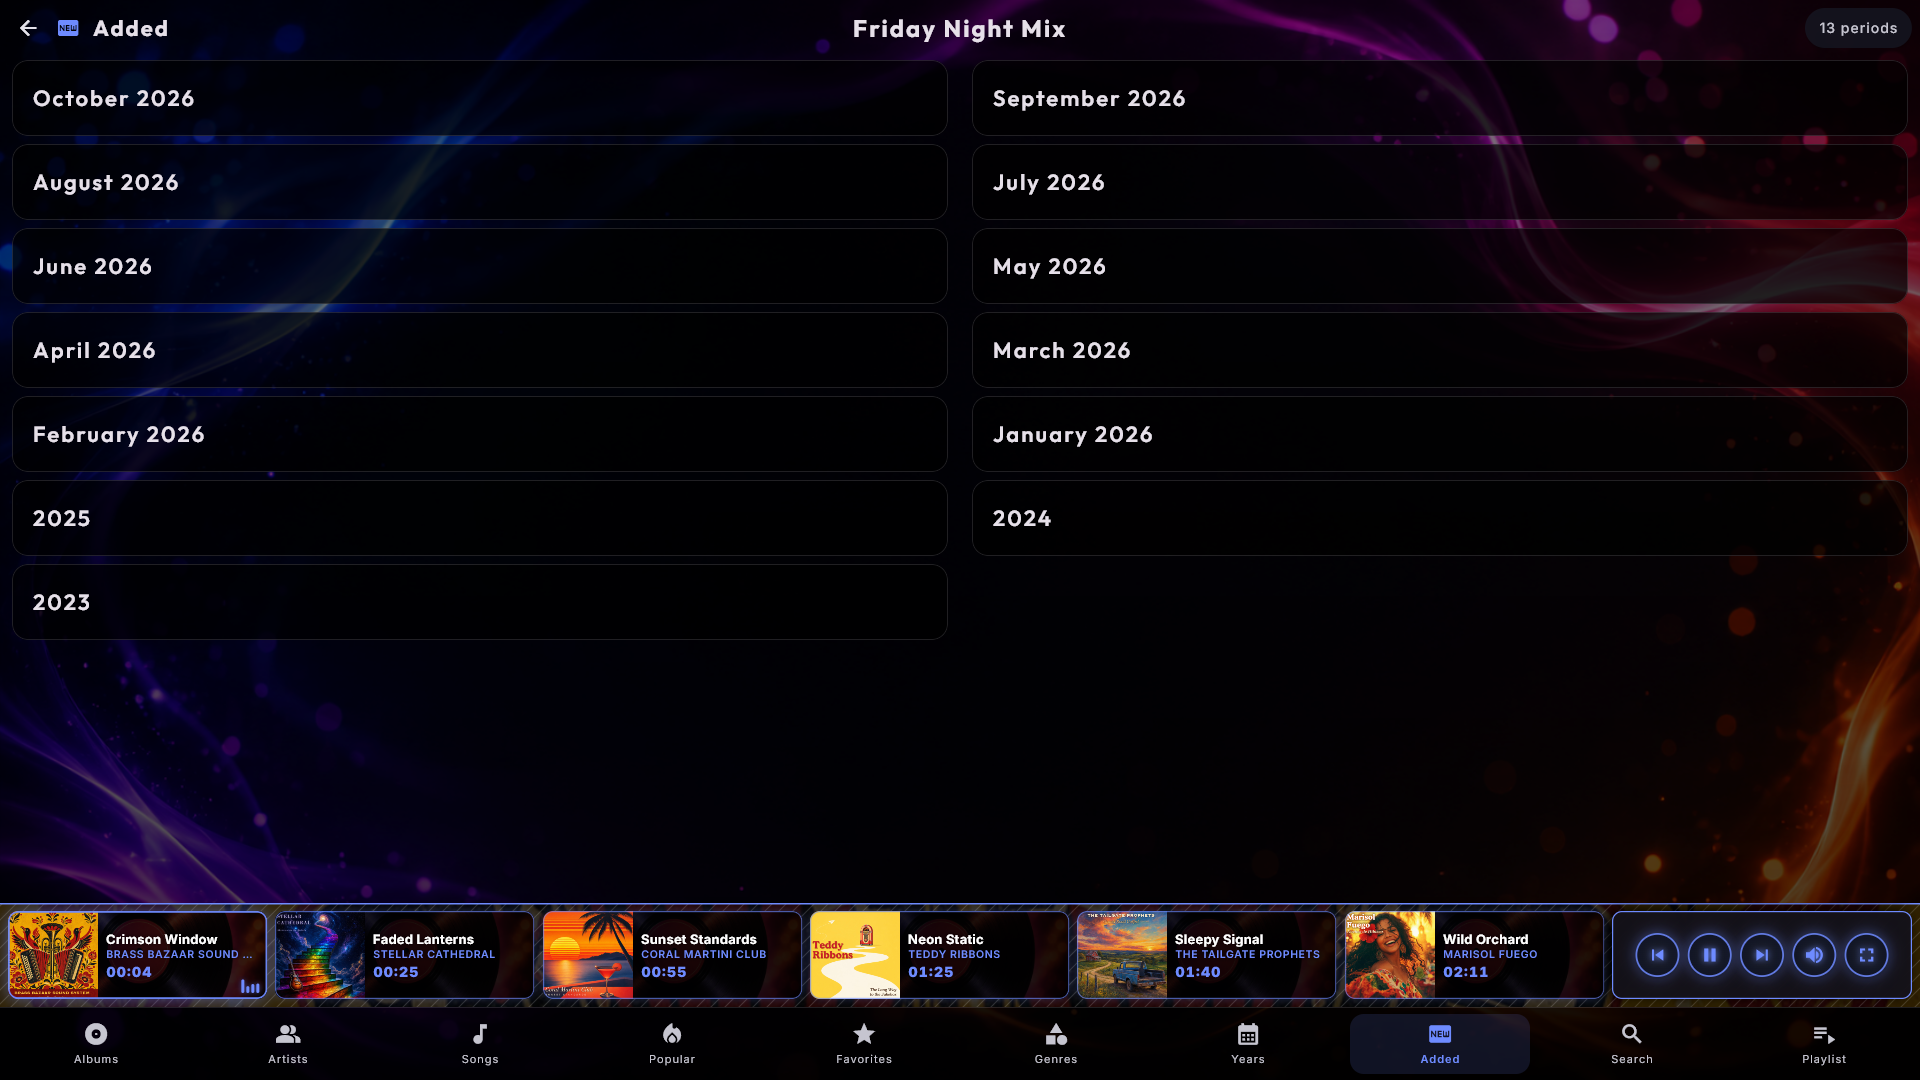
Added - what is new in the library. A second optional view, Added, groups everything by when it arrived in the library, newest first: one card per month of the current year, then one card per earlier year, with anything of unknown date last. It is the quickest way to show guests what you have put in recently. Available in Music, Music Videos, Movies and Karaoke, and switched on by an administrator with its tile under Pages in the bottom menu in the center's settings. An administrator decides the same way which of the other pages guests see; Search and Playlist are always there.
A "New" badge on what has just arrived. What you have added recently gets a small badge with a sparkle and the word New in the top-left corner of its cover - on the album in Music, and on the film, video or song in Movies, Music Videos and Karaoke (and on a group, such as an artist, when something in it is new). By default the badge stays for 7 days; an administrator can choose 3, 7, 14 or 30 days, or switch it off, for each center (see Settings & administration). If the whole collection suddenly looks new at once - for example after it was copied to a new disk - no badges are shown, since that is a move and not news. Instead of the small badge, the administrator can choose a band across the cover: a clear band across the full width of the top of the cover, in the colour of your skin, with the words Just added, which is easier to spot from across the room.
When was it added? An administrator can also switch on Show when it was added for each center. The date a song, film or video came into the library then appears as a quiet line in its window, for example Added Sep 30, 2026, and on an album's, artist's, genre's or period's page the date of the newest arrival sits under the title.
Songs or albums inside a group. Open an artist, a genre, a decade or Added, and a button at the end of the alphabet bar switches that page between Songs and Albums. On an artist page you get their albums as covers instead of one long list of titles, which is the quicker way in when somebody has thirty records by the same name. The choice follows you from group to group for as long as you stay in the center, and starts again at Songs next time. Movies and Music Videos have a similar button that switches a group page to posters and covers; see below.
The way back from an album, artist, genre or year page. At the top left of the page sits a button with an arrow and a word that says where you go back to, for example Albums, Artists, Genres or Search - the page in the bottom menu you came from (in Movies, Music Videos and Karaoke it may say Films, Videos or Songs). If you opened the page from somewhere else, such as another album page or the queue, it simply says Back. The same button can also be shown at the bottom left, just above the queue, where a finger already is, so guests never have to look for the way back. The bottom one is off by default and is switched on under Administration → Controls & touch → Back button at the bottom too; the one at the top is always there. The buttons stay when the back arrow is hidden from guests in Party Mode or Credit Mode, because they only lead around inside the center.
The search page can wait for the first letter. Out of the box the search page lists the whole library until you type, which is a lot to look at on a big collection. An administrator can set the center to start the search empty instead: the page then rests on a calm Type to search until a guest presses the first key, and a backspace back to an empty field returns to it. It is available in Music, Movies, Music Videos and Karaoke and applies to all the search tabs.
Karaoke
Sing along to your karaoke songs, with the same library and playlist experience as
Music. Karaoke opens on Songs - one tile per song, like Movies and Music Videos; tap
a tile to open the song's actions. You can also browse via Artists (a list of
artists - tap one to see that artist's songs) or Search. The bottom menu runs
in the order Songs, Artists, Search and Playlist. Tap a song to play it.
Tapping the playing card at the bottom opens a small pop-up with the song's
actions; to fill the screen, use the Full screen button. For songs with detailed
word timing you get the classic bouncing ball;
otherwise the current line lights up. If a song has a pause marker set for an
instrumental break, the lyrics go blank for the length of the break - instead of
leaving the previous line on screen - and come back for the next line. If a song
has an instrumental version, press the o key (or the microphone button)
during full-screen playback to switch between the original vocal and the
instrumental.
Karaoke videos. Many karaoke songs also exist as a video file where the words are already part of the picture. Put them in your karaoke folder like your other songs, and switch on Include karaoke videos under Administration → Karaoke (it is off until you switch it on). The videos then appear as ordinary songs, and in full screen the singer sees the video itself with its words - on the screensaver and on your extra screens too.
- The same song twice: if the same song also lies as an audio file (or a zip file) with the same name in the same folder, only the audio file is shown and the video is hidden.
- What a video cannot do: the key and tempo cannot be changed, and there is no switch between original and instrumental, so those buttons are not shown while a video plays.
- Name and cover: a video without a picture of its own gets a picture from the start of the video as its cover. Title, artist, genre and cover are edited in ZenPoint Media Manager on the karaoke tab; the video file itself is never changed.
Backing tracks without an original. If a backing track (a song without the lead vocal) lies in your karaoke folder with no original recording next to it, Karaoke can show it as a song. Switch on Show backing tracks without an original under Administration → Karaoke, in the Library section (it is off until you switch it on). The songs appear after a few seconds, without a restart.
- The original from your music: Digital Center looks for the original in Music Center's folders, in the folder with the same name as in the karaoke folder (Karaoke > ABBA looks in Music > ABBA), and with the same file name. If it is found and is as long as the backing track (at most two seconds' difference), the song takes its title, artist and cover, and you can switch between the original and the backing track. A different length, such as a live version, is not used. The original is never changed. If your music sits on a network drive that is switched off, the songs keep their names and covers until the drive is back.
- Without an original: the song plays with the backing track and the lyrics only, and there is no button to switch to an original. The names come from the backing track itself. If it lacks a title, artist or album, the lyrics file's own details are used, and otherwise the file name: "Artist - Album - Title" or "Artist - Title" (a disc code in front, such as "SC8125-03 - ", and a "Karaoke Version" at the end are skipped).
- On another screen: a screen that borrows karaoke from this machine only gets the original's names and cover if the person may also see the music.
Order songs by artist. On the Songs page the songs are normally ordered by title. Switch on Order songs by artist in the Karaoke settings (section View & sorting), and they are ordered by artist and then by title instead - still one card per song, with the artist under the title, and the letter bar jumps to the artist's first letter. If a guest picks a grouping with the button, the grouping alone applies for as long as it is chosen. It is off by default.
An artist as covers. Open an artist (or a period from Added) and you get the songs as a list, as always. A button at the end of the letter bar switches to Covers instead - one cover per song, drawn with the effect you have chosen, just as in Music Videos. Tapping a cover opens the song's window, as on the list, and the letter bar jumps by the song's title in both views. A song without a cover of its own is shown with the standard picture. Tap the button again (List) to go back to the list. The choice follows you from page to page and goes back to the list when you leave Karaoke or the screensaver starts.
Play Now opens the song in full screen with the lyrics, and so does putting the first song into an empty queue, so it starts straight away. Besides Play Now, Play Next, Add All and Shuffle, the song window offers Add Similar (up to ten songs that resemble the chosen one - see Music). After Popular the bottom menu has Favorites, the house's own songs: open a song and tap the star, just as in Music. The star is only there on an unlocked kiosk, and the Favorites tile under Pages in the bottom menu in the Karaoke settings hides the page. In full screen, dragging the scrub bar moves the song - and the lyrics or graphics with it - only when you let go.
Backing vocals in their own colour. Many lyric sheets put the part a choir or a second voice sings alongside the lead singer in brackets - (ooh ooh). Those words are shown in a colour of their own, so the singer can see at a glance which words are not theirs. It works on the lyrics you already have; there is nothing to change in the files. It does rely on the lyrics marking it, which not all do - a song without the marking looks exactly as it did before. An administrator can switch it off.
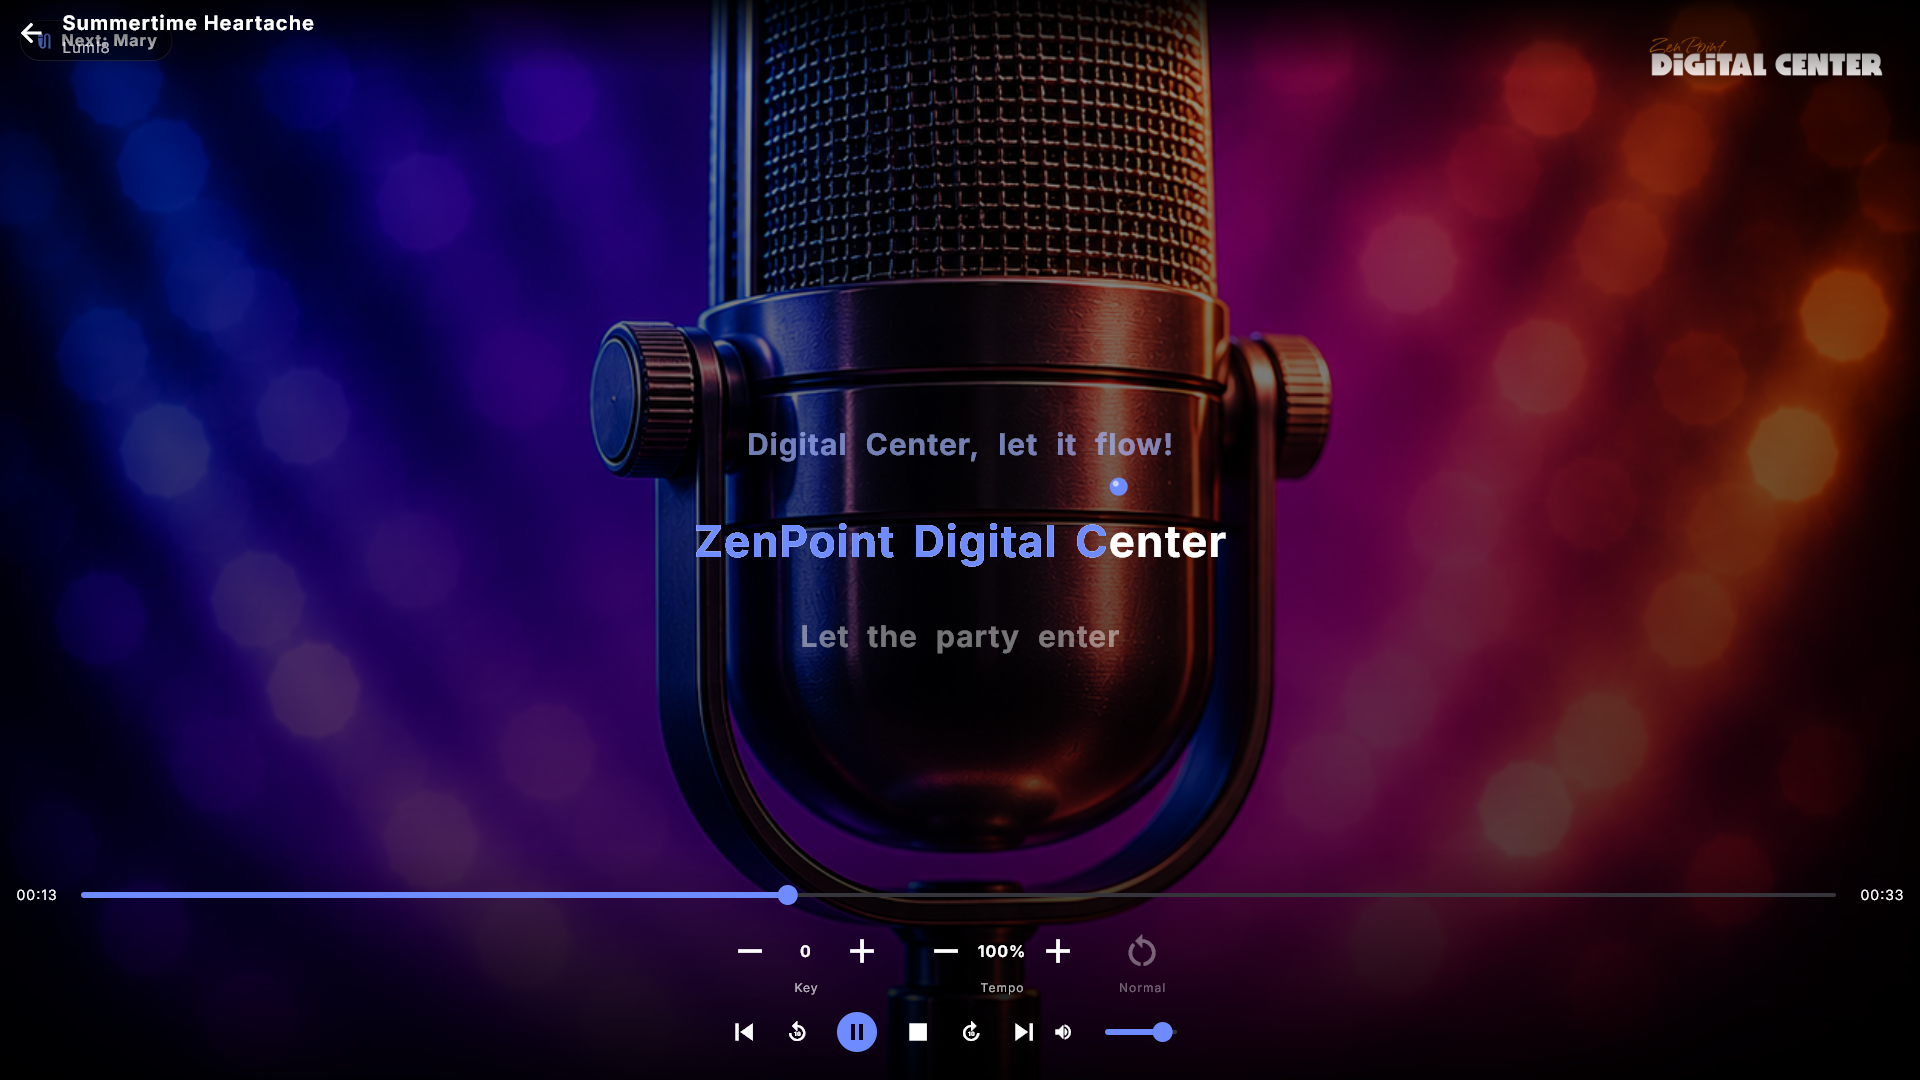
Change the key and tempo on the fly. While a karaoke song plays full screen you
can raise or lower the key (pitch) a semitone at a time with the [-] and
[+] buttons at Key - up to six semitones each way, handy when a song sits too
high or low for the singer - and speed it up or down with + and -
without changing the pitch. R (or 0) puts both back to normal. The buttons
sit at the bottom of the player, just above the control bar: two groups of [-] and
[+] (Key and Tempo, with the current value between them) and a Normal
button. Use them with a finger, or reach them with the arrow keys or a controller and
press Enter. The up and down arrows do not change the key themselves - they move the
selection, just as in the other players. A short note on screen shows where you are
("Key +2", "Tempo 105%" or "Normal"); the change only affects this playback and resets
on the next song.
Key and tempo can be reserved for you
An administrator decides whether these controls exist at all, and whether guests get them while the kiosk is locked in Party Mode. By default anyone can use them when the kiosk is open, while a locked guest cannot. See Settings & administration.
A moment to get ready. By default a short countdown runs before the song starts: the player holds the song at the beginning and counts 3 - 2 - 1 on the screen, so the singer can get the microphone up. An administrator can set it to 5 seconds or turn it off.
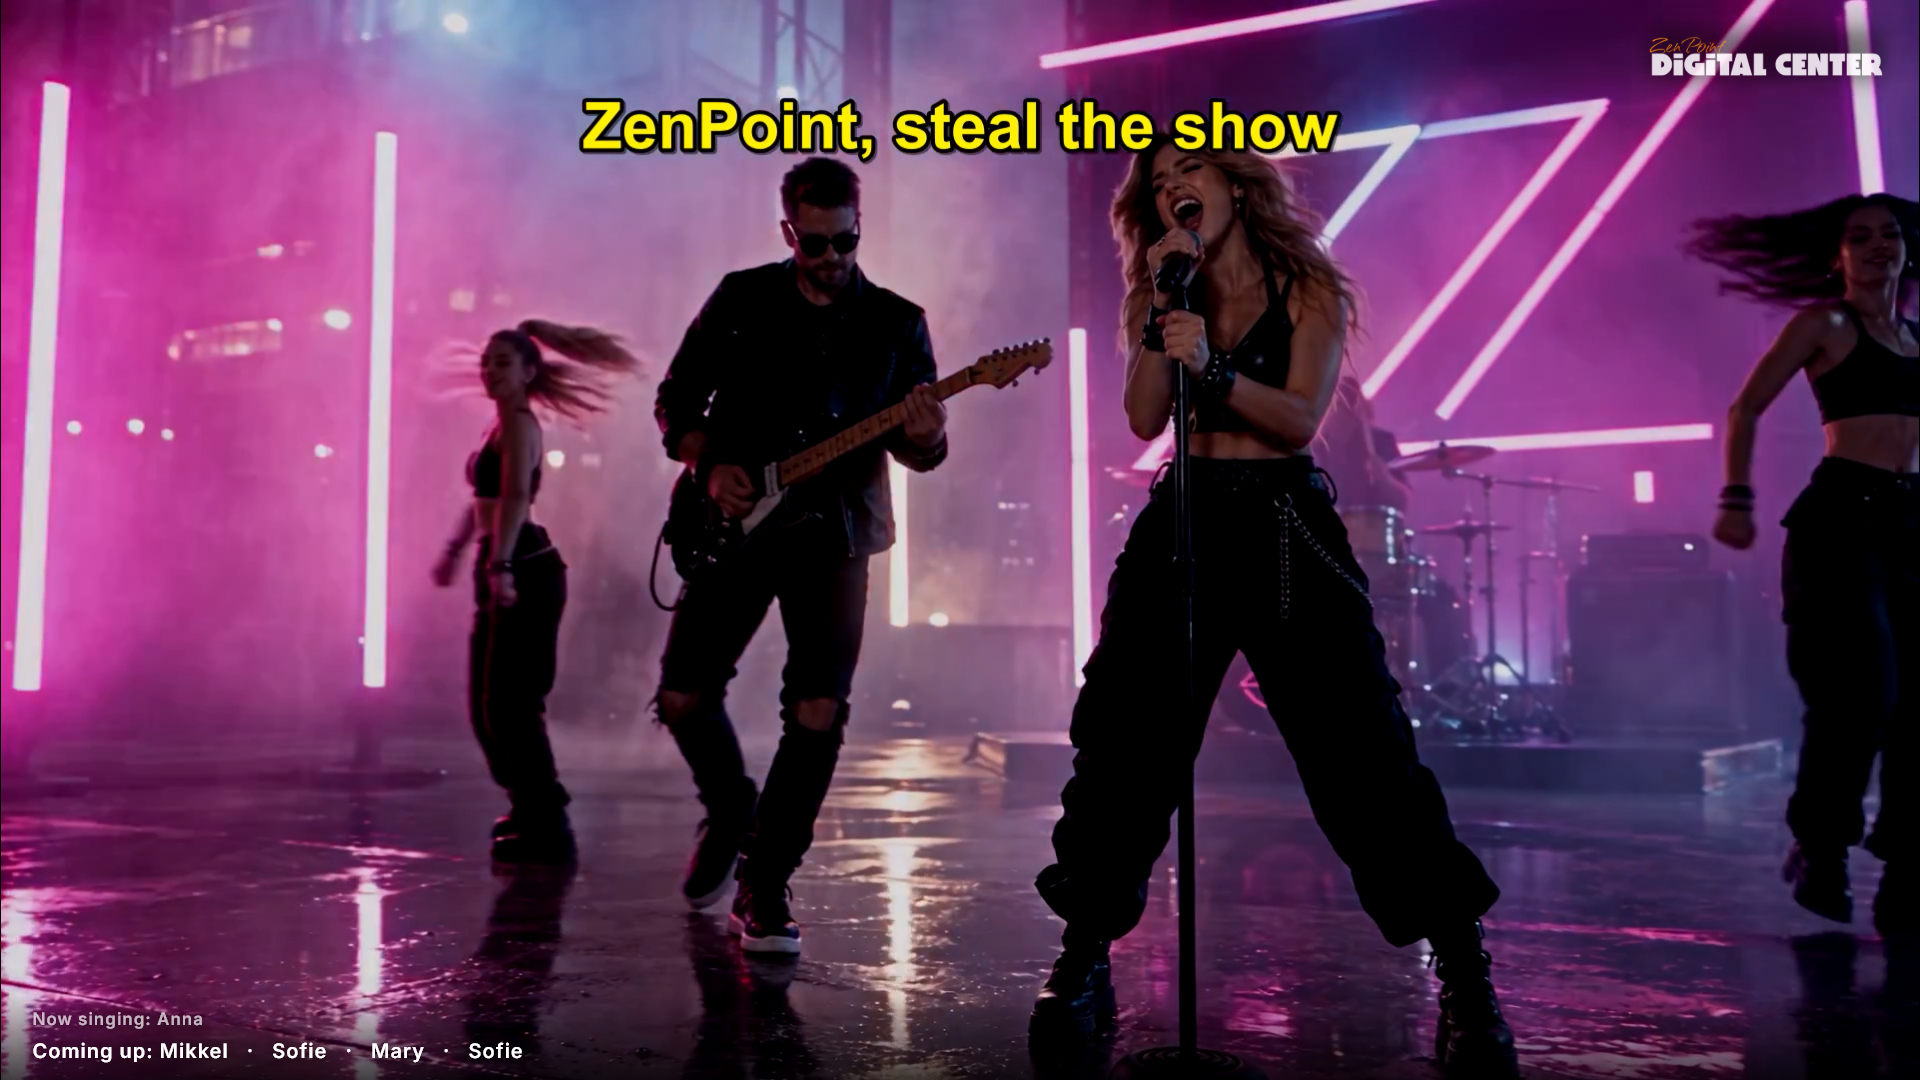
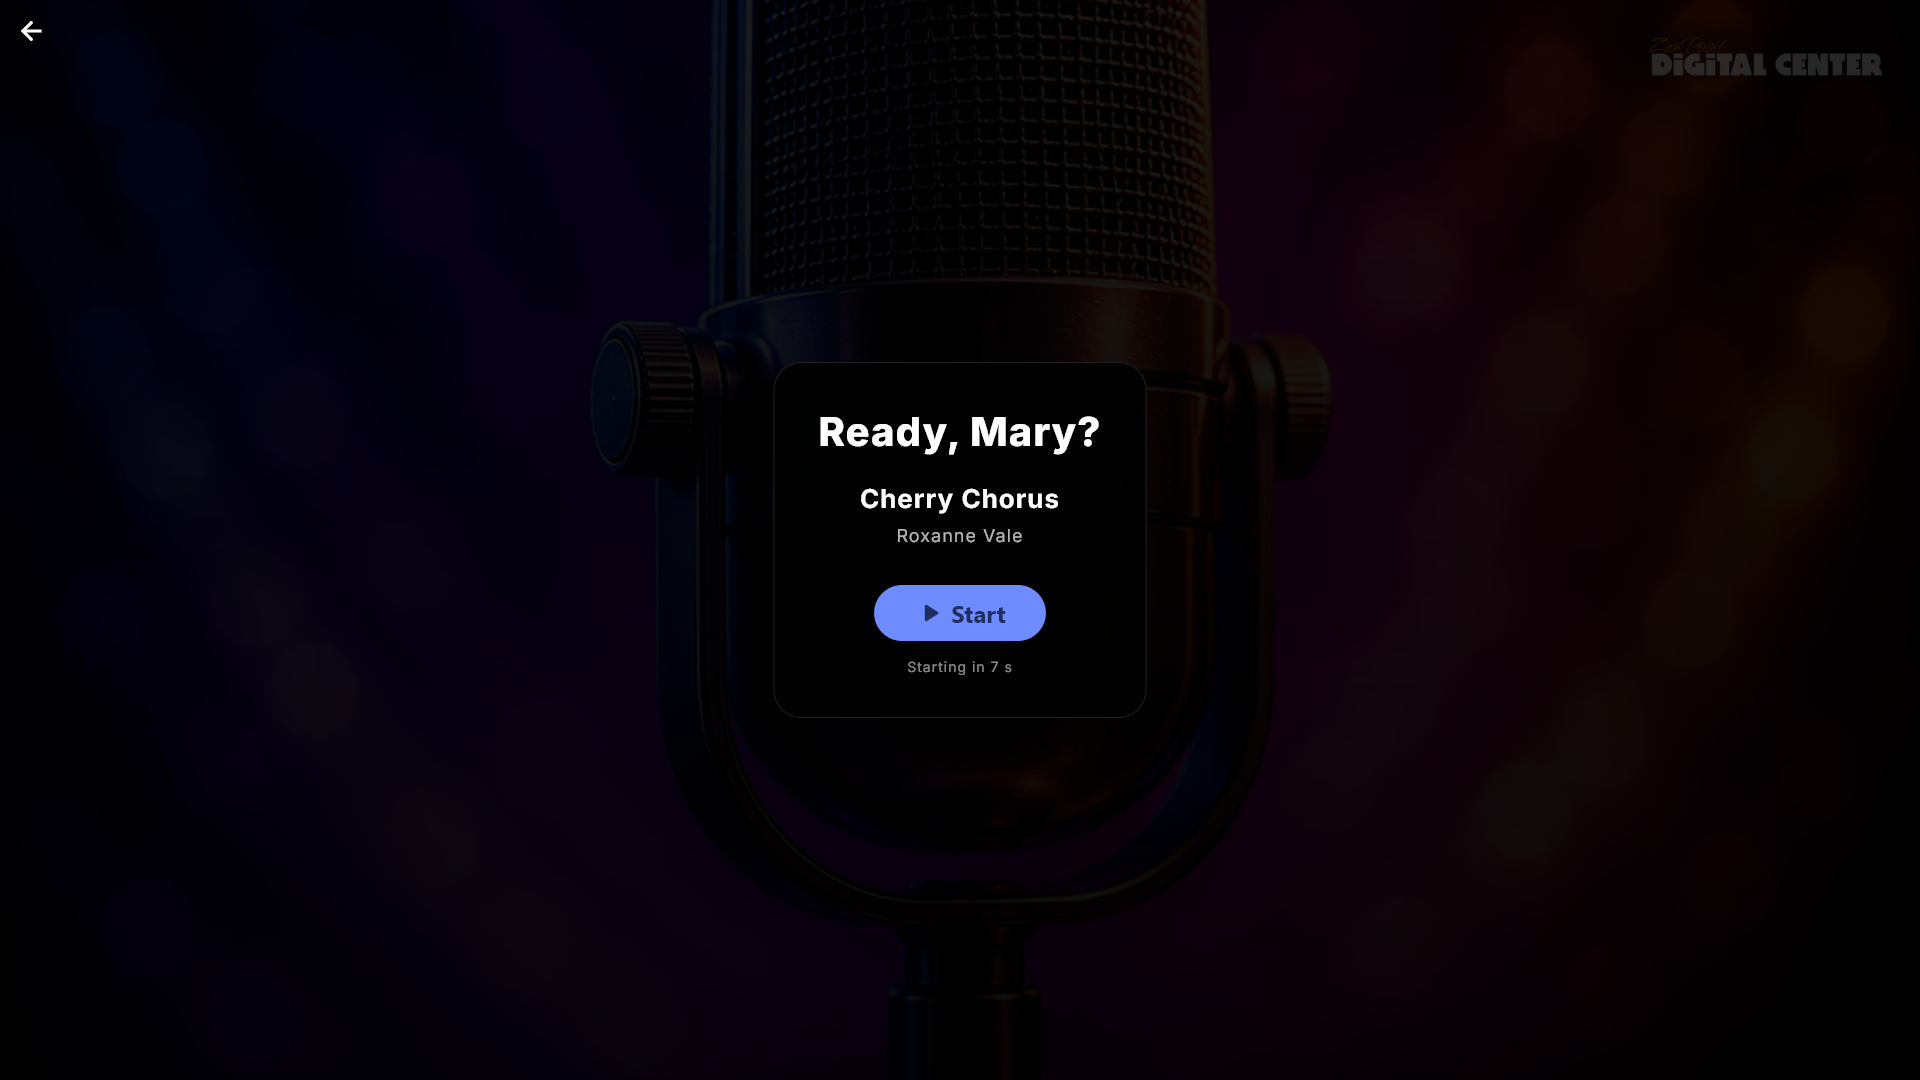
Whose turn it is. If the playlist asks for it, everyone who queues a karaoke song is asked for a name first - on the big screen or on their own phone. The names then show up where they are useful: on the queue entries, as a Next: Mia note in the player, and as a Now singing / Next banner on the screensaver and on any extra screens. Before the song begins, a ready screen announces the singer and lets them press Start when they are set. While it waits, the original recording plays quietly underneath, so the singer can hear the melody coming. To keep the queue moving, the song starts by itself after a while if nobody presses anything - an administrator chooses how long, or turns the Start button off altogether so the song simply begins after a short announcement.
Singer names on karaoke videos. A karaoke video has its words in the picture - some at the top, some at the bottom - and the names must not cover them. Under Administration → Karaoke, section On stage, choose with Singer names on karaoke videos where they stand: At the top (as always), At the bottom (the screensaver and your extra screens then show a slim band at the bottom with who is singing now and a scrolling line of the singers up next with their songs, such as "Bo sings Dancing Queen"; the player shows "Next: ..." at the bottom left while its buttons are hidden) or Do not show. The choice is only shown when Include karaoke videos is on, and only applies to videos: ordinary karaoke songs, the ready screen, the countdown and the applause are unchanged.
Every singer keeps their own turn. With Allow the same song for a different singer switched on for the playlist, the same song may wait in the queue for several singers. When a new singer presses Play Now or Play Next on a song someone else already has in the queue, the new singer gets a place of their own: the other singer's turn is never taken, and the song being sung is not cut off by a Play Next. If the same singer presses again, the song is moved instead of being queued twice. Delete in the queue removes exactly the place you tapped - never another singer's turn - also when it is done from a phone. When a new singer opens the song from the library (Search, Songs, Artists), its window offers Add even though the song is already queued, and Add, Play Now and Play Next all ask for the name. If the name given already has the song in the queue, it does not go in twice, and the screen says that the song is already queued for that singer.
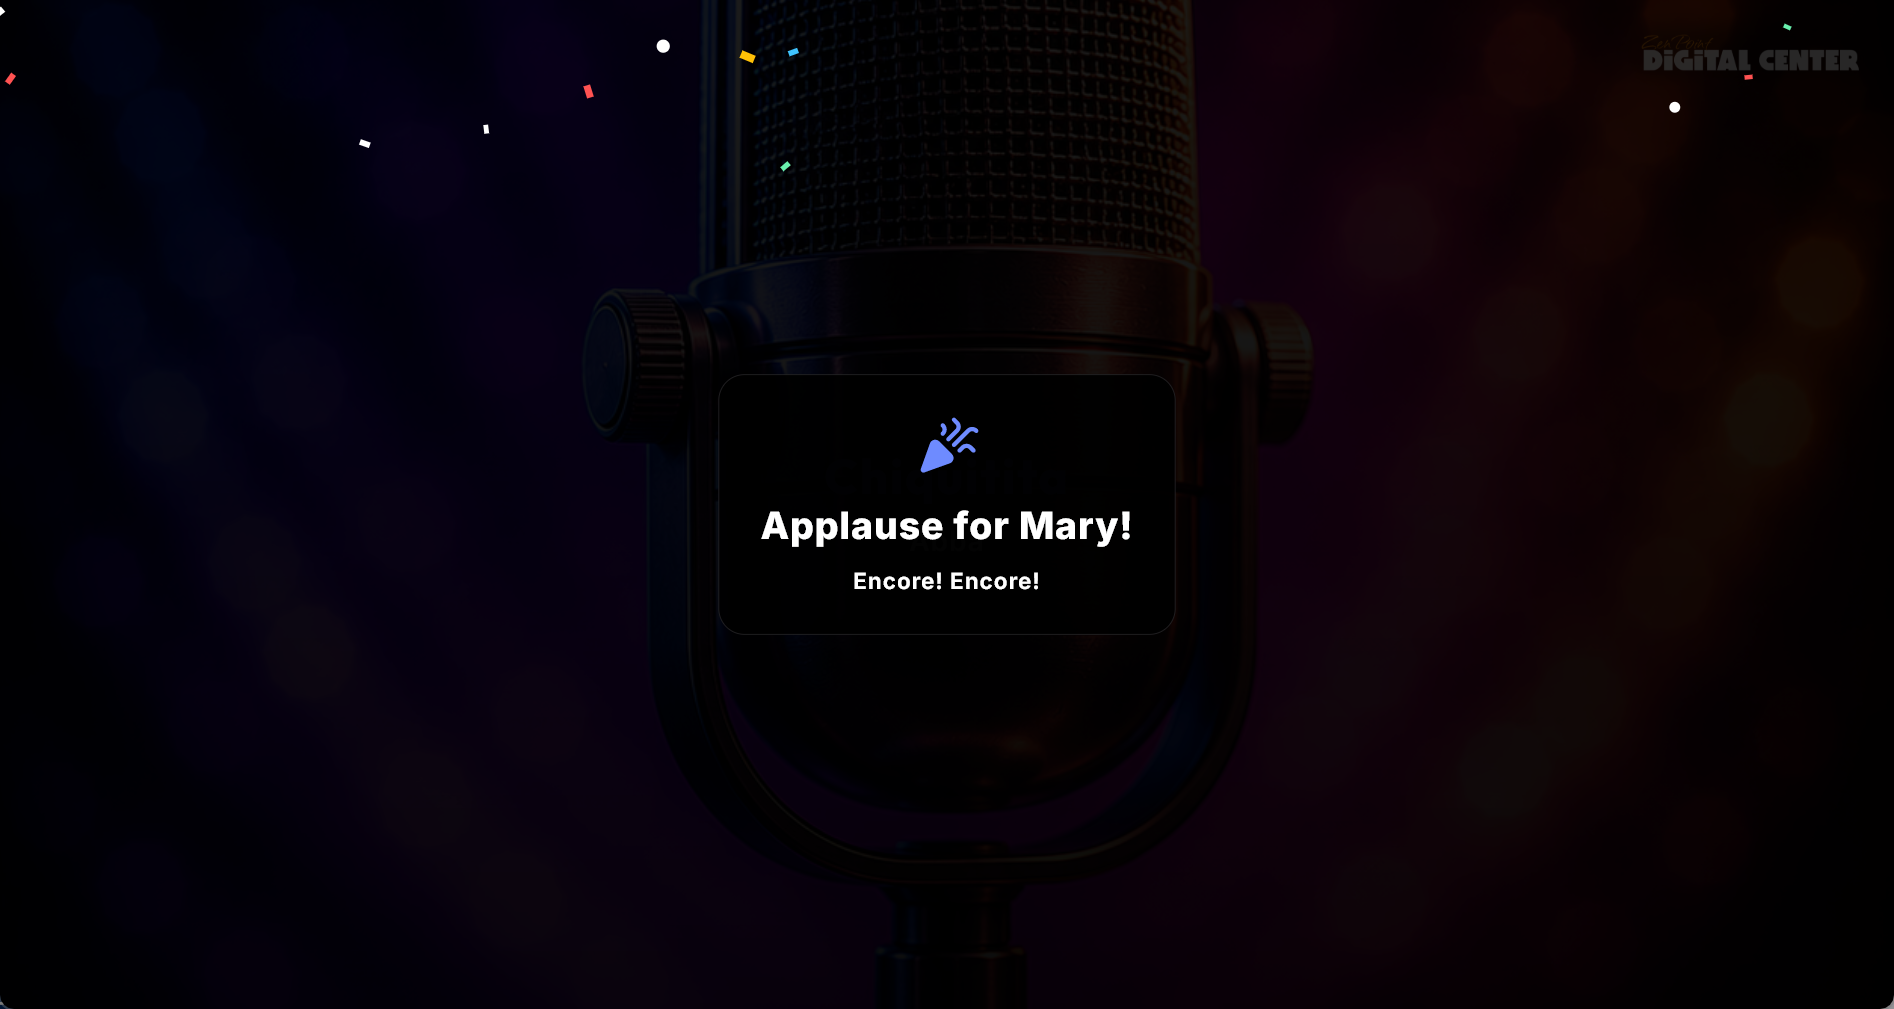
A round of applause. When a song is sung all the way to the end, a short celebration card appears with the singer's name, a cheerful line and confetti. It is a celebration, not a judgement: there is no score, no stars and no rating of how you sang. It shows on the screensaver and on any extra screens too, so the whole room joins in, and it disappears by itself after about eleven seconds (or at once when anyone taps). If the next singer's ready screen or countdown is waiting behind it, that wait only begins once the applause is gone, so the next singer always gets the whole wait; pressing Start meanwhile takes the applause away at once. If the next karaoke song is already being sung without a ready screen, the applause only stays about six seconds, so the first lines of the words are not hidden. An administrator can turn it off.
The sound of applause comes with it (on from the start): clapping from the speakers for as long as the card is on the screen, faded out quickly when it goes, so it never runs into the next song. It plays once per applause, from the main screen only (never once per extra screen), a little below the music's volume. If Digital Center is recording the song, the clapping waits until the recording is over, so it is never in the singer's recording. Turn the sound off with Applause sound under Setup → Administration → Karaoke (it is only shown while the applause is on).
Record the song and give it to the singer. Digital Center can record each karaoke song while it is sung, so the singer can take the performance home on their own phone. It is off until you switch it on: under Administration → Karaoke, in the Recording section, switch on Record the songs and tell it How is the room set up?
- Mixer connected to this machine: the mixer's recording output goes into the machine, so it already carries both voice and music. Choose the input the mixer is plugged into.
- Microphone plugged into this machine: Digital Center records the microphone and what the machine itself plays, and puts them together in one file - so the key and tempo, karaoke videos and songs from another machine come along by themselves. The voice is recorded but not played in the room, so the singers still need a mixer, an amplifier or an audio interface to hear themselves. Do not switch on Windows' own Listen to this device for the microphone, or the voice ends up twice in the recording.
Then choose the input at Record from. Nothing is recorded until both are chosen. A microphone or mixer you plug in while Digital Center runs is on the list the next time you open Administration. Input level in the recording turns the input up or down (100% records it as it comes in), and with a microphone in the machine Music level in the recording sets the music on its own, so the voice is not drowned out. This only changes the recording - never how loud the room plays, nor Windows' own sound settings. You do not have to hit the perfect level: every saved recording gets an even volume by itself, much like ordinary music on a phone, without distortion, so the levels mainly decide how much room the voice gets next to the music. A near-silent recording is only turned up a little, so it does not become noise. Under the settings you can watch the sound level (with a microphone, the music's too); if the bar turns red, it is too loud and the recording will distort. Press Test recording to record ten seconds and hear them played straight back while the line under the button counts down - a quick check before the evening begins.
Only a song that is sung all the way to the end and lasts at least 20 seconds is kept; a skipped song is deleted. After the song a small card asks the singer Take your song home?. Yes, please shows a QR code the singer scans to get a page with the song, where it can be played and downloaded. The phone must be on the same WiFi as the screen; no internet is needed. No, thanks deletes the recording at once - and if nobody answers within 20 seconds, it is deleted too. The card never holds up the next song. With Ask the singer first switched off, every finished song is kept and the QR code is shown straight away. If the singer added the song from their phone, the recording is also on that phone under My songs with Listen and Download; other guests' phones cannot see it.
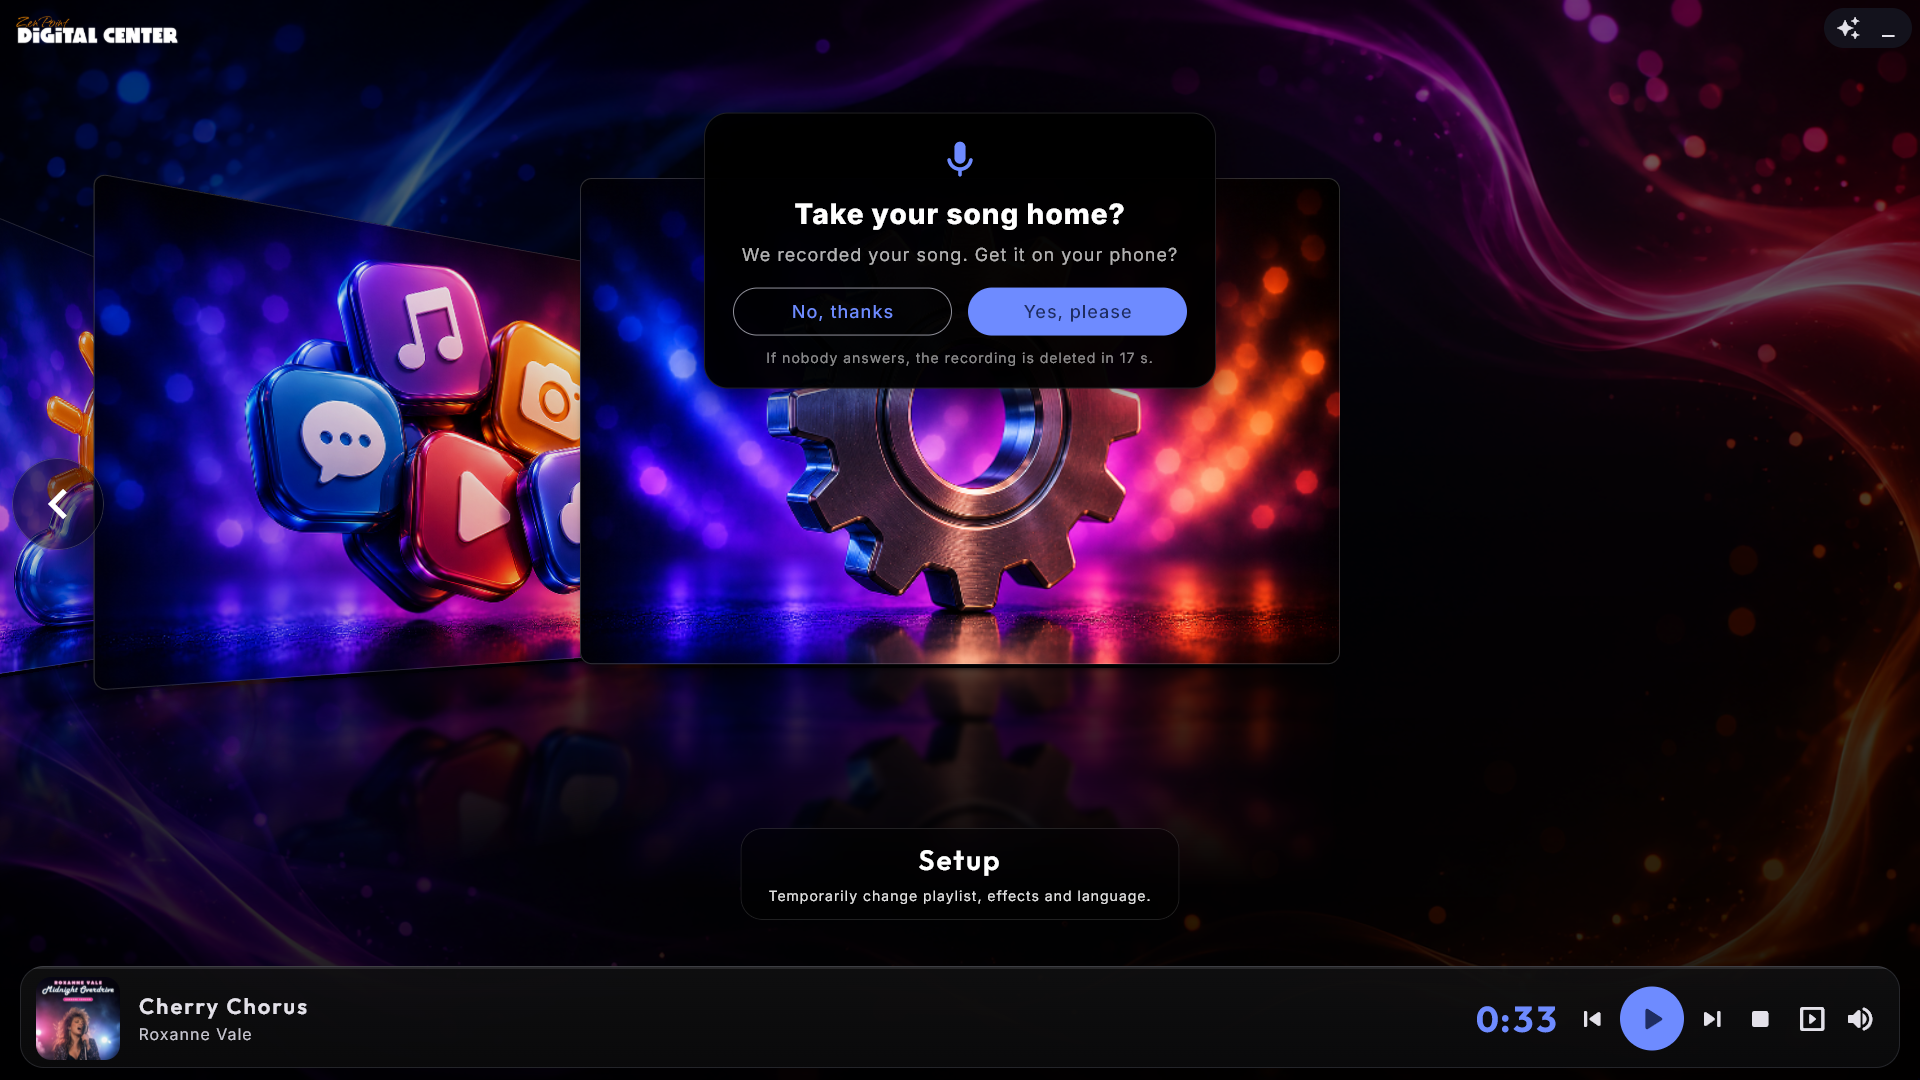
The recordings are kept in one folder per evening, in the folder you choose at Save recordings in (empty means Digital Center's own folder), named after the singer and the song. On a Windows edition that cannot make mp3 files, a recording is saved as a WAV file instead and works the same way. With Delete recordings at the end of the night, recordings from earlier evenings are deleted when Digital Center starts and before the first song of a new evening - only the files Digital Center made itself. The evening ends at 6 in the morning, not at midnight, so a party that goes on past midnight keeps its recordings (and the guests' QR codes still work). If the chosen input is not connected when a song starts, nothing is recorded, and the page in Administration says so. Recording needs Home or Professional.
Play tonight's songs again. With Play tonight's songs again when it goes quiet, the evening's recordings can fill the silence when the singing is over. If nobody has queued a song for the Quiet time before songs are played again (30 seconds to 5 minutes), the screen plays the evening's recordings one at a time in random order, each at most once before someone sings again, with the song's title, the singer's name and a little nudge: Sung tonight by Anna - can you sing it better?. When all have been played, they wait until someone sings or a new recording is ready. Only songs whose singer said yes twice are used: yes to taking the song home, and yes to one more short question right after, May we play it again tonight? (no answer counts as no, and the QR code follows as usual). With Ask the singer first switched off, only the second question is asked. A recording from tonight that has been deleted never comes back, and the first song a guest adds - on the screen or from a phone - takes over at once.
The replays never go into a playlist, do not count in the statistics or Most sung, are not shown on the guests' phones, and are never played with a paid playlist - nor while Administration is open, so they do not interrupt a test recording. With the Karaoke center open, the replay shows at the bottom with its title, the label Playing again, the singer's name and a Stop button (the same as Stop on the front page; where that is not allowed, the button is not there). When a guest presses Stop, the replays wait until someone has sung again.
Movies
Watch your films, shown as a cover wall with a browse effect. Tap a film to queue or play it; the film window also shows the plot/description if there is one. Browse via Movies, Genres or Years, or search for a specific film. During playback you can choose audio track and subtitles, skip ±10 seconds and pause. If a film has no subtitle tracks to choose between, the subtitle menu says so rather than offering an Off and an Automatic that do nothing - some films carry the text as a fixed part of the picture itself, and that can be neither turned on nor off. If Resume playback is switched on (administrator), each film starts where you last left it, with a Restart button offered for the first minute. Films can also fill in their own details in the background: the system completes the title, year, director, genre, description and poster for any film still missing them, from the file name, and never touches a film you have edited yourself. You can turn this off, and pick the language for the fetched text, under the Movie settings. On the Movies cover page the same grouping button as Music groups films by genre or decade. With Open full screen when playback starts switched on, a film opens in full screen when it is started.
Posters from Kodi and similar programs. A picture next to the film called poster.jpg (or, for example, Die Hard-poster.jpg) becomes the film's poster straight away. A picture with exactly the same name as the film always wins, and after the poster come cover, album, folder and front. The same goes for music videos.
Details from Kodi NFO files. Movies also reads the NFO files that Kodi and MediaElch make (movie.nfo, or one with the film's own name, such as Die Hard.nfo) for the title, year, plot, genres and director. One with the film's name always counts; movie.nfo only when the folder holds a single film. Your own corrections in ZenPoint Media Manager win, and the automatic lookup never changes what the NFO file says.
Trailers are not films. A file whose name ends in -trailer or -sample (such as Die Hard-trailer.mp4 next to Die Hard.mkv), and the files in a folder called Trailers, Sample or Samples, are left out of the library, so they never show up as films of their own.
Watch trailer. When a film has its own trailer next to it (Die Hard-trailer.mp4 in the same folder as Die Hard.mkv), the film's window has a Watch trailer button. The trailer plays in full screen and never goes into the queue, does not count in the statistics and does not change how far you have got in the film. When it ends, or you press back, stop or Esc, you are back in the film's window. If something is already playing, you are asked first whether it may stop. In Party Mode the button only shows when nothing is playing, and at a paid jukebox (Credit Mode) guests do not see it at all. It also works for films on another machine.
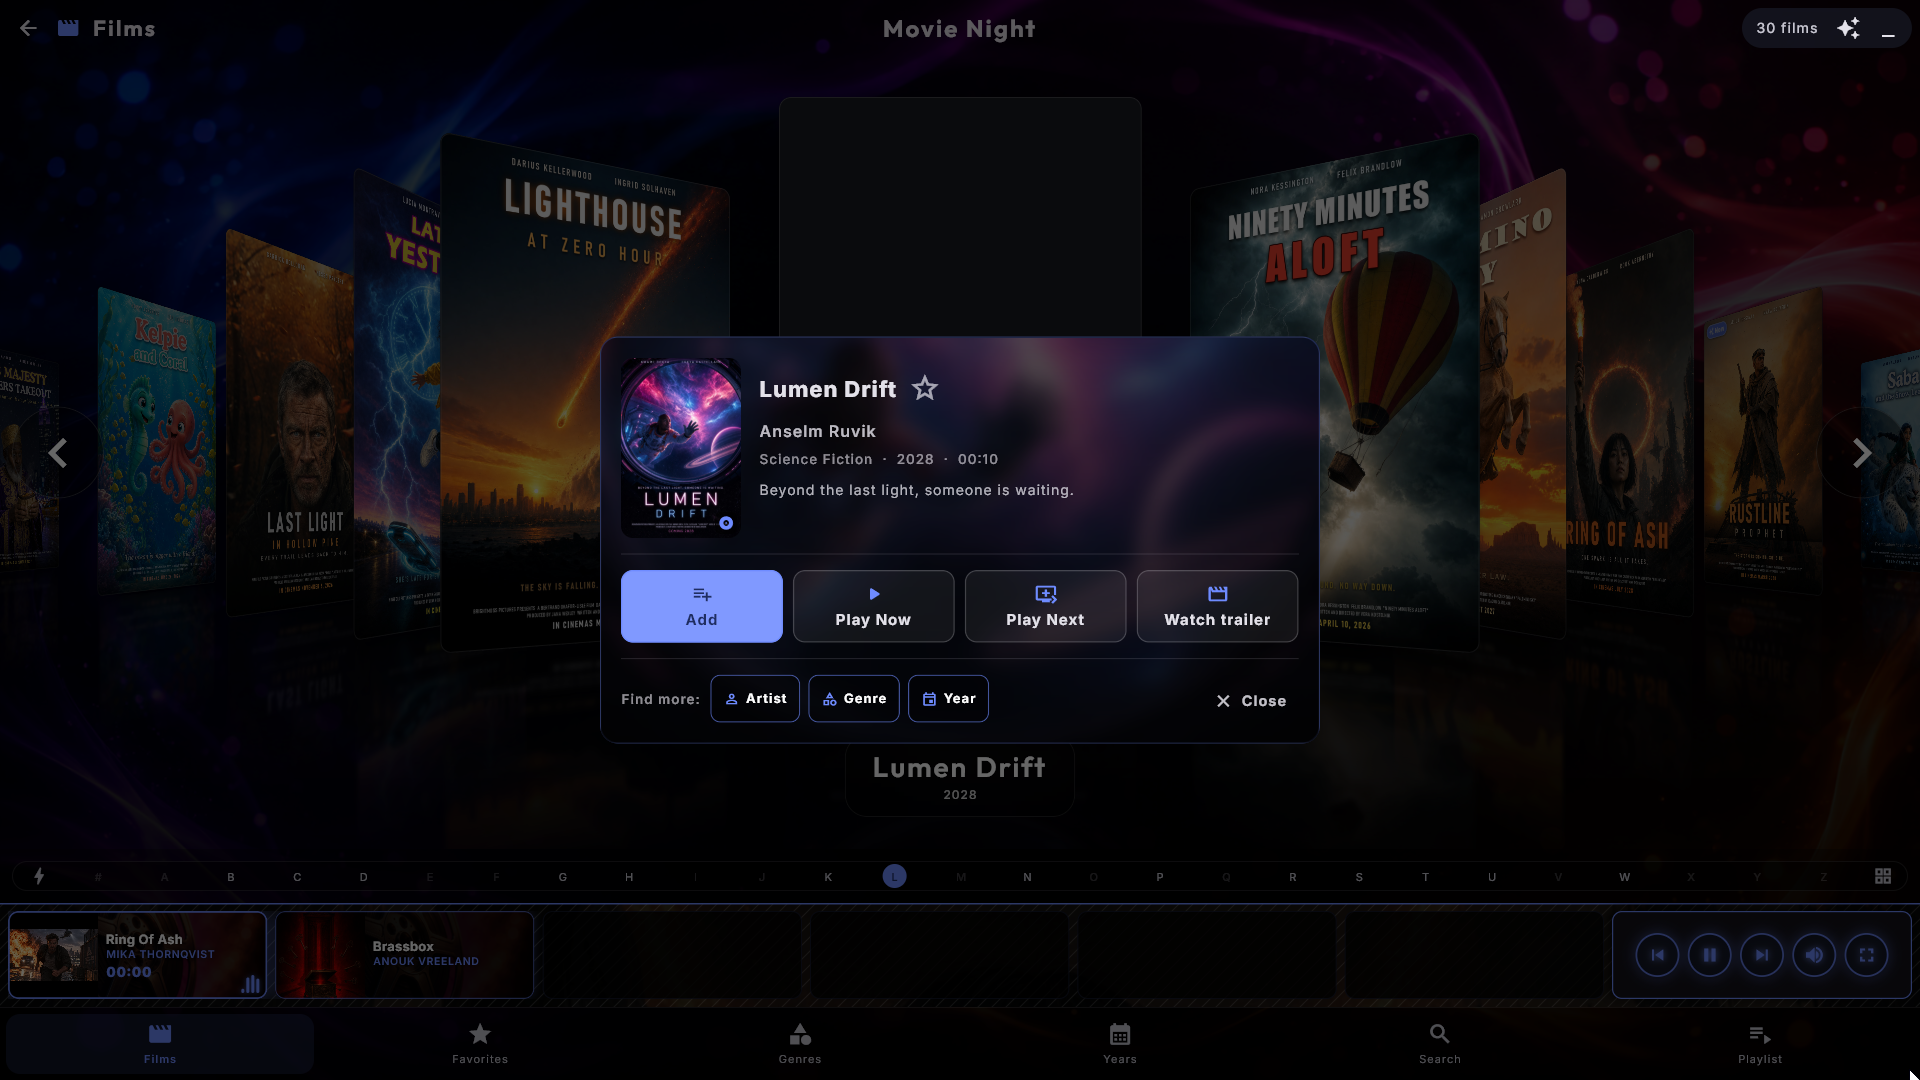
Favorites. After Movies the bottom menu has Favorites, the family's own films. Open a film and tap the star; the star is only there on an unlocked kiosk. Movies has no Popular page (a film is usually watched once), but it does have its own favourites. The Favorites tile under Pages in the bottom menu in the Movie settings hides the page.
A genre or a decade as posters. Open a genre, a decade or a period from Added and you get its films as a list. A button at the end of the alphabet bar switches to posters instead - the same poster wall as on the Movies page, with the browse effect you have chosen. Tapping a poster opens the film's window, just as on the Movies page, and the alphabet bar jumps by the film's title in both views. Press the button again to return to the list. The choice follows you from group to group and goes back to the list when you leave the center or the screensaver starts.
Fill the empty space. A wide film on a portrait screen leaves large empty areas above and below the picture (and an old 4:3 film on a wide screen leaves them at the sides). By default they show Blurred cover - a softly blurred, dimmed copy of the film's own cover - instead of black, while the film itself stays untouched in the middle. If you prefer black, choose None (black) at Fill the empty space in the Movie settings. The choice only appears when the film is set to Fit (with Zoom and Stretch there is no empty space), and it applies in full screen and on the screensaver, also on extra screens that show what is playing. A film without a cover keeps black areas.
Music Videos
Plays your music videos with the same rich library as Music. Browse via Videos, Artists, Genres, Years or Search - Videos comes first and shows every video as a cover gallery; with By artist at Grouping at start in the Music Videos settings it opens with one card per artist instead. Tap a video to play it or add it to a playlist, or use Add Similar and Find more: Artist / Genre / Year in the song window, just as in Music. With Open full screen when playback starts switched on, a video opens in full screen when it starts - also when you put the first video into an empty queue. The playing video appears as the first card in the player bar, running as a small live thumbnail. Titles, artists, covers and other details are edited in ZenPoint Media Manager. The same grouping button as Music sits on the Videos cover page, grouping videos by artist, genre or decade. Music video playlists are kept apart from music playlists: a music video list only holds music videos.
How a video gets its artist. Digital Center first looks for the artist in the video's own details (which you can set in ZenPoint Media Manager, for example). If there is none, it uses the file name when it is written as Artist - Title (for example "Queen - Bohemian Rhapsody.mp4"). And if that says nothing either, it uses the name of the folder the video sits in - so if you keep one folder per artist, the videos are gathered under the right artist by themselves. A video lying directly in the music video folder you chose in the settings gets no artist from the folder and is listed under Unknown artist.
Let the folder decide the artist. If you keep your music videos in one folder per artist, you can switch on Use the folder name as the artist in the Music Videos settings (section Library). Each video then gets the name of the folder it sits in as its artist, even when the file itself names another artist - for example "Music Videos\Adele\Chasing Pavements.mkv" is listed under Adele. The title is read as before. An artist you have set yourself in ZenPoint Media Manager still wins, and a video lying directly in the music video folder keeps its own artist. The change shows straight away, without reading the library again. With it off (the standard) everything is as before.
Order videos by artist. To keep one card per video but have them ordered by artist instead of by title, switch on Order videos by artist in the Music Videos settings (section View & sorting). The videos are then ordered by artist and then by title, the artist stands under each title, and the letter bar jumps to the artist's first letter - just as albums can be ordered by artist in Music. If a guest picks a grouping with the button, the grouping alone applies for as long as it is chosen. Artists starting with "The" follow your choice at Artists starting with "The". It is off by default.
Give an artist their own picture. If your videos lie in one folder per artist (for example "Music Videos\Adele"), put a picture called artist.jpg in that folder. It then stands for the artist on the artist's card, in the Artists list and at the top of the artist's own page, as long as Show details in the artist list is switched on. The picture may also be .jpeg, .png or .webp. In Music Videos only artist.jpg gives an artist a picture: a folder.jpg next to a video is still that video's cover, as before. A picture directly in the music video folder itself (the one you chose in Administration) is never used as an artist's picture.
An artist, a genre or a decade as covers. Open an artist, a genre, a decade or a period from Added and you get the videos as a list. A button at the end of the alphabet bar switches to covers instead - the same cover gallery as on the Videos page. Tapping a cover opens the video's window, and the alphabet bar jumps by the video's title in both views. The choice follows you from group to group and goes back to the list when you leave the center or the screensaver starts.
Popular and Favorites. After Artists comes Popular, just as in Music, with its own list, and after it Favorites, the house's own videos: open a video and tap the star (only on an unlocked kiosk). The Favorites tile under Pages in the bottom menu in the Music Videos settings hides the page.
Fill the empty space. A music video on a portrait screen leaves large empty areas above and below the picture. By default they are filled with Equalizer bars - a dimmed visualizer that moves with the music above and below the picture, while the video itself stays untouched in the middle. At Fill the empty space in the Music Videos settings you can choose one of the other visualizer styles from the screensaver instead, Blurred cover (a softly blurred, dimmed copy of the video's cover, as for films) or None (black). The choice only appears when the video is set to Fit, and it applies in full screen and on the screensaver, also on extra screens that show what is playing. When Graphics mode is set to Light, the visualizer styles are shown as the blurred cover instead, so the areas do not turn black just because the machine is modest - it says so under the setting. None (black) is black in every mode.
Arcade
Play retro arcade games, shown with cover images like albums, with the same browse styles. Tap a game to start it; any music that was playing pauses automatically and resumes when you leave. While playing you can save the game (F5) and load the saved game (F8), adjust volume and go full-screen. To leave a game without a keyboard, move the mouse or touch the screen - a Back button appears in the top-left for a few seconds (or press Esc). Highscores and progress are remembered between sessions. If you have not added any games yet, Arcade shows a short guide on how to add games instead of an empty page.
Two games to start with. A new installation already has two games in the Arcade - our own Star Blaster and Glowbug, each with a cover and a frame. Both are Nintendo games, and Nintendo games need the Game player for Nintendo games, which is not part of Digital Center itself: the machine fetches it from the internet the first time you ask for it. You can ask in the setup guide, under Administration → Arcade (the Game player for Nintendo games card with Get the game player), or right in the Arcade - tap a Nintendo game before the player is there, and the Arcade shows a calm message with the same button. You can carry on while it is fetched; once it is ready, the game starts straight away, with no restart. If it fails (no internet connection, for example), the message says why and the button reads Try again. On a locked kiosk, guests only see a short note that the game cannot be started right now.
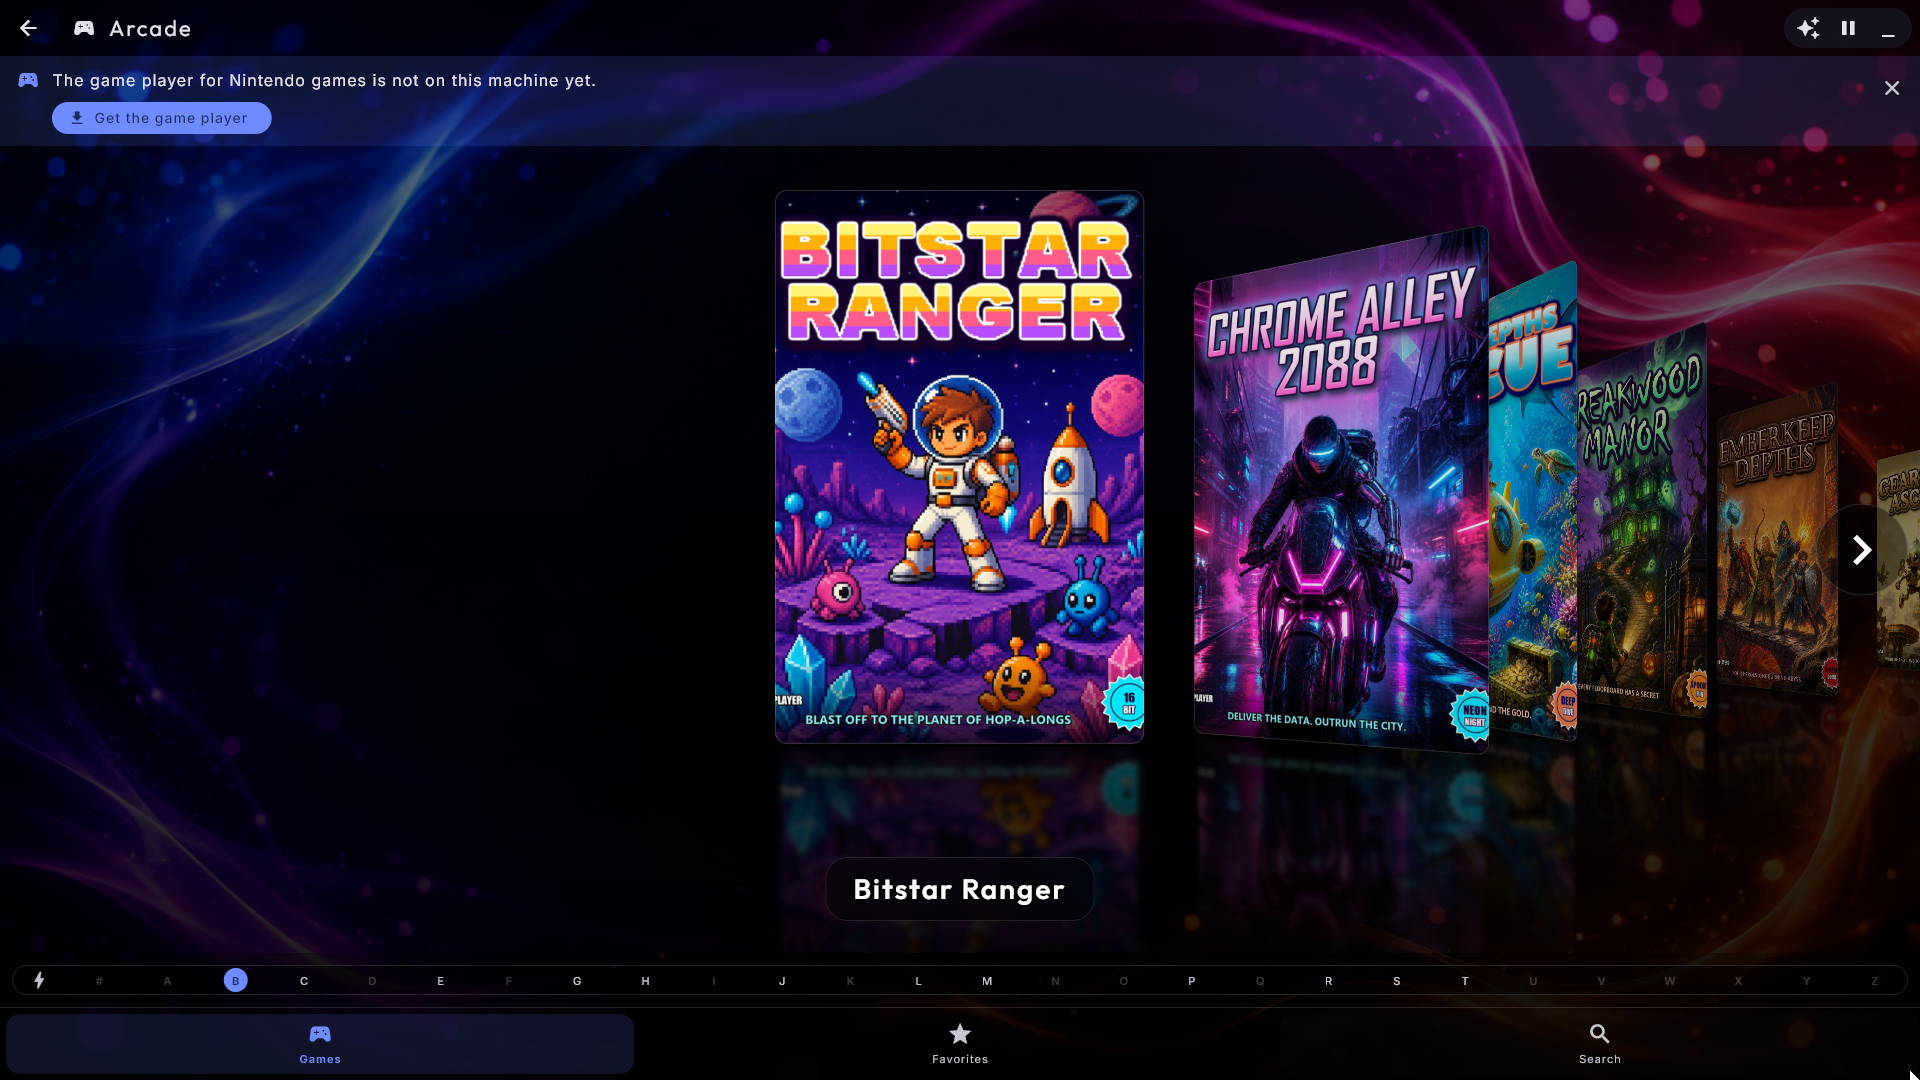
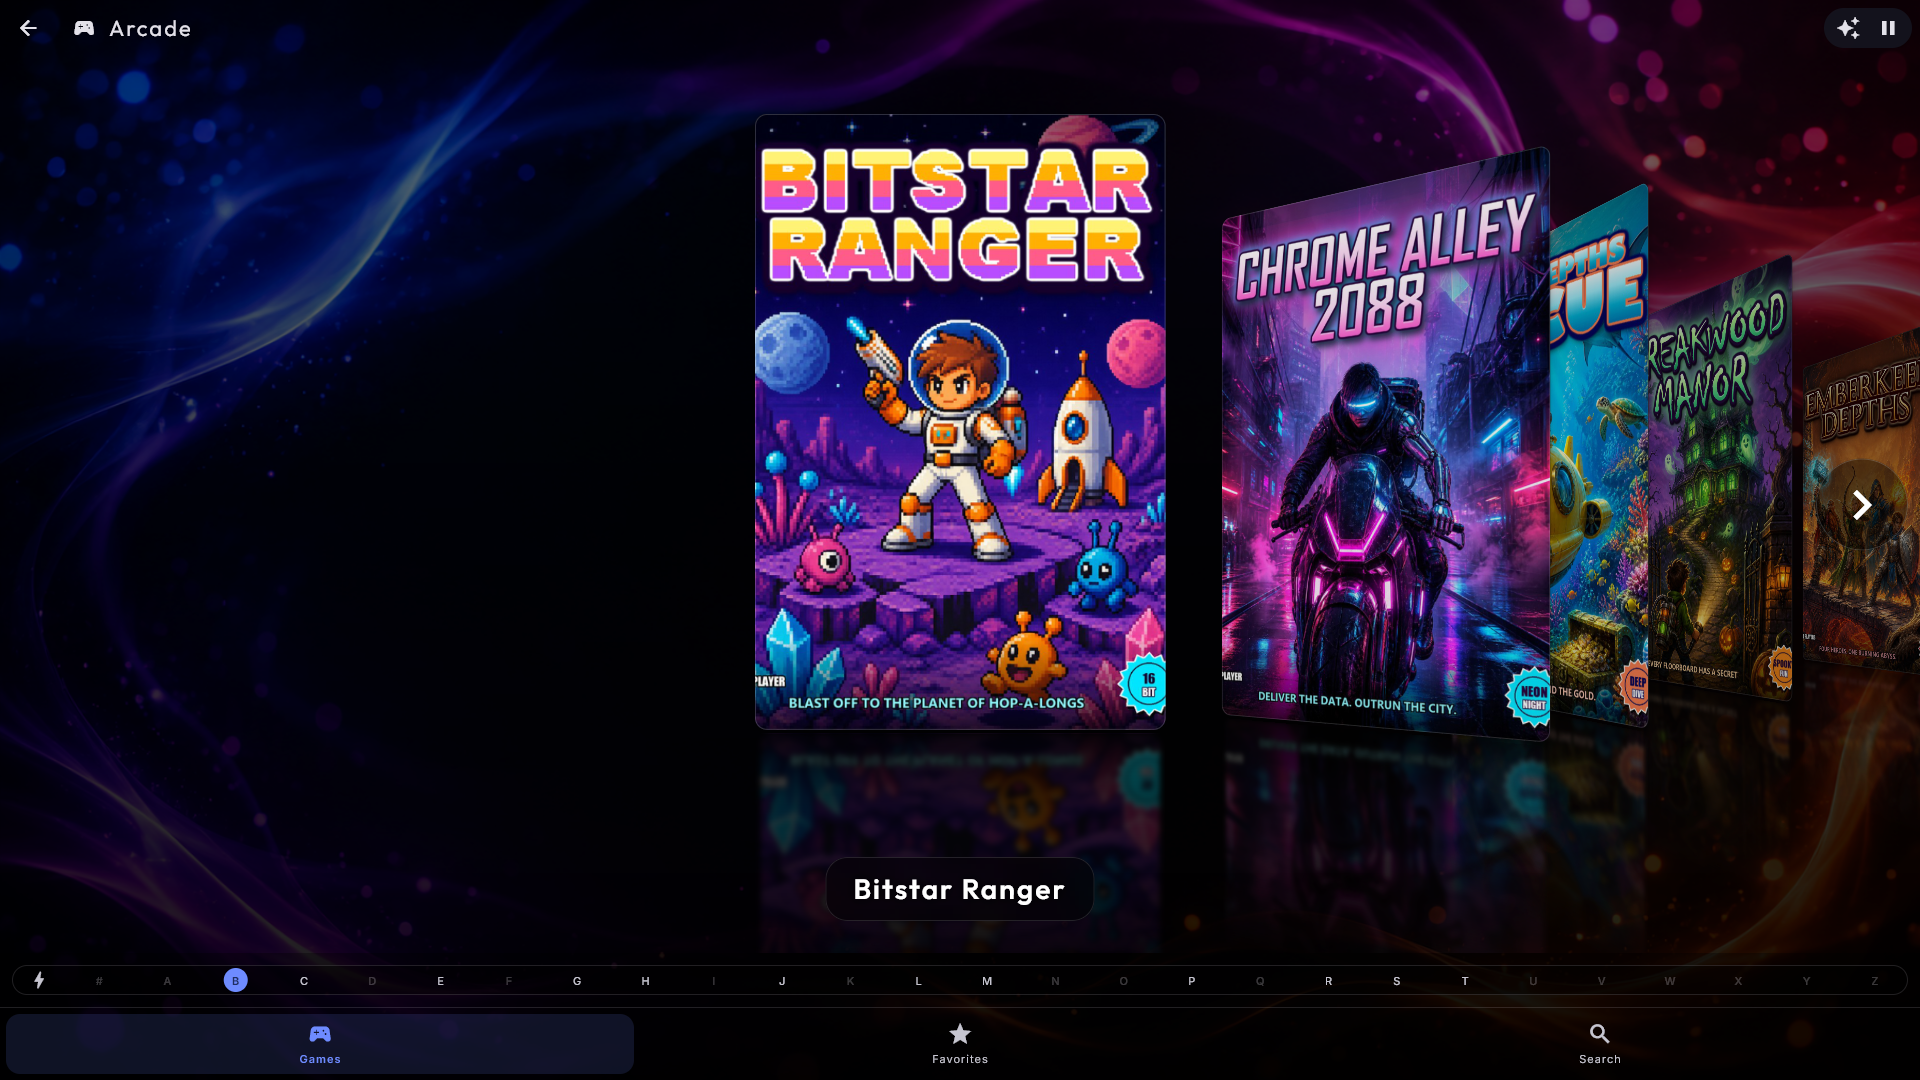
The menu at the bottom. As in Music, the Arcade has a menu along the bottom with Games, Favorites and Search. Games always shows every game. Switching between the pages never asks for a password, and the back arrow at the top leaves the Arcade from any of them, just as in Music.
The A-Z bar. Next to the games stands the same letter bar as in Music - down the side when the screen stands upright, along the bottom when it lies down. Tap a letter to jump straight to the first games with that letter, or drag your finger across the bar to move quickly through the whole list - handy with several thousand games. Games whose name starts with a number or a sign sit under #, first in the list. The bar works with every browse style and with the keyboard too.
Favorites for an event. With many games, you can star the ones for a party or an event. Hold your finger on a game (or right-click it with the mouse), and a small card opens with the game's name: tap Add to favorites (or Remove from favorites). An ordinary tap still starts the game at once. Under Favorites the guests see the starred games with the same browse style and the same letter bar; if there are none yet, the page says how to set a star. It is a shortcut, not a limit: Games always shows every game. Stars can only be set and removed while the kiosk is unlocked (or an administrator is logged in); on a locked kiosk a long press does nothing. The favorites are included in your backup, and an administrator can take the page away with Show "Favorites" in the Arcade settings.
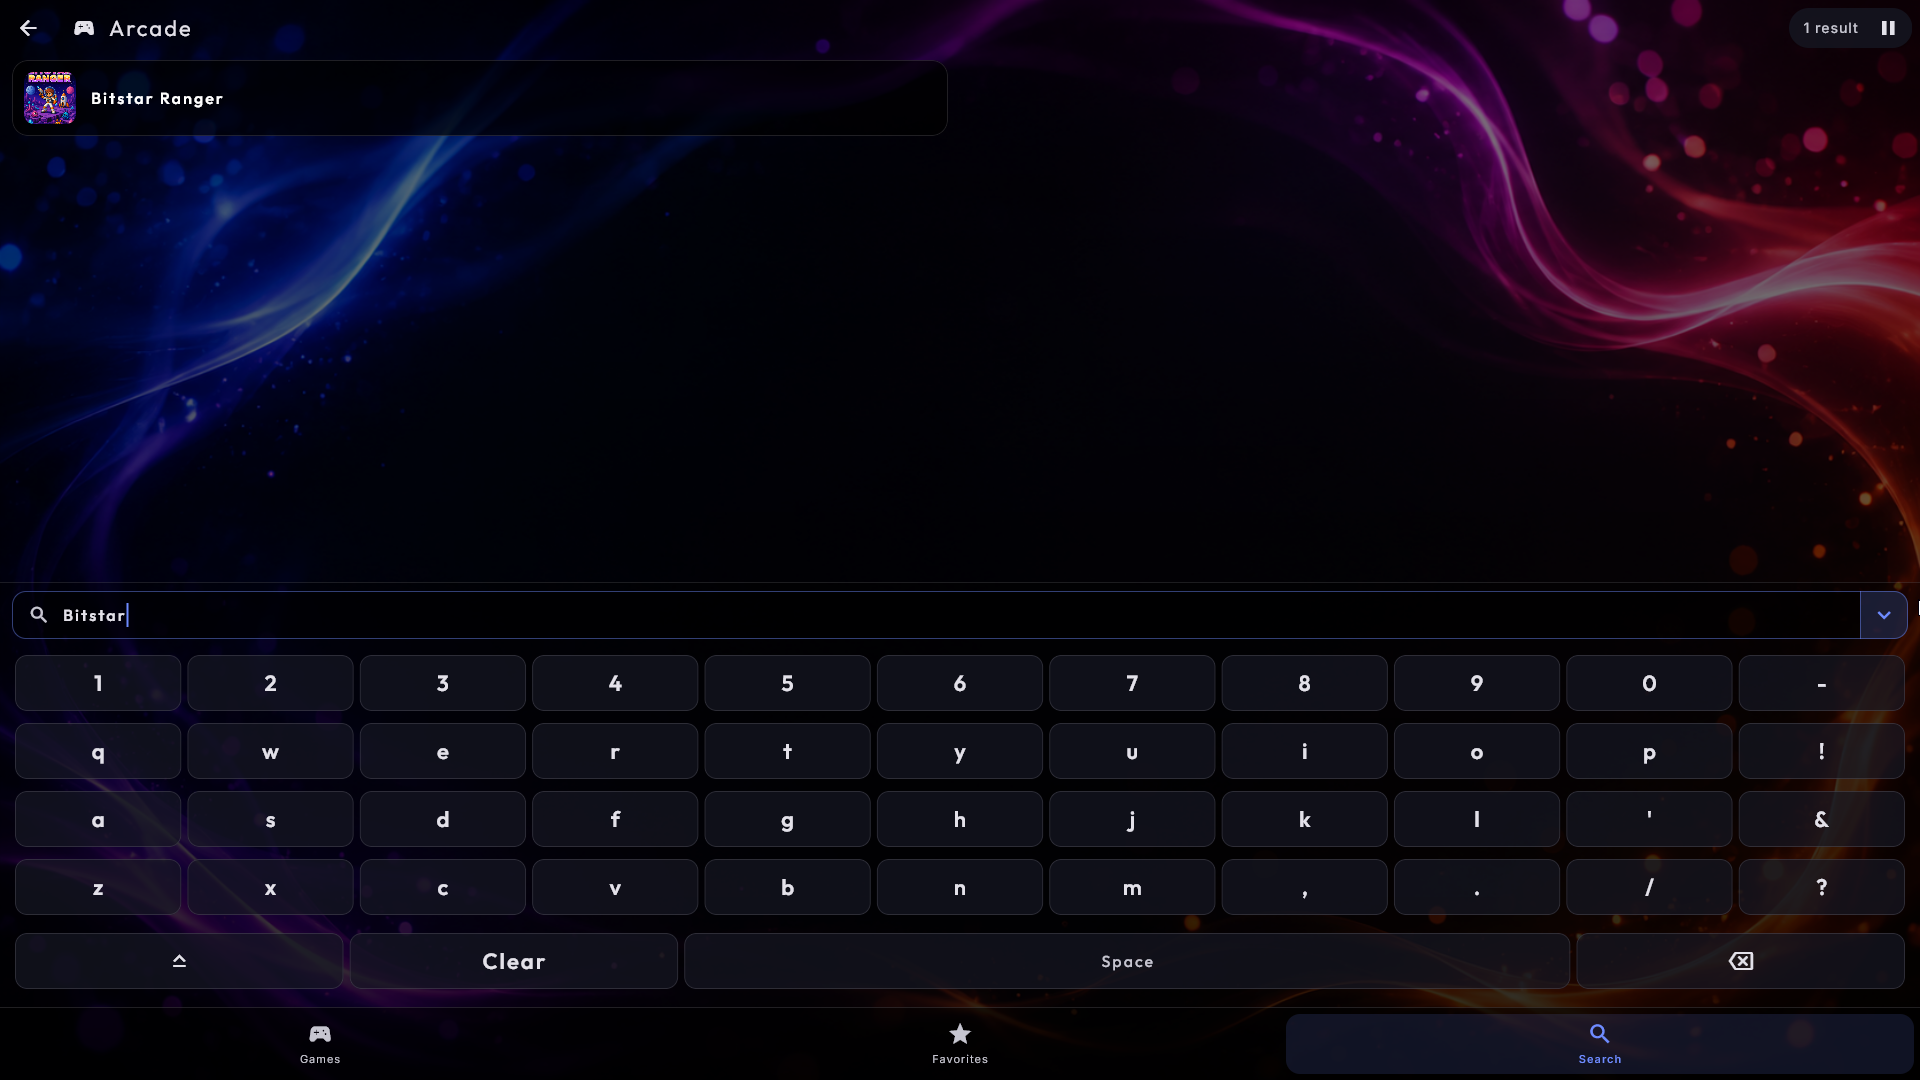
Search for a game. Tap Search in the bottom menu, and a search field and the on-screen keyboard appear. Type, for example, gala, and the list straight away shows only the games whose name contains it (Galaga, Galaxian ...). Capitals, accents and signs such as hyphens and apostrophes do not matter, and if you type several words, all of them must be in the name. Every game is searched, also the ones that are not favorites, and the hits are shown as a list - just like the search in Music, Movies and Music Videos - with the game's cover and name on each row. Tap a game to start it, or hold your finger on it (or right-click) for the favorites card. With a physical keyboard you can simply type on it. Guests may search too, also when the kiosk is locked, and the search starts afresh each time it is opened.
Clean game names. Game files often carry a tail of tags in brackets, such as
Pac-Man (USA) (Namco) or 1200-in-1 (J) [p1]. The list simply shows Pac-Man and
1200-in-1: only the brackets at the end of the name are removed, and the files are
never changed. If two games for the same machine then look the same, what tells them
apart is shown under the name, for example Japan and USA. Which machine a game
runs on is otherwise never shown to the guests - only when two games have the same name
on different machines (Tetris for the NES and for the Game Boy, say) does the machine
stand under the name, for example NES and GB. Search finds a game on both the
short and the full name. A name you have given a game yourself is always shown exactly
as you wrote it, and an administrator can switch the cleanup off with Automatic name
cleanup in the Arcade settings.
Covers found automatically. If a game has no cover, Digital Center fetches the
front of the game's box from the internet and shows it - but only when the name of the
picture matches the game exactly (the game file's name, or for arcade games the
game's real title). No cover is better than a wrong one. Console games are also
recognised by the game's own content, so a game with a file name of your own (for
example pacmania.zip) still gets the right cover. It happens quietly in the
background, so a cover may take a moment to appear. Your own picture next to the game
file always wins, and nothing is ever put in your game folders. It can be switched off
with Find covers automatically in the Arcade settings, under From the internet.
The games are ready at once. The game list is already there when you open Arcade, also just after the kiosk has started, and while it looks through the game folders it says so and fills in the list by itself. Put a new game or a new picture in a game folder, or change Game machine programs folder in the Arcade settings, and it turns up by itself a few seconds later - no restart needed.
Arcade is not only for coin-op cabinets: Digital Center also plays games from a long list of classic consoles - among them the NES, SNES, Game Boy/Color/Advance, Nintendo 64 and DS, Mega Drive, Master System, Game Gear, PlayStation and PSP, several Atari machines, PC Engine, Neo Geo Pocket, WonderSwan and Sega Saturn. Drop the games into one of your game folders and the system works out which machine each one belongs to. A Mega Drive game in a file ending in ".bin" (also packed in a zip file) is recognised by the game's own details and started as a Mega Drive game.
A few machines need a little extra. Disc-based games (Mega CD, PC Engine CD, Saturn, Dreamcast) look alike across machines, so put them in a folder named after the machine (for example "Sega Saturn" or "Mega CD") to steer them to the right one. Some machines also need their own start-up file, which you supply yourself, and a few are demanding on the computer. If a game can't start, Digital Center tells you why - either the game machine it belongs to has not been fetched yet (you choose which game machines to install in ZenPoint Media Manager), or the game needs a start-up file or more graphics power than the built-in player can give.
Not every game fills a modern widescreen. Rather than leave black bars, Digital Center fills the empty edges with quiet artwork - the game's own cover, or a marquee picture you have placed beside the game file - the way a real cabinet has a lit sign above the screen. It is deliberately dimmed and breathes very slowly, so it never draws the eye away from the game and can never burn into the screen. An administrator can turn it off.
If the machine is built as a single-game cabinet, an administrator can have Digital Center go straight into one particular game when it starts, and choose whether Esc leaves the game or simply restarts it - handy when the cabinet should always begin a fresh round for the next player. If the screensaver is showing at that moment, the game waits: the first touch wakes the screen, and then the game starts. A game never runs hidden behind the screensaver.
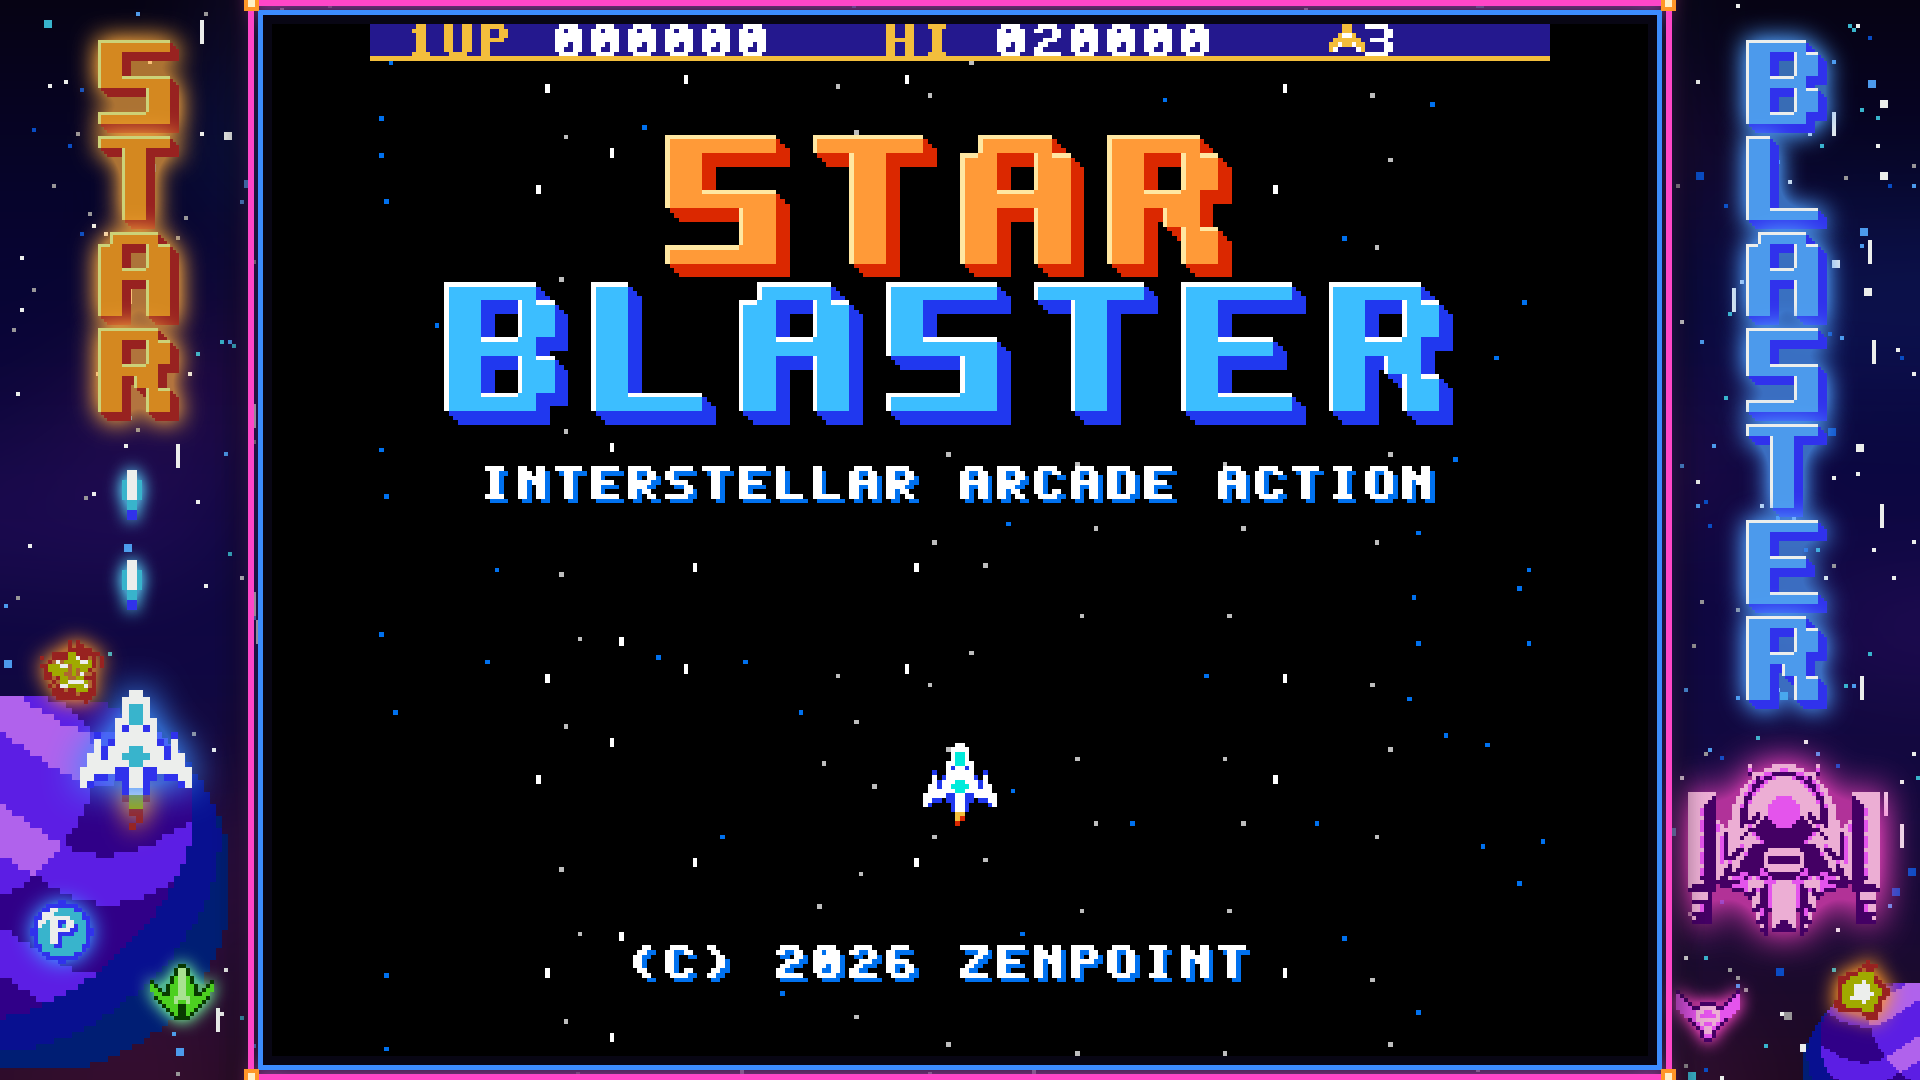
A frame around the game. You can put a frame picture of your own around the game, so it looks like the screen in a real arcade cabinet. Such pictures are often called bezels, and there are many ready-made collections online that you can fetch yourself. A frame picture is a PNG picture (usually wide, for example 1920 x 1080) with a see-through window where the game goes. Digital Center finds the window from the picture itself - you never have to type in any measurements. Put the pictures in one of these places (the first that fits is used):
- Next to the game, with the game's name plus
.bezel- forPac-Man.zipthe picture is calledPac-Man.bezel.png. - In a folder called
bezels, directly inside one of your game folders, with the same name as the game file - for examplebezels\Pac-Man.png. That way you can add a whole collection at once. - One frame for every game on the same machine, in the same
bezelsfolder, named after the machine - for examplebezels\arcade.pngfor arcade games,bezels\snes.pngfor the Super Nintendo,bezels\nes.pngfor the NES andbezels\megadrive.pngfor the Mega Drive.
An upright screen (an arcade cabinet with a vertical screen, for example) can have
an extra frame in portrait next to each of the three: Pac-Man.bezel-vertical.png next
to the game, and the same names as above in a folder called bezels-vertical, for
example bezels-vertical\Pac-Man.png and bezels-vertical\arcade.png. Digital Center
picks the frame that fills the screen by itself: an upright screen gets the portrait
frame, a lying screen the wide one. A frame for the game always comes before a shared
frame for the machine: if you only have a wide frame for the game and a portrait frame
for the machine, the game gets its own frame inside the screen. If no frame fills the
screen, the first one that fits inside it is used.
The frame appears by itself the next time the game starts. A picture without a see-through window is never used as a frame. If the frame has nearly the same shape as the screen, it fills the whole screen. The game's window is never cut off by the edge of the screen, though: if the screen is a little wider than the frame, the frame is made just small enough for the whole window to show, which can leave a narrow black edge at the sides. If its shape is quite different - a wide frame on a 4:3 screen, on an upright screen, or while Digital Center runs in a window - the whole frame is shown on the screen with black around it, and the game still sits in its window. If a frame does not suit the game (a frame for upright games around a lying game, or a window far too small), the next one in the list above is tried; if none fits, the game is shown as before, without a frame. No frames come with Digital Center. Show a frame around the game in the Arcade settings is on by default (with no frame pictures nothing happens), and frames are only shown when Fit game to screen is set to Fit.
Fetch frames automatically. Under From the internet in the Arcade settings, an
administrator can switch on Fetch frames automatically. Digital Center then fetches
a frame from the internet the first time a game is started - only a frame whose name
matches the game file exactly (for arcade games the short name, such as pacman.zip),
and otherwise a shared frame for the machine. The frame slides into place while the
game is running, as soon as it has arrived (usually after a few seconds). A frame made
for the game itself always comes before a shared frame for the machine, whether you
added it yourself or it was fetched: first your own frame for the game, then the
fetched frame for the game, then your own frame for the machine, and last the fetched
frame for the machine. If you have a frame for the game yourself, nothing is fetched.
The frames are made and shared by enthusiasts, which is why the switch is off by
default; switch it off again and fetched frames are no longer used.
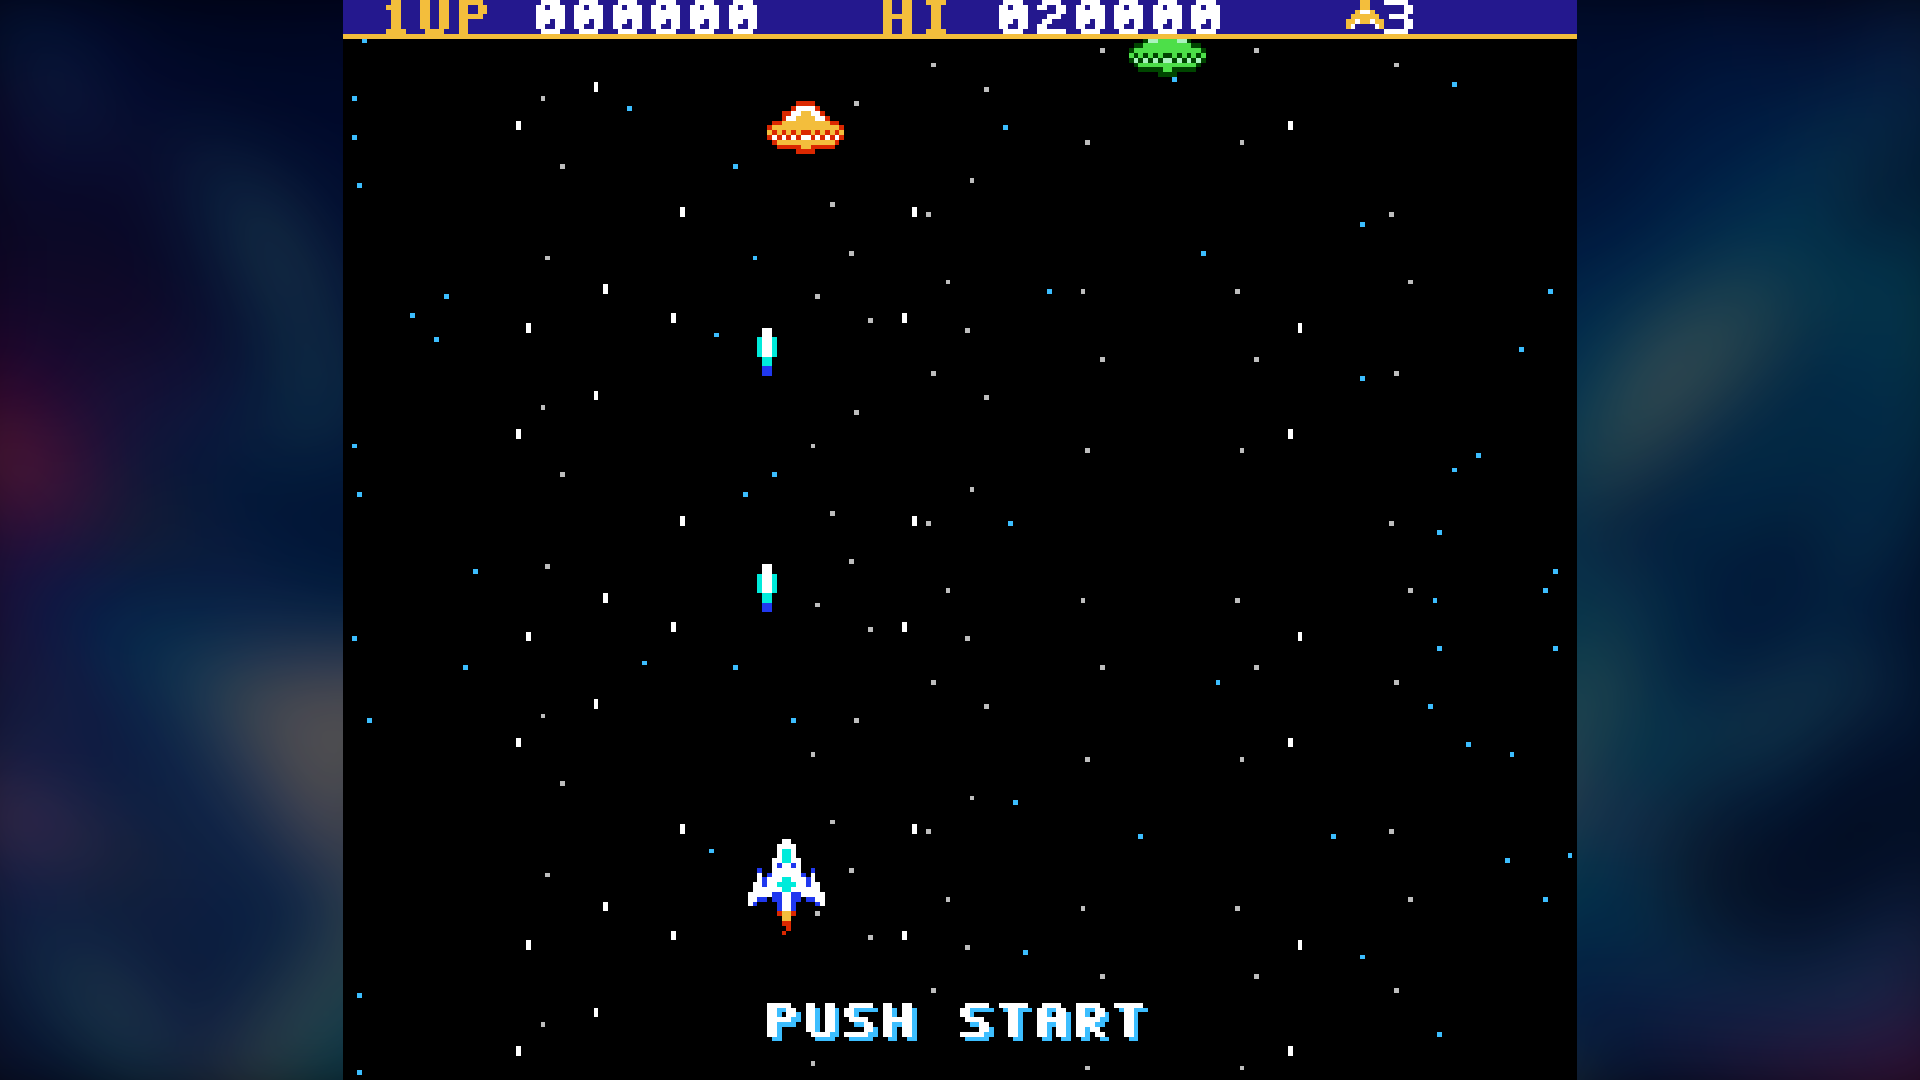
If a game is incomplete (one of its files is missing) it may still start with a normal picture but wrong or very loud sound. Digital Center spots this and shows a calm message over the game - "This game is not complete" - with Play anyway or Choose another game. It never stops the game for you. With the keyboard or a game controller the game keeps running under the message: after a moment a new press on a game button closes it (Play anyway), and Esc chooses another game (on the controller: hold Start and Back/Select, or your own back button, for a second). An ordinary press on a game button can never send you out of the game.
The default keyboard controls are the arrow keys plus a Back button.
Driving games with a wheel and pedals (for example OutRun, Hang-On and Super Monaco GP) can be played without a wheel: left/right steers, R2 is the accelerator and L2 the brake. On the keyboard L2 and R2 are E and R by default (next to L = Q and R = W); on a controller they are the triggers at the back (left = brake, right = accelerator). In OutRun the gear is changed with the game button B. The pedal is either pressed all the way or let go.
Play with a game controller. An ordinary game controller for the computer works too while a game is running - an Xbox-style controller, a USB controller of the same kind, or a plain, inexpensive USB gamepad (for example a SNES- or PlayStation-style pad). If both an Xbox-style controller and an ordinary USB gamepad are connected, the Xbox-style one is used. Plug it in, before or during the game, and Controller connected is shown briefly. Out of the box the buttons are laid out like this:
- The D-pad or the left stick moves (the stick has to be pushed a fair way, so a worn stick does not steer by itself).
- The four round buttons are the game's buttons, placed as on the old arcade machines: bottom is B, right is A, left is Y and top is X.
- The shoulder buttons are L and R, and the triggers behind them are L2 and R2 (brake and accelerator in a driving game; in the game list they page like the shoulder buttons).
- Start is Start, and Back (on some controllers View or Select) is Select - usually "insert coin" in an arcade game.
- Hold Start and Back/Select together for a second to do the same as Esc: go back to the game list, or restart the game if that is what What Esc does in a game is set to.
The controller works in the Arcade, and in the whole kiosk when Control the kiosk with a game controller is switched on (see Settings & administration, Controls & touch). It is for one player. The keyboard keeps working at the same time. If the controller is pulled out in the middle of a game, all its buttons are let go, so nothing gets stuck. If an Xbox-style controller is plugged in while an ordinary USB gamepad is in use, the Xbox-style one takes over after a few seconds, but never in the middle of a game: the controller being played with is kept until the game ends.
Find the game with the controller. The controller can also browse the game list, so a guest needs neither keyboard nor screen to pick a game:
- The D-pad or the left stick moves the selection; hold it and it keeps going, like an arrow key held down.
- L and R jump a page back or forward.
- The bottom round button (the game's B - the fire button in an arcade game) or Start starts the selected game.
- The right round button (the game's A) or Back/Select goes back, just like Esc; on a locked kiosk the password is asked for as always.
The buttons follow what an administrator has chosen under Game controller (and the joystick direction). Only a new press counts: a button still held down from the game does nothing until it is let go. If the screensaver is showing, the first press only wakes it. Once a game starts, the controller belongs to the game, and the press that started it does not count inside the game.
Choose the buttons yourself
The keyboard keys and the controller buttons can both be moved around under Administration → Arcade. Under Game controls, tap a game button's key and press the key you want instead - two game buttons cannot share a key. Under Game controller, connect the controller (the page then says it is connected and which kind it is), tap a game button on the page and press the button on the controller you want it to be. If nothing happens within 10 seconds, the window closes by itself and nothing is changed; Cancel stops at once. Pick a button another game button already uses, and the two swap places, so no game button can go missing. The directions (the D-pad and the left stick) cannot be moved to other buttons, but they can be turned (see below). An Xbox-style controller and an ordinary USB gamepad each remember their own choices, and Reset controller buttons puts them back. Holding Start + Back/Select follows the buttons you chose for Start and Select.
Ordinary USB gamepads have no common standard for their buttons, and on some models (for example many PlayStation-style pads and Logitech controllers in D mode) the four round buttons come out a quarter turn wrong. Use the turned layout fixes that in one go, or you can choose the buttons one by one.
If the joystick sits in a games table or on a panel turned a quarter round, the game goes the wrong way (left when you push up, for example). Under Joystick direction choose Normal, Turned a quarter to the left, Turned a quarter to the right or Upside down: connect the controller, push the joystick up, and pick the one that makes the line below say The game gets: Up. The choice covers both the joystick and the D-pad, diagonals too, and the keyboard is not changed. Each kind of controller remembers its own direction, and Reset controller buttons also puts the direction back to Normal.
If Start and Back/Select are hard to reach on a cabinet, pick one button that goes back. Under Back button, tap the button next to Back / leave game and press the button on the controller you want to use. In the kiosk one press goes back; inside a game you hold it for a second to do the same as Esc, so a stray press never throws the player out. Holding Start and Back/Select still works too. The back button cannot also be a game button: press one a game button already uses, and the window says which, so you can press another. The reset button next to the row removes the back button again, and each kind of controller remembers its own.
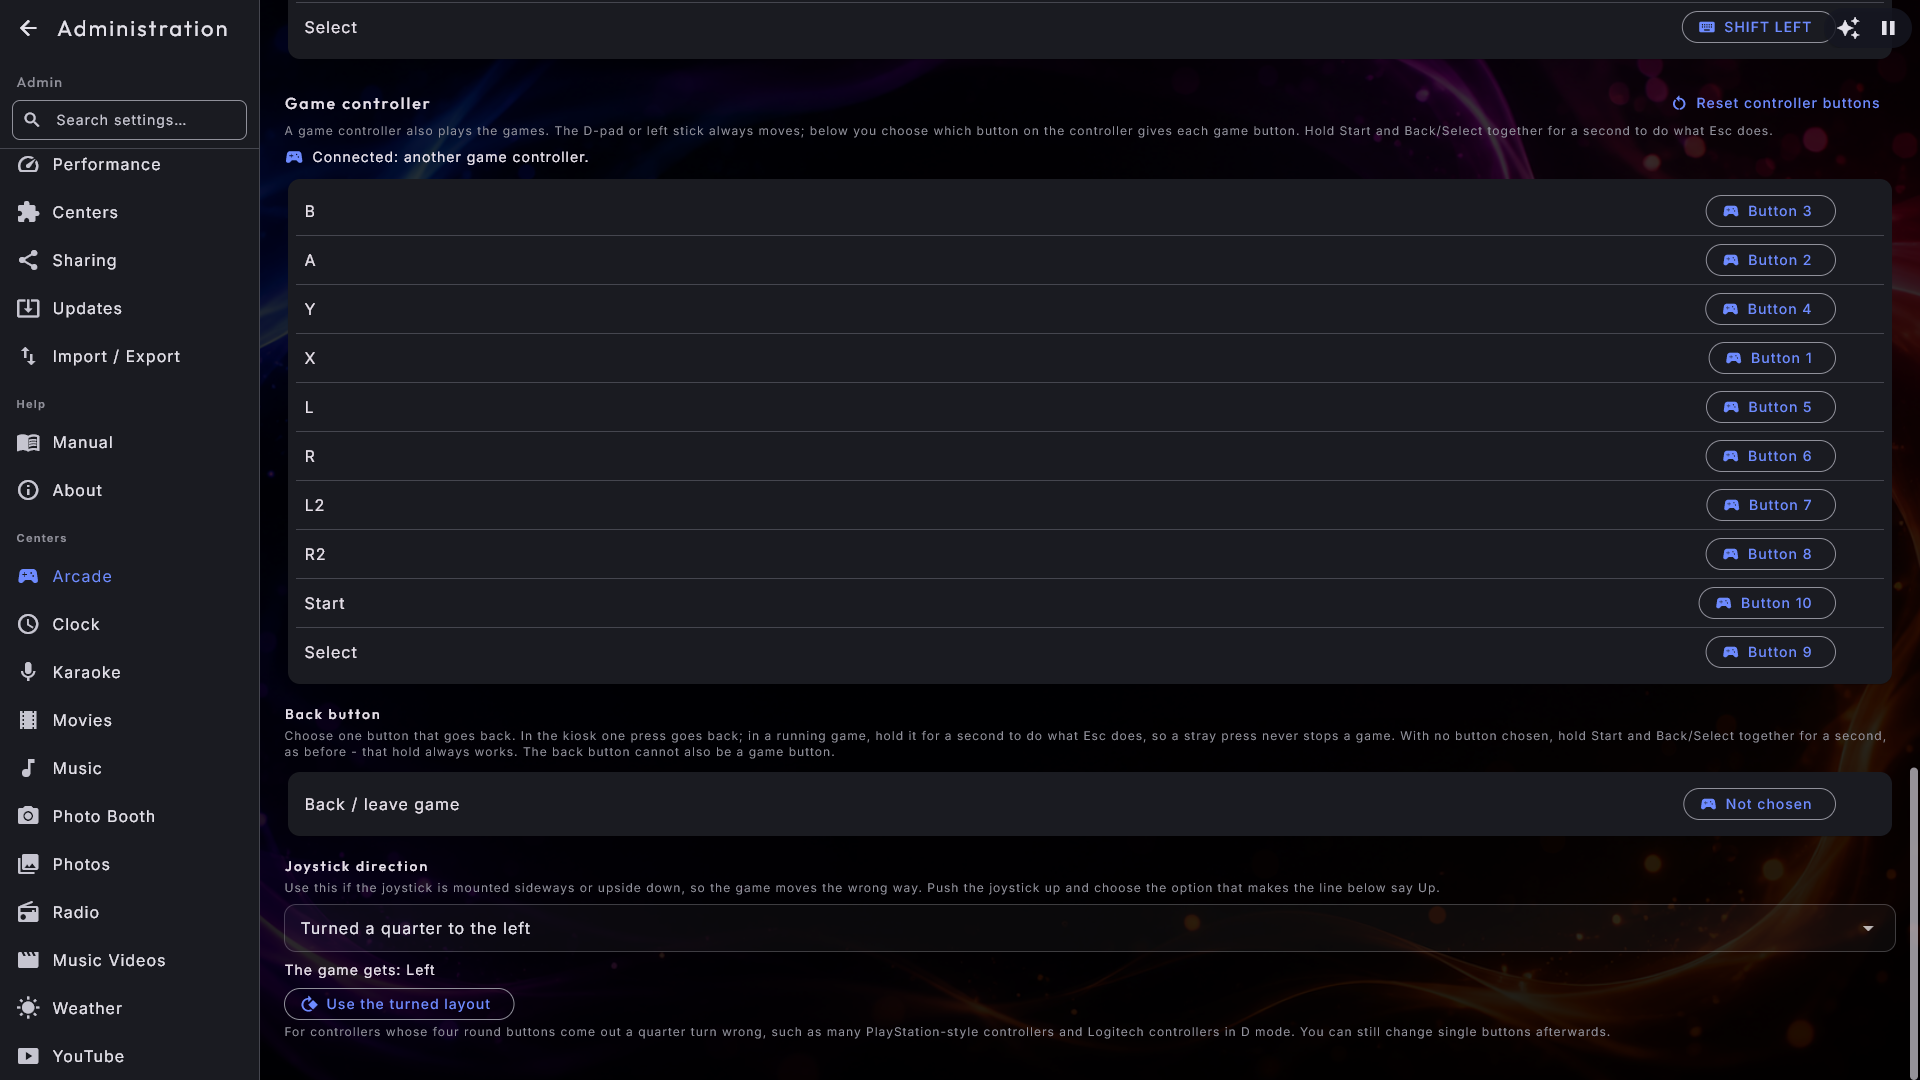
Photo Booth
Take fun pictures with a webcam, just like a real party photo booth. Everything a guest needs sits in one control bar beside the camera - down the right-hand side on a wide screen, along the bottom on a tall one. It holds a live preview of the finished picture, the choices the administrator has left switched on (Layout, Motif, Filter and Decorations), and the Take button, which can never be hidden. The booth counts down, takes as many pictures as the layout needs, and puts the finished picture together with the owner's event title and logo on it.
Afterwards the picture can be printed, and a code can be scanned to fetch it on a phone over the local network - one picture at a time, or the whole evening's pictures at once from the gallery along the bottom. Out of the box that gallery shows only today's pictures, so the guests at one party never see the previous party's photos. The booth itself cannot delete anything: pictures are looked through, deleted one at a time or saved day by day as a zip file on the Photo Booth page in Administration.

The full Photo Booth chapter
Layouts and Motion, your own motifs, decorations and collage templates, branding on the finished picture, printing and sharing, and the day-by-day list of taken pictures, are all covered in Photo Booth.
Photos
Browse your pictures and show them as a slideshow. Switch between two tabs at the top: Folders (browse folder by folder) and Events (your pictures grouped automatically by when they were taken). Each folder is shown with the first pictures inside it on the card, up to four at a time, so you can see what a folder holds before you open it. Video clips in your folders are shown too, with a still picture from the clip itself and a small play symbol on top, so you can see what the clip shows; if no picture can be made, a film symbol is shown instead. The same goes when a guest browses the pictures on a phone. Tap a clip to play it full screen.
The slideshow gently zooms and pans each picture and crossfades between them. Press Start slideshow (or tap a picture), pause or step back and forward, and double-tap a picture to zoom in. With the keyboard or a controller, left and right show the previous and next picture and Space pauses. Down (or Tab or Enter) goes to the buttons at the bottom, and up to the buttons at the top (close, get all, share and the menu on the right); the arrows move between them and Enter presses. The buttons stay on screen while one of them is selected. A QR code closes with Enter or Esc, and you are back on the button that opened it.
The share button shows a picture large with a QR code to view or grab it from a phone on the same network. You can also share a whole batch: Get all pictures in the folder view (and in the slideshow) shows one code that opens a page with every picture from that folder or event. Prefer to hand over a few chosen ones? Tap Select, pick the pictures you want and choose Share selected for a code covering just those.
The back arrow at the top left goes one folder up as long as there is a folder above, and only leaves the center when you are at the top - and when you come back out of a folder you land where you left off rather than at the beginning. The whole center can be driven from a keyboard as well: arrow keys move, Enter opens, and Tab steps between the folder cards, the pictures and the bottom menu.
Leave the Photos center untouched for a while and it starts a slideshow of all your pictures by itself - like a screensaver made of your own photos; the ordinary screensaver stays away while you are in Photos. Touch the screen to return.
Radio
Listen to internet radio from around the world. A menu along the bottom lets you find stations by Language, Location, the Music / Podcasts / Sport / Talk categories, your History, Search, your Favourites and, when you have added any, My stations (see below). All lists are alphabetical with an A–Z bar down the right edge. Tap a station to listen, and tap the star to save it as a favourite. In Search, type the station's name and press the search button with the magnifying glass at the right of the search field (or Enter) to fetch the results - the button is there on a machine without a touch screen too, where the on-screen keyboard is not shown.
The player at the bottom looks like the bar in Music, Movies, Music Videos and Karaoke, but uses the whole width for the station, since radio has no queue. On the right sit the same round buttons as there: play/pause, stop and the speaker, which opens the same volume box as in the other centers. Play and stop only appear once a station has been chosen.
When you have picked a country under Location or a language under Language, a button with an arrow and the name of the page you go back to (for example Location) sits at the top left - the same button as on the album and artist pages in Music - with the country's or language's name right beside it. It takes the place of Radio's own back arrow at the top, so there is only one way back: it leads to the list of countries or languages, not out of Radio. Esc does the same. Only once you are back on the list does the arrow at the top left (and Esc) leave Radio.
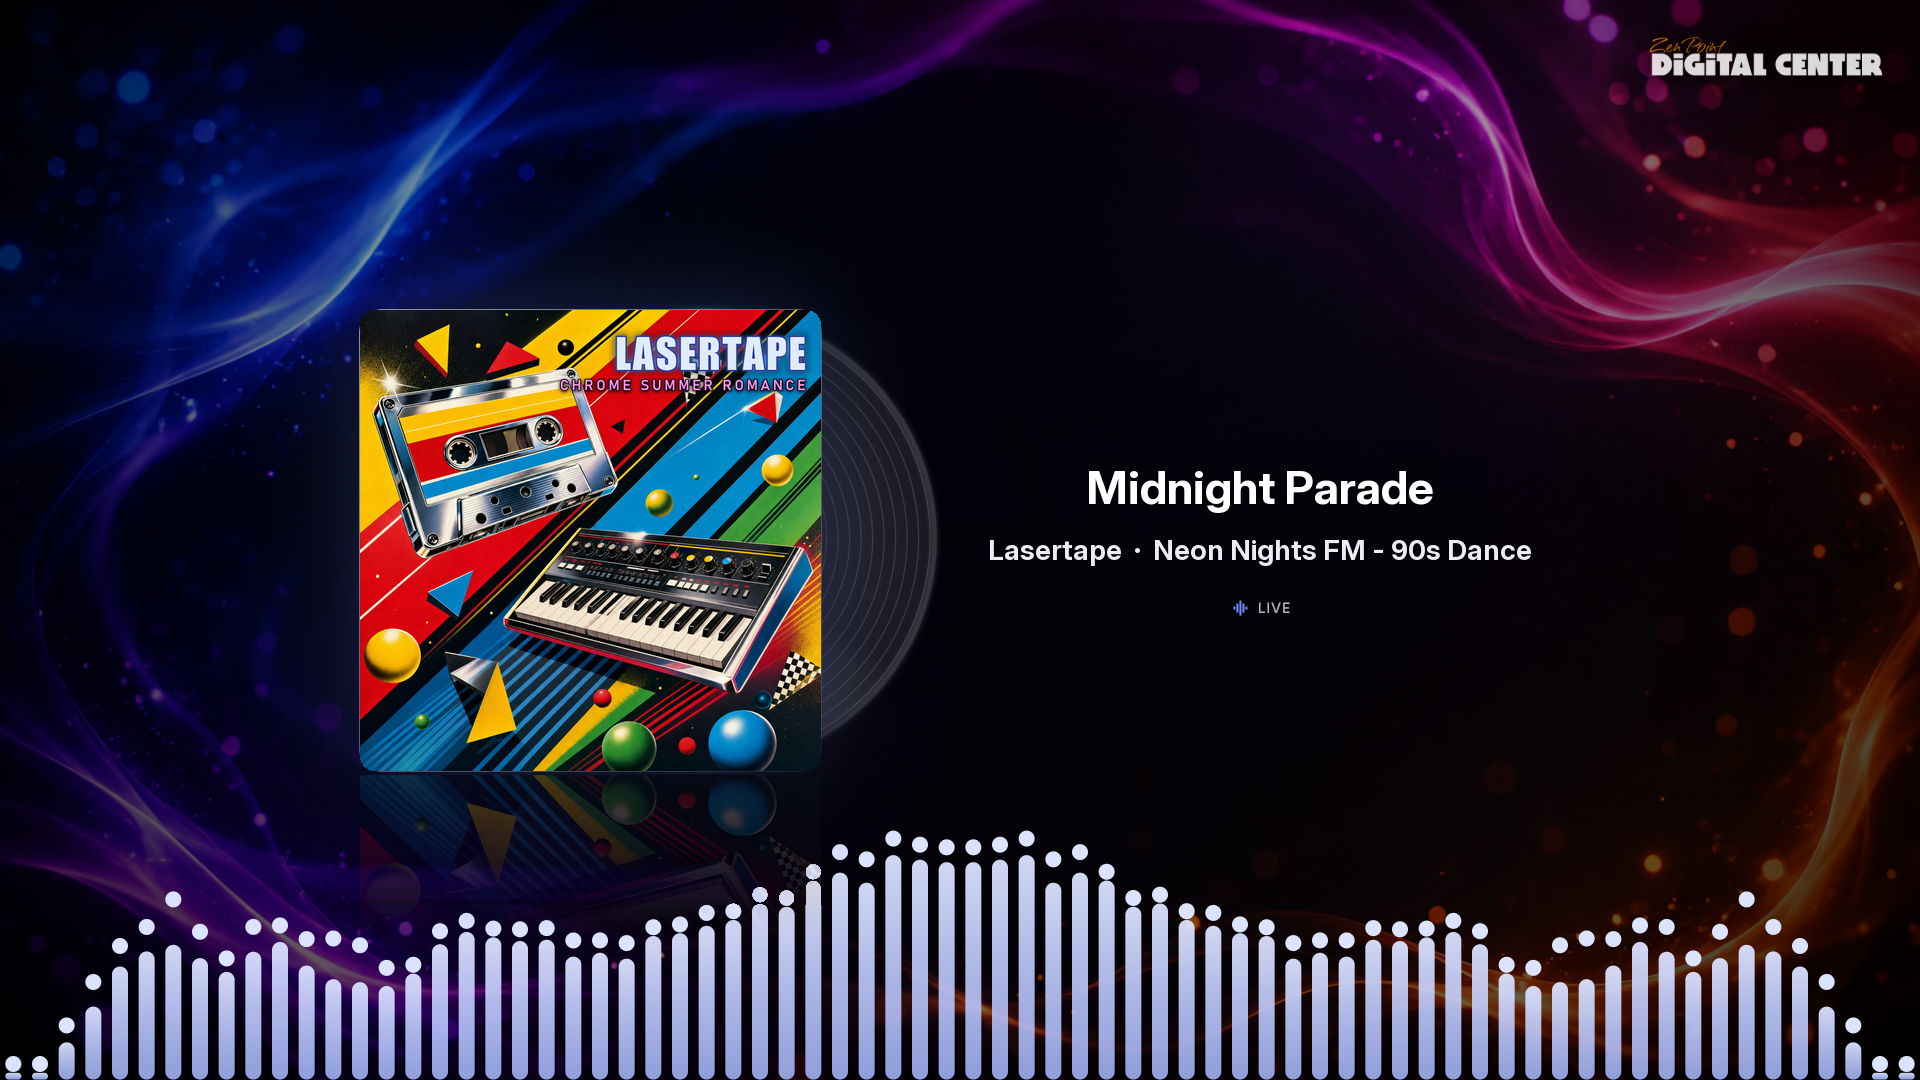
See the song, not only the station. Many stations send the name of what they are playing along with the sound. Digital Center reads it and shows title and artist on the big line, with artist · station underneath, so the station is never hidden. If we can place the song with certainty, its album cover takes over from the station logo for as long as it plays, and the logo is back the moment the song ends.
A station that sends nothing simply looks as it always has, and a cover is only ever shown when the song has been matched beyond doubt: a wrong cover would be worse than none. The song title reaches the phone remote as well.
Your own radio stations
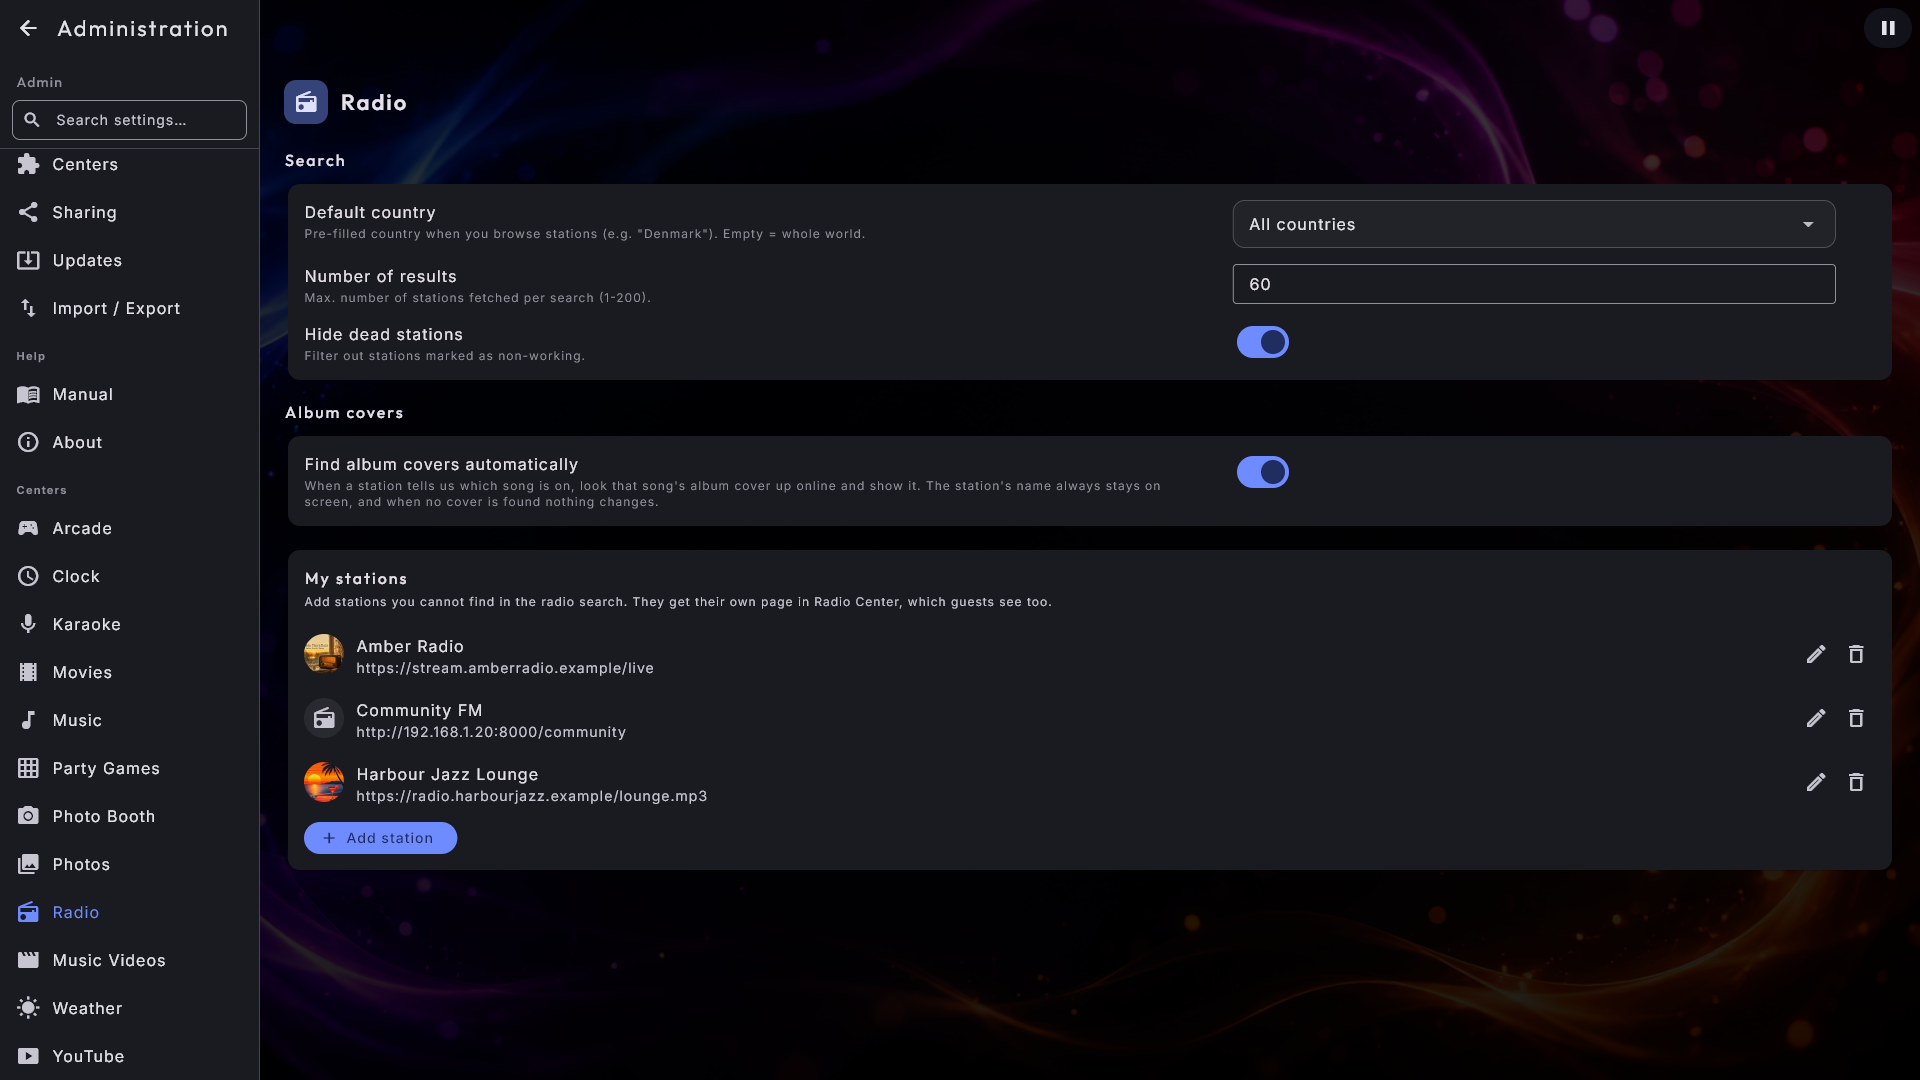
If you cannot find a station in the search, you can add it yourself. You need the
station's name and the address the station gives for listening online (it starts
with http:// or https://).
- 1
Open My stations
Open Administration → Radio and find the section My stations.
- 2
Add the station
Tap Add station, and type the name and the Stream address.
- 3
Try it
Tap Try it to hear whether the address works before you save. Whatever is playing already keeps playing meanwhile. Tap Stop when you have heard enough.
- 4
Give it a picture (optional)
For the station's own logo, tap Choose picture and pick a picture (JPG, PNG or WebP). It is shown in a circle, so a square picture with the logo in the middle works best.
- 5
Save
Tap Save.
The picture stands by the station everywhere, also on the screensaver, on extra screens and on the phone. While the station says which song is on, Radio shows the song's album cover instead, and the station's picture is back when the song ends. Digital Center keeps its own copy, so you may move or delete the original file. Take the picture off again with Remove picture when you edit the station.
As soon as you have at least one station, Radio gets a new page in the bottom menu, My stations, where guests can choose them too. The stations work like all the others: they can be starred, they come along in the history, and they can be started from the phone. With no stations of your own, the page is not there.
You edit or delete a station in the same place in Administration. A deleted station also disappears from favourites and history. Your stations and their pictures come along in Import / Export, and an update never touches them.
Weather
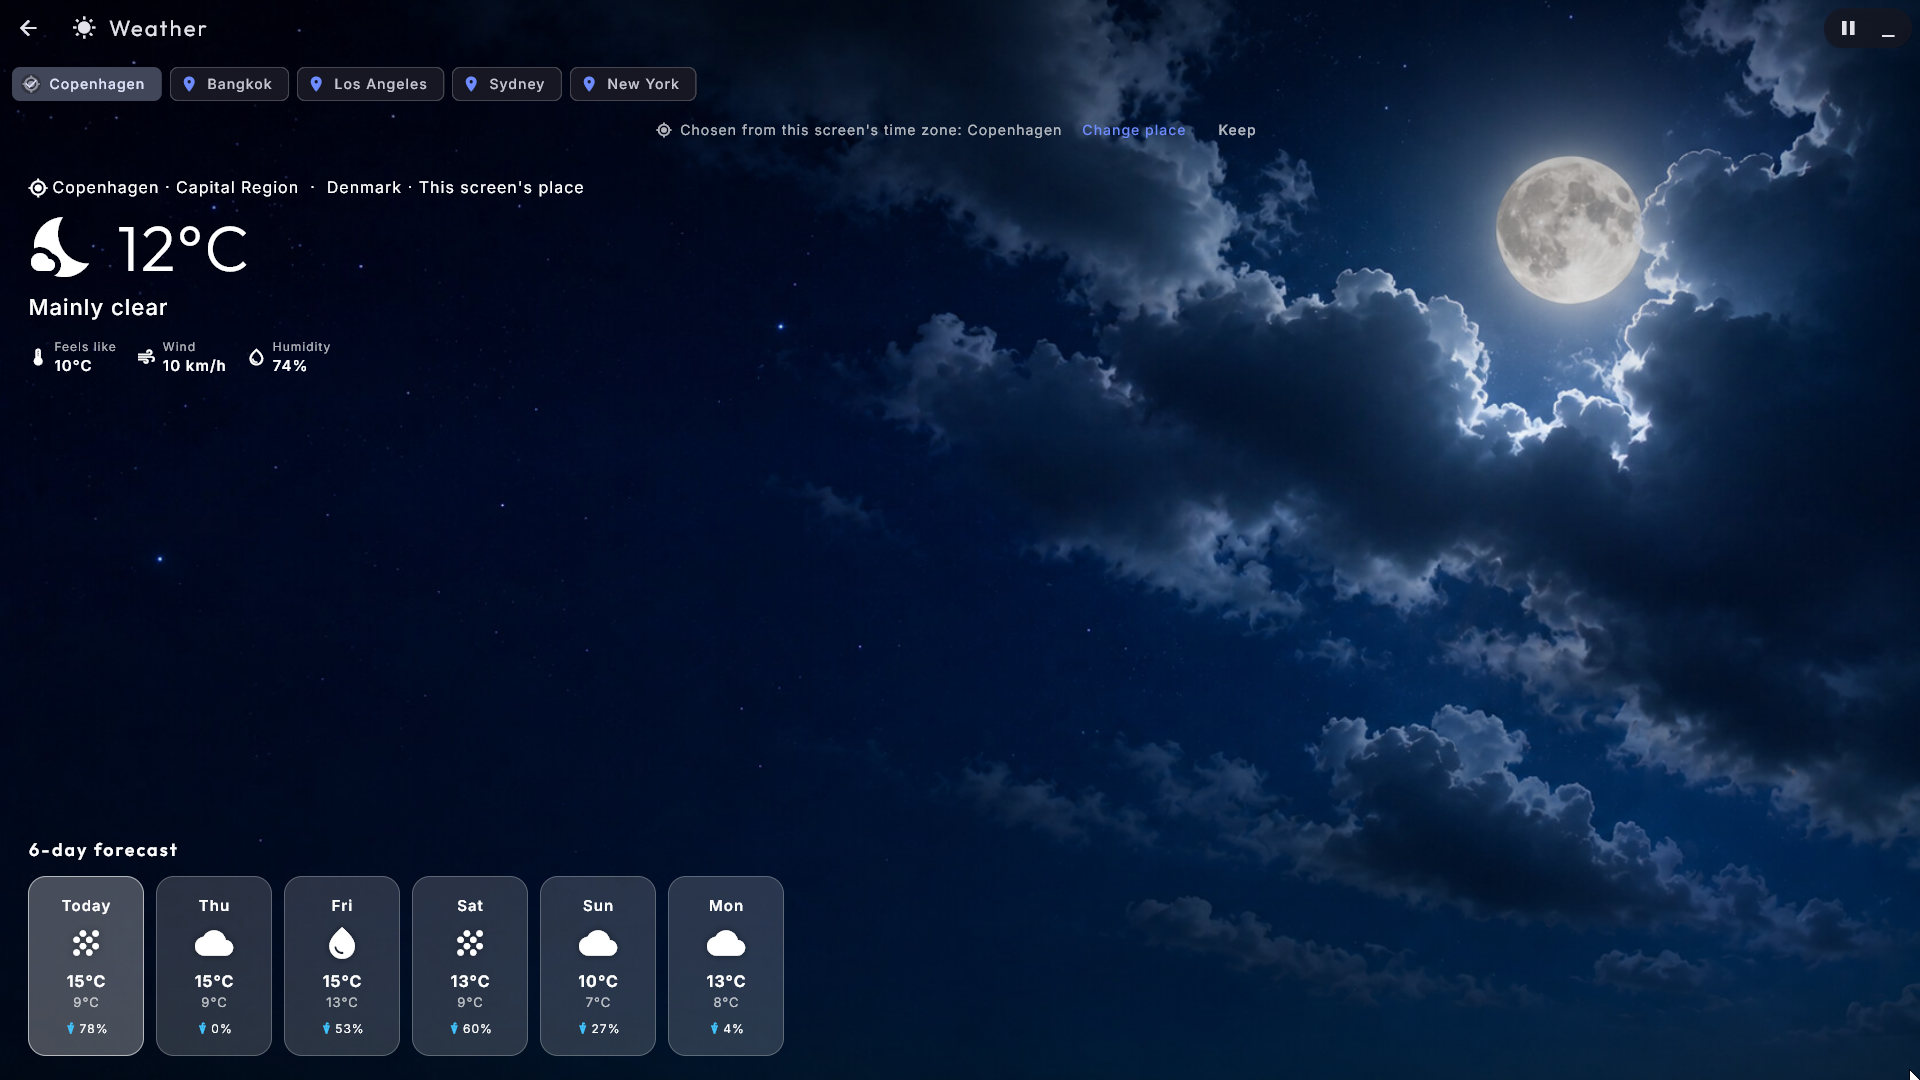
See the weather for today and the coming days with lively animations. Switch between the saved locations to see their weather - temperature, "feels like", wind and humidity. The wind's unit (such as km/h or m/s) is written in the language the screen shows. The locations are chosen by the administrator under Administration → Weather.
This screen's place. The place where the screen stands always comes first, marked This screen's place. When the machine is online, Weather picks it by itself once, from the screen's time zone - but only when the city is beyond doubt (Copenhagen for Danish time, for example). Otherwise nothing is picked, and you choose. When the place was picked that way and the screen is not locked, a small line says Chosen from this screen's time zone: ... with Change place and Keep. With no place chosen, an unlocked screen calmly asks Where is this screen?: press Choose place, and the search is already filled in with a city from the time zone - tap the right one. Not now hides the question for the rest of the session. Guests see neither the line nor the question. Under Administration → Weather you can also press Choose this screen's place, or This is here / Not here next to a saved place. Your own choice - Not here too - always stands; Weather never picks by itself again afterwards.
Clock
See the time as a large animated analogue clock, and keep an eye on the time elsewhere in the world. Tap a world clock to show it as the big clock. A world clock is always a city with its own time zone: a whole country with several time zones (such as the USA) cannot be chosen, because it has no single time. If your machine had the old starting places "USA" and "Australia", they have turned into Los Angeles and Sydney by themselves. The world clocks and the 12-/24-hour display are chosen by the administrator under Administration → Clock.
YouTube
Works just like Movies. A bottom menu offers Videos, Search and Playlist, with videos shown as cover images. Videos shows clips from the trusted sources the administrator has chosen; to see only one theme (such as "Kids" or "Music") pick it from Setup → Themes. Tap a video to play now, play next or add to the queue - it plays in the shared player and can be made full-screen. As playback continues on its own, it pulls in more videos from the chosen theme's sources. Whether party guests may use Search is decided on each YouTube playlist; see Party Mode.
If YouTube asks "are you a robot"
If videos stop playing and YouTube starts asking to confirm you are not a robot, the administrator can give Digital Center a sign-in under Administration → YouTube. When Firefox is installed the easiest way is one click: press Open YouTube in Firefox, sign in, then press Import login from Firefox. If you use a different browser, you can point Digital Center at a saved sign-in file instead. See Maintenance & troubleshooting.
External Programs
Launch your own programs straight from Digital Center - a spreadsheet, a browser, a game or a small command you use often. They are shown with cover images, with the same browse styles.
If the owner has chosen the Alphabetical order, an A-Z bar stands beside the programs, as in Music: tap a letter to jump there. If the owner has put the programs in categories, there is a menu along the bottom with Programs (all of them) and Categories (one card per category, such as "Slots" or "Tools"). A category card carries a small folder badge with the number of programs at the top right, so it can never be mistaken for a program, not even when the category holds only one. Tap a category to see its programs, and tap the Categories button at the top left (or Esc) to go back to the categories. Programs without a category are gathered under Other programs at the end.
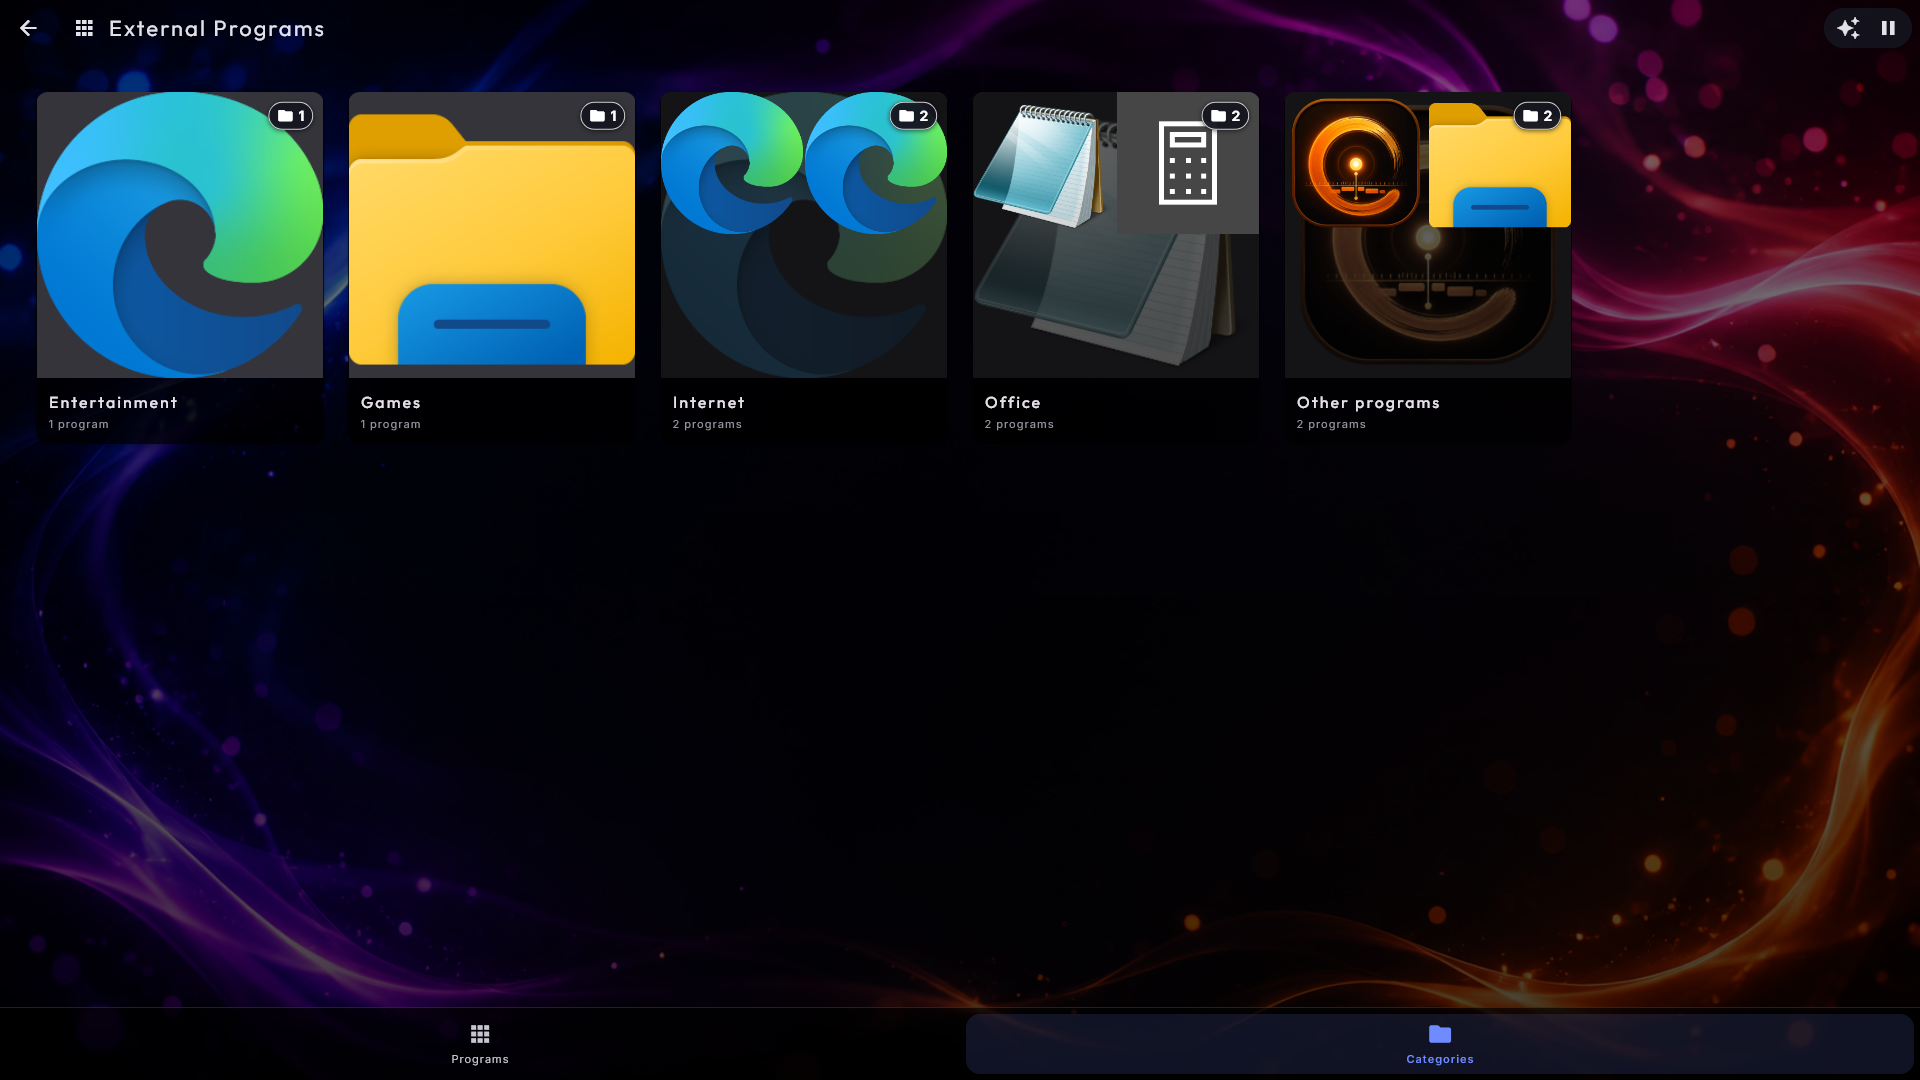
Tap a program to start it. While the program starts, Digital Center shows Starting ... - and keeps showing it for as long as the program is starting (up to a minute). If it takes more than about 10 seconds, for example the first time, when Windows checks a new program, it also says calmly that it is still starting. Meanwhile nothing else can be tapped, so a program is never started twice by accident; tapping a program that is already running brings it forward instead.
If the program opens a normal window, Digital Center steps aside while you use it: it stays in its place, in full screen and completely still (nothing moves, and the welcome music pauses), behind the program - so when you close the program, Digital Center is there at once, without the desktop showing in between. Meanwhile Digital Center is gone from Alt+Tab and the taskbar, so you can switch freely between the program and, for example, a browser without landing on Digital Center. Instead its icon sits in the system tray by the clock: double-click it (or right-click it and choose Show Digital Center) to bring Digital Center forward at once, also while the program is still running, and the right-click menu can play, pause, change song and stop the music. If the program does not come to the front by itself, or someone taps Digital Center meanwhile, Digital Center gets completely out of the way after a few seconds instead (only the icon by the clock is left, and it comes back in full screen when the program closes), so the program never hides behind it. While Digital Center has stepped aside, it does not react to taps, the mouse or keys (so nobody starts another program by accident) - only F12 and the media keys (play/pause, stop, next, previous) work.
If you have made Digital Center an ordinary window yourself (F12), it stays a window afterwards, and the screensaver is kept away while the program runs. The same goes for Media Manager in the Setup tile. If a program from here and Media Manager are both open, the screensaver (and the return to the front page) waits until both are closed.
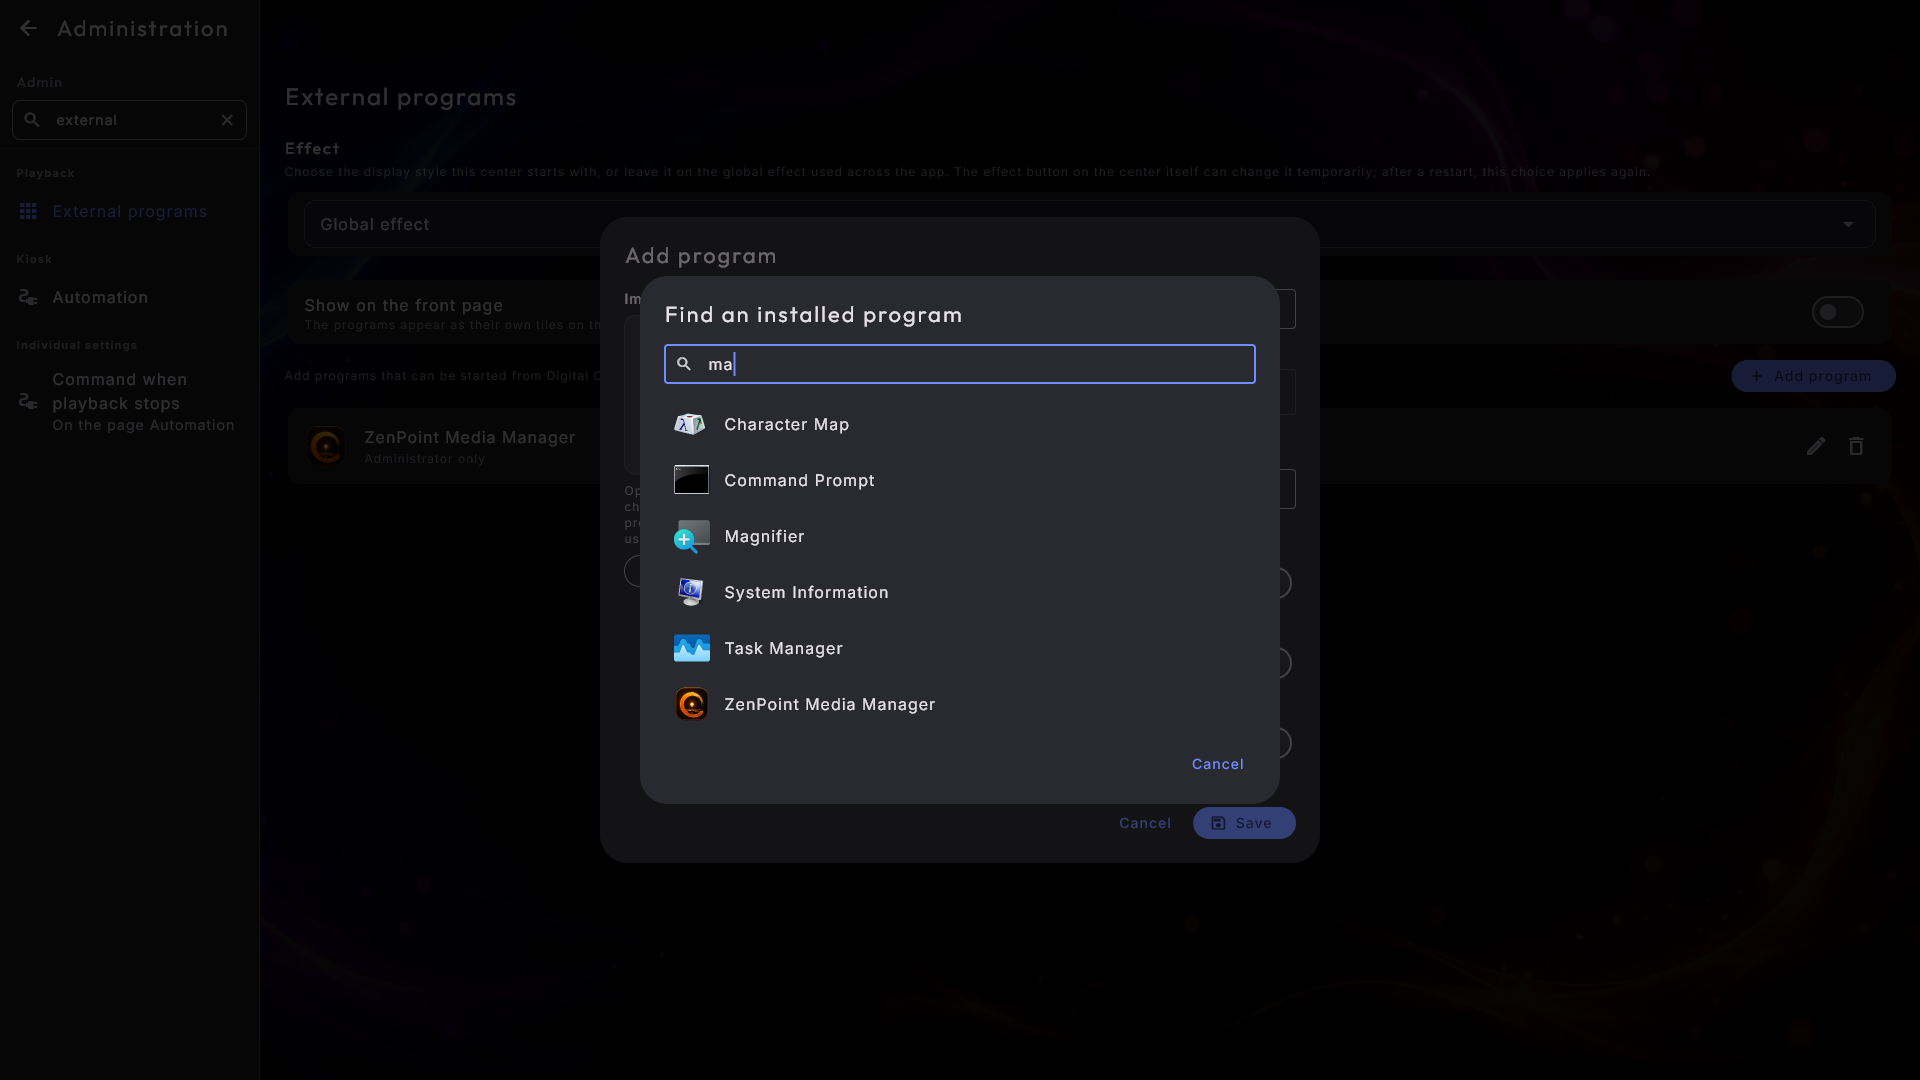
You set the programs up under Administration → External programs. Tap Add program, and at Program press Find installed program: search for the program by name among the programs installed on the computer, and the program and its parameters are filled in for you (and the name, if you have not written one yourself). Or press Choose program and find the program (or file) on the computer yourself. This center only appears on the front page when there are programs to show, and administrator-only programs are hidden while Party Mode is on.
Categories are optional. In the program's window, type a name at Categories, such as "Slots", and tap Add. A program can be in several categories. The categories you already use on other programs stand underneath: tap one to use it again, and remove a category with the cross on it. If you add a program that starts the same file as a program you have already given categories, the same categories are filled in for you, and you can simply change them.
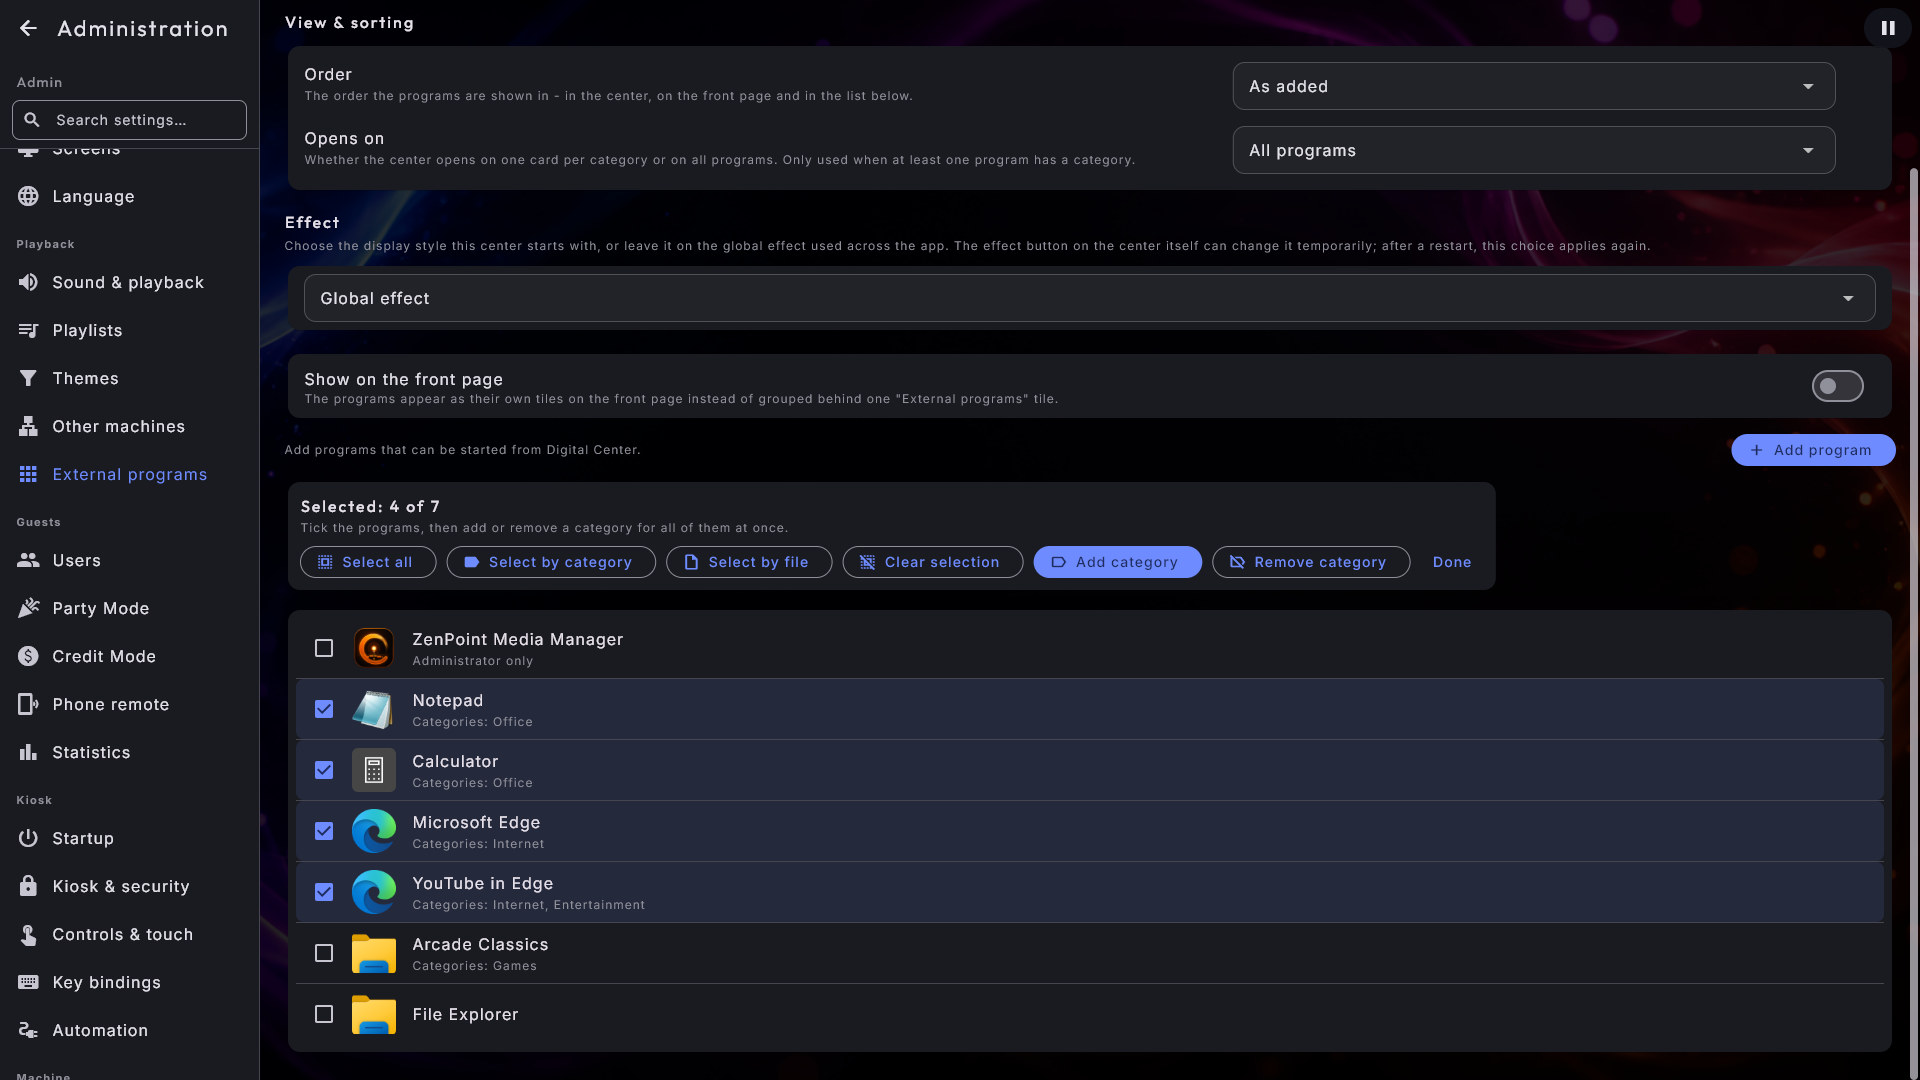
Give many programs a category at once. Tap Select programs, and tap the programs it concerns (or Select all). Select by category adds all the programs in a category to the selection, and Select by file all the programs that start the same file. Then tap Add category and type the category (or tap one you already use); the selected programs keep their other categories. Remove category takes one category off the selected programs, or All categories, which always asks first and says how many programs lose their categories. Afterwards you are told how many programs were changed, and for 10 seconds you can tap Undo to get their categories back exactly as before. If the programs were changed somewhere else meanwhile, nothing is put back, and you are told so. Tap Done when you have finished.
At the top of the page you choose how the programs are shown. Order: As added (the default) or Alphabetical, which sorts by name (numbers by their value, so "Game 2" comes before "Game 10") and gives the center an A-Z bar; the order also applies to the programs on the front page and the list in Administration. Opens on: All programs (the default) or Categories, if the center should open on one card per category; it only counts when at least one program has a category.