
Chapter 15
Photo Booth
The Photo Booth turns Digital Center into a proper party photo booth: a guest steps up to the webcam, picks how the picture should look, poses while the booth counts down, and walks away with the picture on their phone or in their hand. This chapter covers both sides of it - what a guest does at the booth, and everything you as administrator set up on the Photo Booth page in Administration.
The short version
The guest picks a layout, and optionally a motif, a color filter and some decorations, then taps Take. The booth counts down, takes as many pictures as the layout needs, and puts the finished picture together with your event title and logo on it. The guest can scan a code to get it on their phone, or print it. You decide how much of that the guest gets to choose.
Taking a picture
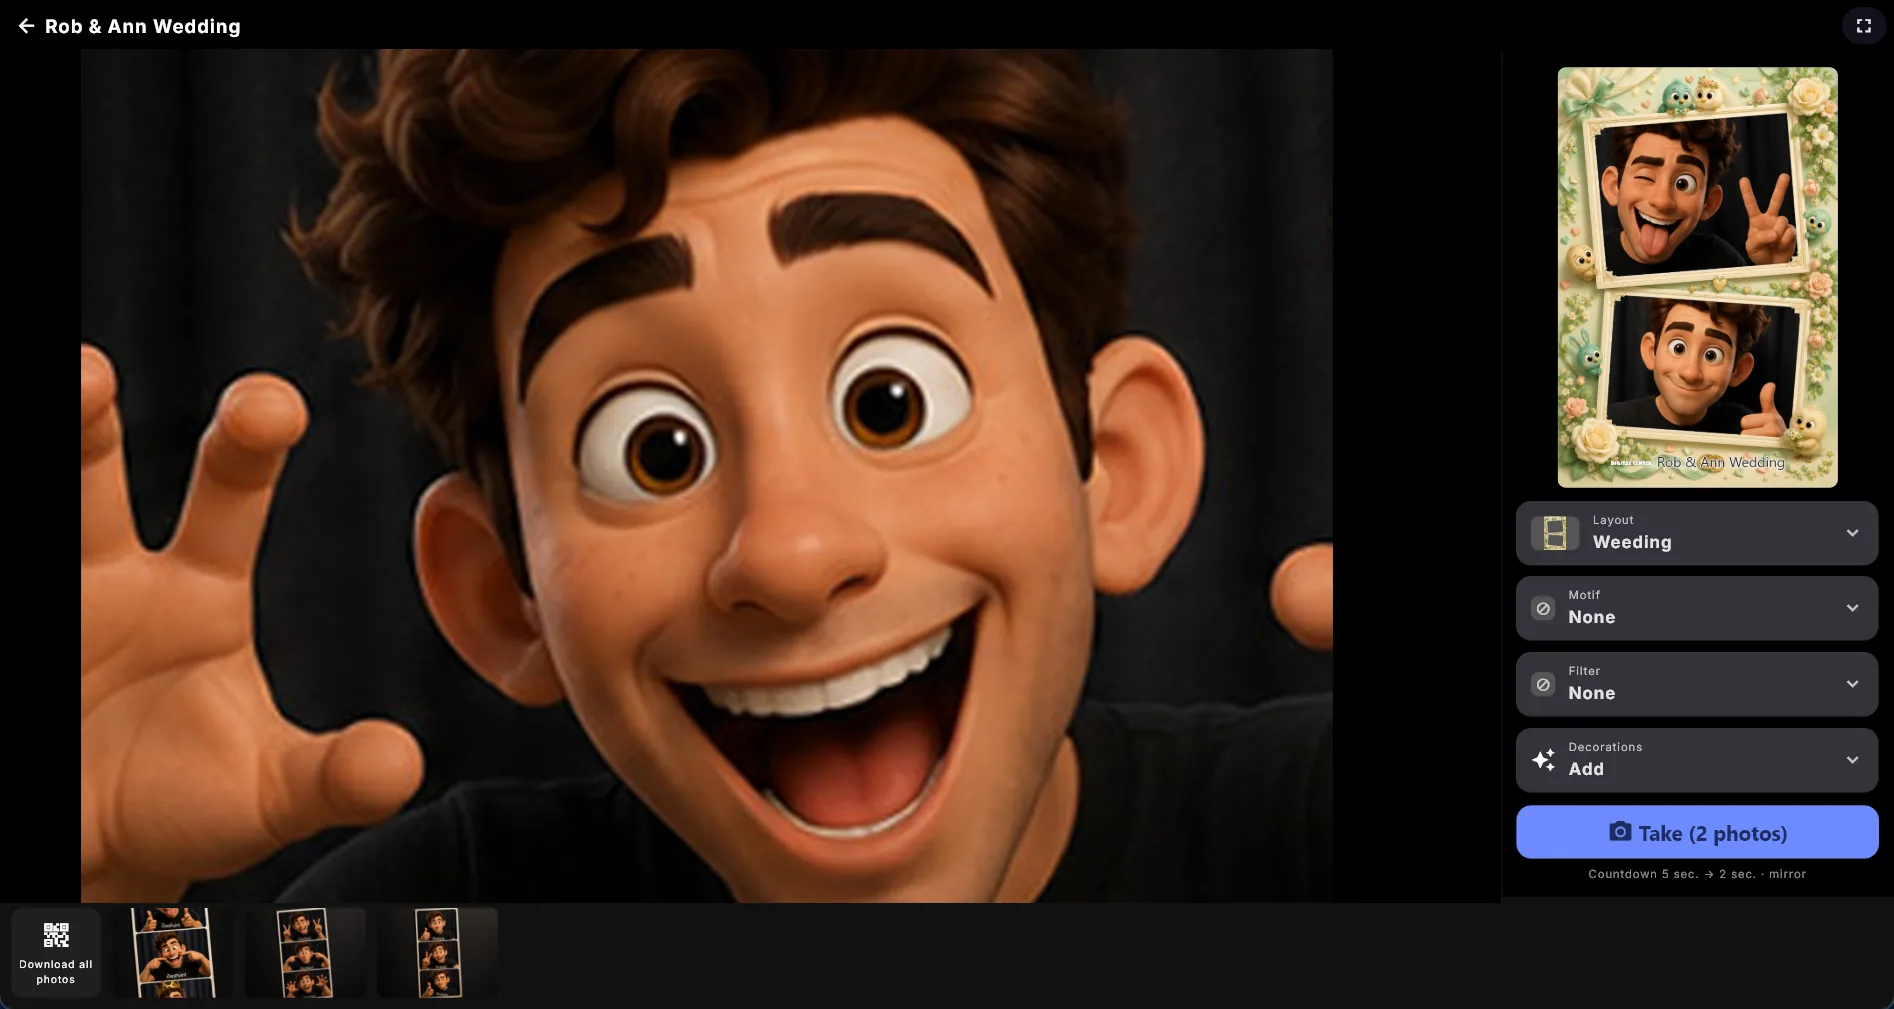
Everything a guest needs sits in one control bar next to the camera - down the right-hand side on a wide screen, along the bottom on a tall one. That leaves the camera itself as large as possible, which matters when several people are trying to fit into the frame.
The bar holds three things:
- A preview of the finished picture, kept up to date the whole time. It is the real thing, put together exactly the way the saved picture will be, with your event title and logo already on it - so the guest can see what the layout, the motif, the filter and their decorations add up to before they take anything. As the pictures are taken, the empty slots are replaced by the real ones and the next slot is marked, so everyone can see where the next shot lands.
- The four choices: Layout, Motif, Filter and Decorations. You can hide any of them (see below), and the row disappears entirely if you hide all four.
- The Take button. It says Take, Take (3 photos) or Take motion depending on the layout, and it can never be hidden or folded away.
- 1
Choose how the picture should look
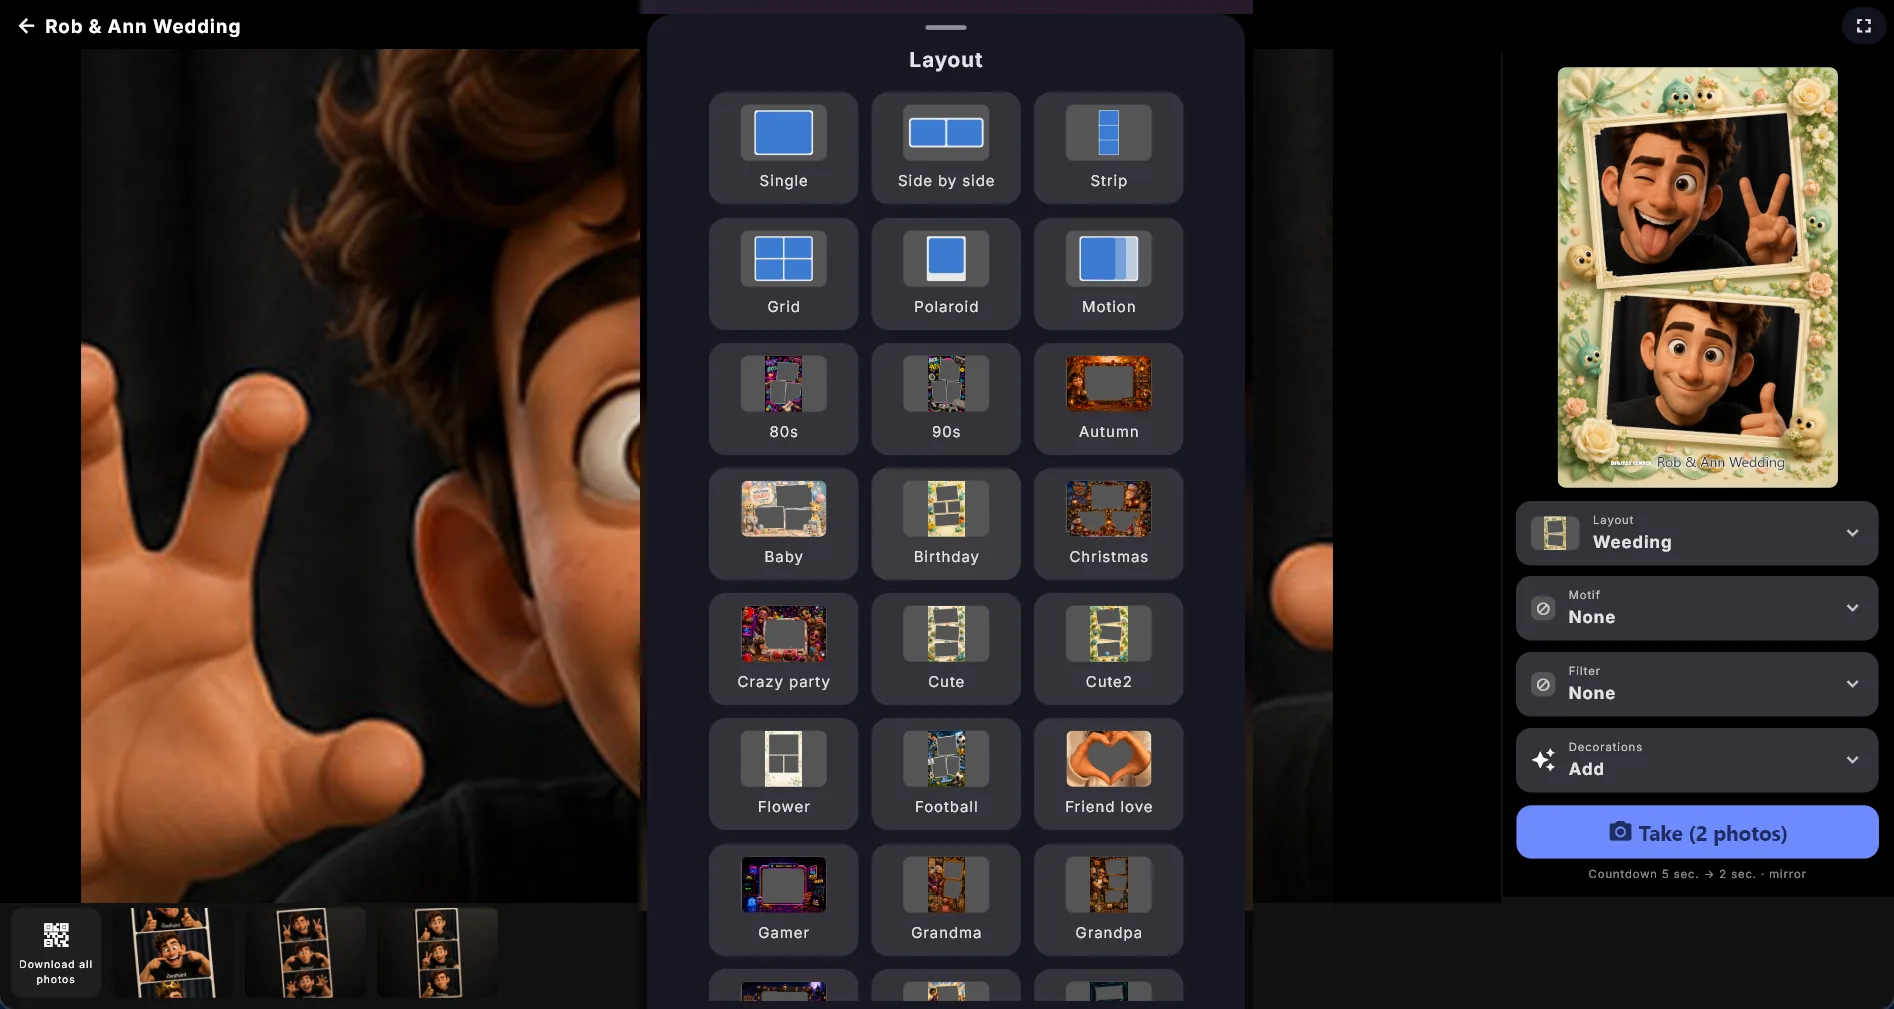
Tap Layout and pick one. If you have added collage templates of your own, they sit in the same list under the built-in layouts, with their own names. Then add a Motif, a Filter and any Decorations you want.
- 2
Tap Take and pose
The booth counts down out loud on screen - five seconds by default - and takes the picture. A layout that needs several pictures counts down again between them, usually with a shorter countdown.
- 3
Get the picture
The finished picture appears with a Done button, a Print button if you have allowed printing, and a code to scan if you have allowed sharing. Tap Done and the booth is ready for the next guest.
Approve before saving (off by default) puts one step in between. With it on, the finished picture is shown with two large buttons, Keep and Retake. Keep saves it as usual; Retake throws it away without saving anything and lets the guest try again with the same layout, motif, filter and decorations still in place. With the setting off, the picture is saved automatically. If saving fails for a moment, the booth holds on to the picture and tries again by itself, so a guest's picture is not lost because of a short hiccup.
When the booth is left alone
After a while with nobody using it, the booth shows a welcome screen inviting the next guest to take a picture, with a slideshow of the evening's pictures behind it. It appears at the start of the party too, when no pictures have been taken yet, showing a large camera symbol so the screen never looks switched off. You set the delay with Attract screen after (seconds), where 0 turns it off.
Layouts
The layout decides how many pictures are taken in a row and how they are placed on the finished picture:
| Layout | What you get |
|---|---|
| Single | One picture. |
| Side by side | Two pictures next to each other. |
| Strip | Three pictures in a classic photo strip. |
| Grid | Four pictures in a 2x2 grid. |
| Polaroid | One picture with the wide white margin at the bottom. |
| Motion | A short animation instead of a still picture. |
Motion is the odd one out. It counts down once, then takes a fast burst of pictures while the guest holds the pose - there is no countdown between them. The result is a little animation that loops back and forth for ever, and it can be saved and fetched on a phone with the code exactly like an ordinary picture. Your mirroring, rotation and color filter come along, and so do the motif, the decorations and your own event title and logo, which are baked into every frame.
Under Picture layout in the settings you choose which layout the booth starts on (see What the booth starts with below). Guests can switch it themselves at the booth unless you hide the Layout button.
The layout menu shows what each choice looks like
Each entry in the Layout menu is drawn rather than labeled with the same generic symbol: a collage template of yours is shown as its own artwork, and a built-in layout as a small diagram of the finished picture. The closed Layout button shows the layout that is currently chosen, so a guest can see at a glance what they are about to get.
Motifs, filters and decorations
Motifs are laid over the whole picture: a gold frame, hearts, stars, confetti, balloons or neon. The motif is shown over the live camera while the guest gets ready and is baked onto the finished picture, so what you see is what you get.
Color filters change the mood of the picture: None, Sepia, Black & white, Vintage, Polaroid, Film, Warm, Cool, Vivid or Retro. The filter is applied to the live camera as well, again so the guest sees the result before taking anything.
Decorations are laid on top of the picture one by one. Tap Decorations and a tray opens with playful symbols (a star, a heart, a crown, a cake, a trophy, a music note, a sun and more), a Text sign where the guest writes their own words, and any decoration pictures you have added yourself. Tap what you want and it lands on the picture straight away; the tray stays open so several can be added. Close the tray when you are done.
Tap a decoration on the picture to select it. It can then be dragged around, and small handles appear: the one in the bottom-right corner makes it bigger or smaller, the one at the top turns it. Both work with a finger and with a mouse, and on a touch screen you can still pinch and twist with two fingers. The two top corners change the color and remove it. A picture decoration of your own keeps its own colors, so it has no color button.
Decorations belong to one guest
Remove all at the bottom of the tray clears the lot in one go; it shows how many will go and only appears when there is something to clear. The decorations also disappear by themselves the moment the guest's turn is over - when the finished picture is closed, or when the booth has stood unused long enough to show the welcome screen again - so the next guest never starts with someone else's crown on the screen. Retake is the exception: that is the same guest mid-session, so everything they chose is kept.
Guest buttons in the settings decides which of the four the guests get: Show layout button, Show motif button, Show filter button and Show decorations button. All four are on to begin with. Switch one off and that button disappears; switch them all off and the row is gone entirely, so guests can only take the picture with the setup you have chosen.
What the booth starts with
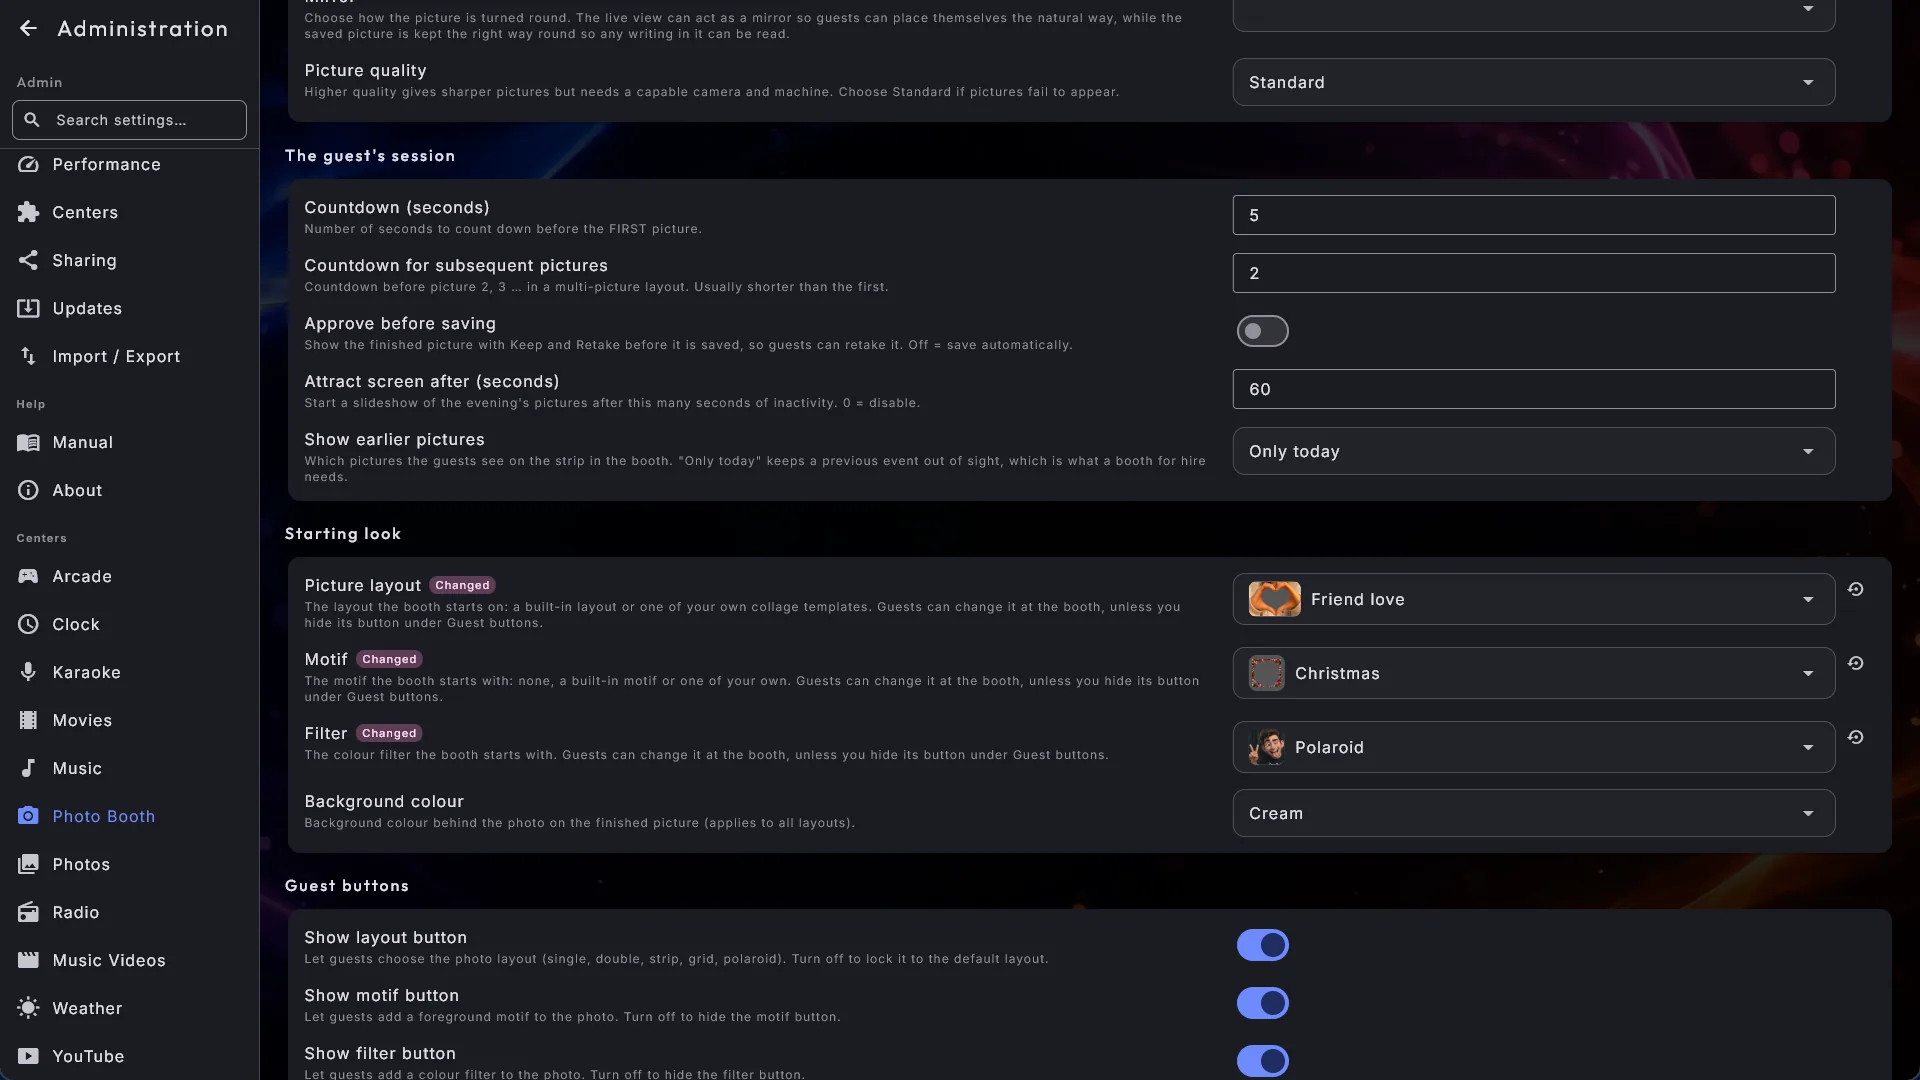
Three settings decide how the booth looks every time it is opened:
- Picture layout - one of the built-in layouts or one of your own collage templates. Your templates are listed under the built-in ones, with their own names.
- Motif - no motif, one of the built-in ones or one of your own.
- Filter - no filter, or one of the color filters.
Each of the three fields shows a small picture of what is chosen next to its name. Tap the field and the same picker with large pictures that guests see at the booth opens, so you can see what a filter such as "Film" or "Vivid", or your own template, looks like before you choose. Tap a picture to choose it. To begin with the booth starts on the strip, with no motif and no filter.
- Lock a whole setup for a party. Choose, say, your wedding frame, sepia and hearts as the start, and switch the matching buttons off under Guest buttons. Every guest then gets exactly that setup all evening.
- Where a button is still shown, the guest can change it. A guest's choice stays until the booth is closed and opened again; then it starts on your setup once more.
- If you delete or rename the template or the motif that is chosen, the booth simply starts on the strip (or without a motif). No error appears at the booth, but a short message under the field in the settings says that the choice can no longer be found. Choose something else and the message goes away.
Your own pictures in the booth
You are not limited to what comes with the product. Three folders under Photo Booth take picture files of your own, and they show up in the guest's menus after the built-in ones. The built-in ones always keep working.
| Folder | What goes in it |
|---|---|
| Motifs | Pictures laid over the whole photo. |
| Decorations | Hats, wigs, glasses, signs - anything the guest places on the photo. |
| Collage templates | Frames that decide how many pictures are taken and where they land. |
You find the three folders on the Photo Booth page in Administration, in the Your own pictures section. The paths are shown as text with a Copy button next to each, because they sit somewhere Windows normally hides: copy one, paste it into the address bar in File Explorer, and the folder opens. The same section also shows where the guests' pictures are saved, under Taken pictures (see Captured pictures).
A few rules apply to all three:
- Use a format that can be transparent - PNG is the obvious one, and WebP and GIF work too. A JPG cannot be used, because it brings a solid rectangle with it.
- The name comes from the file name: hyphens and underscores become spaces and
the first letter is capitalized, so
vintage-film.pngbecomes "Vintage film". The name is never translated, so you choose the words. - A file that cannot be read is simply skipped, and the booth carries on.
- Your files are included in the backup (Administration → Import / Export), so they follow you to a new machine.
For a motif, leave the middle transparent enough that the face can clearly be seen. It does not have to be completely clear - a light haze across the whole picture, like a classic film strip, works nicely. The motif is stretched to fill the picture area, so make it square and it will behave in every layout and both orientations; 1024x1024 or 2048x2048 gives a crisp result.
For a decoration, cut the shape out so everything around it is transparent. A square file of, say, 1200x1200 works well. A decoration is never stretched out of shape - it always keeps its own proportions - and it starts out a little larger than the built-in symbols, because there is usually some air around the shape in the file.
Collage templates
A collage template lets you decide exactly how the finished picture looks: four crooked pictures in a festive frame, three in a heart, an advent strip. A template decides three things - how many pictures are taken, where each one lands, and whether a picture sits slightly askew. The guest picks it in the Layout list like any other layout, and the rest is as always: count down, take a picture, count down again, next slot.
A template is two files with the same name in the collages folder:
- The artwork - the frame that is laid over the pictures. Use a format that can be transparent and leave a transparent hole where each picture goes. Because the artwork sits on top, you can give the holes rounded corners, a polaroid edge, a shadow or whatever you like. The artwork's own size decides the shape of the finished picture, so draw it in the format you want to print.
- A small companion file with the same name, which says where the holes are. Its order is the order the pictures are taken in, and a template may hold between one and six pictures - more than that and the guest would be posing all night.
If the companion file is missing or has a mistake in it, the template simply does not appear in the Layout list. That is where to look if one of yours is missing. The booth carries on as always, and the built-in layouts work regardless. A collage cannot be combined with Motion, since an animation has no slots to fill.
Ask support for the details
Writing that companion file by hand is a job for a text editor, and the exact format is more than this manual should carry. Get in touch and we will send you the description and a working example to start from.
Place branding on your collage templates
Your event title and logo can go on a collage too. They are just not put in a bar underneath it, the way they are on the built-in layouts: a collage is exactly the size you drew it in, which is what makes it good to print, and a bar stuck on the bottom would change that shape. Instead you say where in the artwork there is room for them - usually the empty strip along the bottom that most frames have.
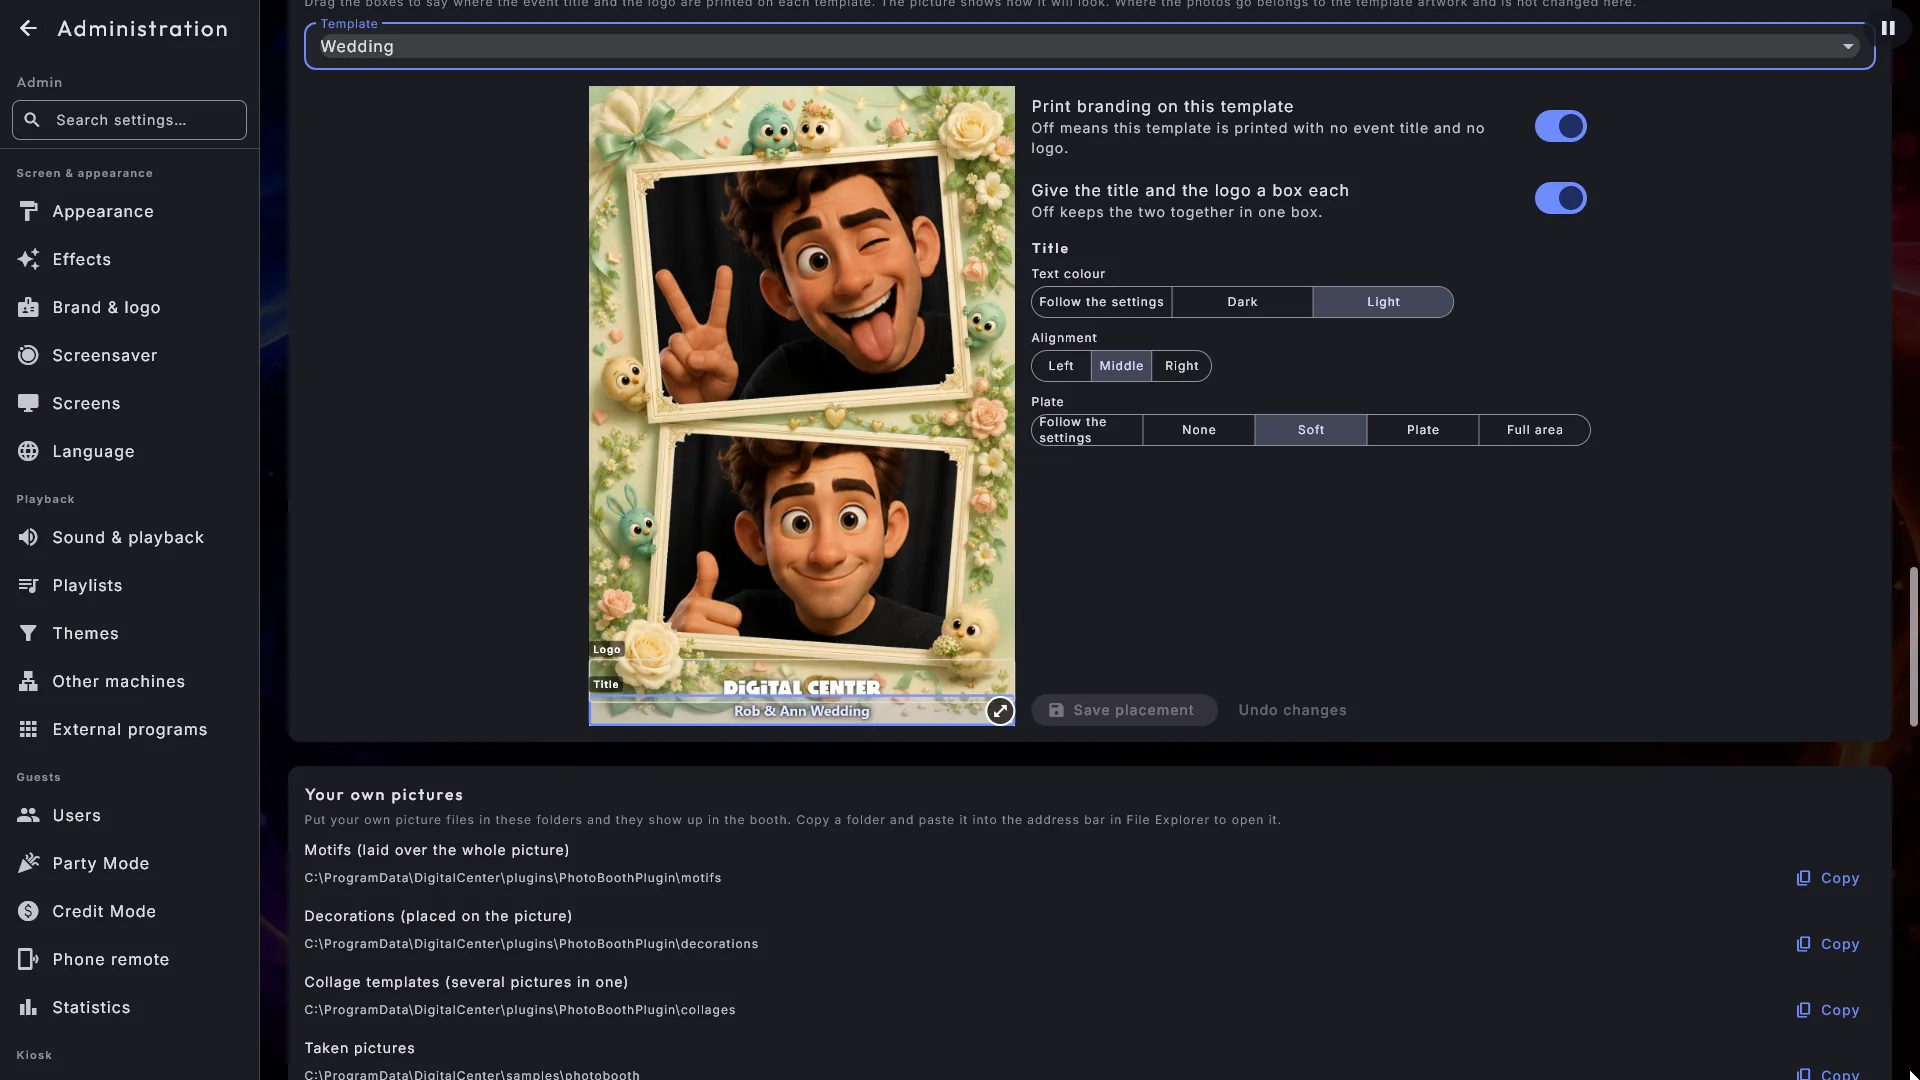
The easy way is to drag them into place. Go to the Photo Booth page in Administration and find Place branding on your collage templates. Pick a template from the list and you see the finished picture exactly as a guest gets it, with photos, your title and your logo already on it. On top of that lies a box you can drag anywhere, and resize with the round handle in its bottom-right corner. Finish with Save placement.
- The settings sit beside the template - in a column to the right, or underneath if the template is wide and there is no room at the side - so you can see the picture and change it in the same place. Save placement and Undo changes are always at the bottom of that column.
- Give the title and the logo a box each splits the box in two, so you can hang the logo in a corner and let the title run along the bottom. Turn it off again and they gather back into the title's box.
- Tap a box and you can set Text colour (Dark, Light or Follow the settings), Alignment (Left, Middle or Right) and Plate for that box on its own - the two boxes may well sit on completely different parts of the artwork. Plate offers the same four steps as the branding settings below.
- Alignment pushes the title and logo out to one side of the box instead of keeping them in the middle. Handy when the box is wide but the text is short - a logo right out in the left-hand edge of the bottom bar, for instance. Middle is what every template does already, so you notice no difference until you choose something else.
- Print branding on this template can be turned off entirely, if one particular template should be printed with no title and no logo.
- Where the photos go belongs to the template artwork and is never changed here. If a placement cannot be used, nothing at all is changed and you are told so.
Copy a bundled template before you move its branding
The collage templates that come with Digital Center are renewed with every update,
so if you have moved the branding on one of them, that adjustment is lost. To keep
it, copy the template - both the picture and the small .json file with the same
name - to a new name in the collages folder, and use your copy. An update never
touches your copy.
Branding on the finished picture
The Branding section decides how the finished picture is dressed with your own mark.
- Use branding is the master switch. Turn it off and the picture carries neither logo nor title - a completely clean picture - and the rest of the branding choices are hidden.
- Logo source - Own image lets you point at your own file under Logo in footer, and App logo or name uses the branding you have already set up for the system as a whole.
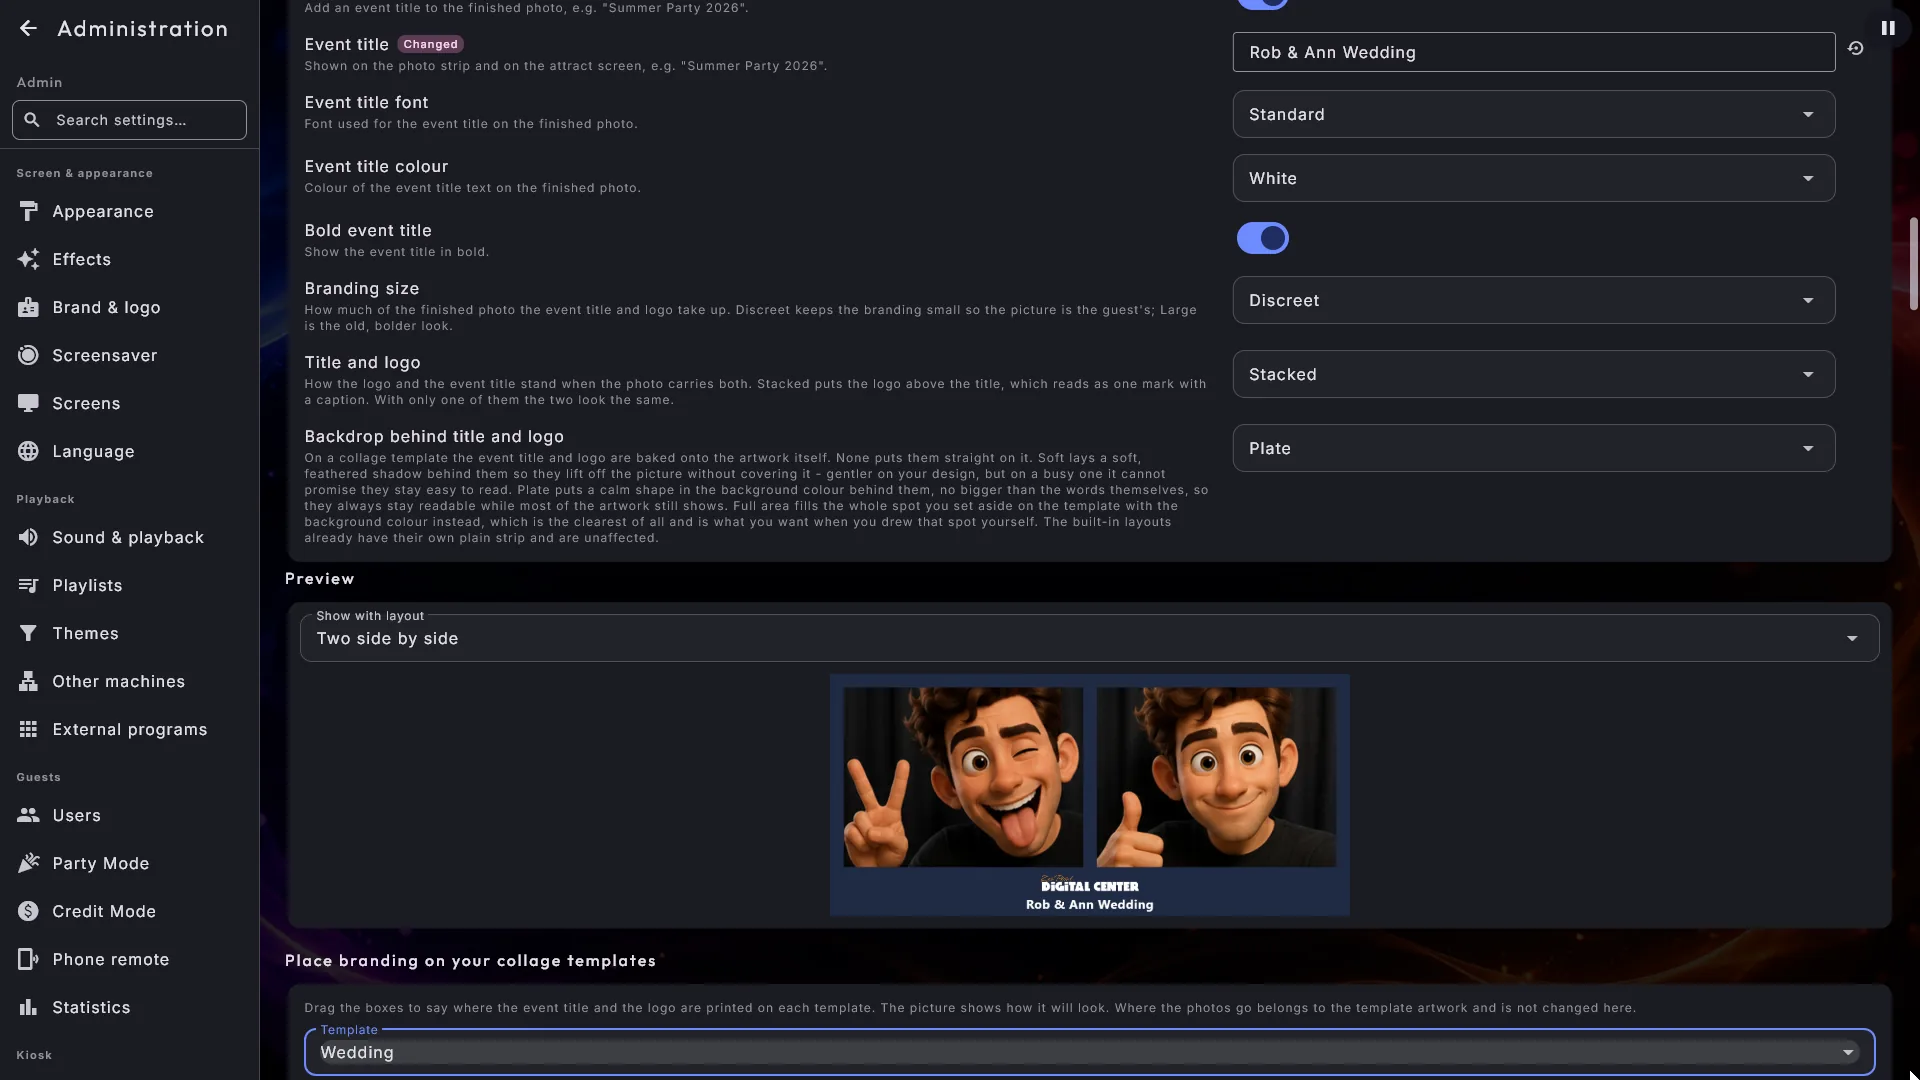
- Show event title, and below it the Event title itself with its own font, colour and bold setting, so the picture matches the look of the venue.
- Background colour for the finished picture - Cream, White, Black, Navy blue or Rose - sits with the camera settings rather than here, because a picture always has a background whether branding is on or not. It applies to every layout, polaroid included, so a light title color cannot drown on a light background. A dark template is usually best served by Black or Navy blue.
How much room the branding takes
Two choices control that, and they are worth knowing about because both have changed.
- Branding size has three steps - Discreet, Normal and Large - and each one adjusts everything at once: how tall the bar at the foot of the picture is, how large the title is, and how much room the logo may take. Large is exactly the look the booth had before.
- Title and logo decides how the two stand when the picture carries both. Stacked puts the logo on top with the title under it, both centered, which reads as one mark with a caption and is usually the tidier of the two. Side by side puts the logo to the left of the title, the way it used to be. With only one of them - just a title, or just a logo - the two choices look identical, and your title is neither moved nor made smaller.
Your booth now prints less branding than it used to
Discreet and Stacked are the new standard settings. If you have never touched these two fields, your booth changed its look with this update and now prints the title and logo smaller and stacked. Nothing is lost - choose Large and Side by side and you have the old look back exactly.
The Preview underneath the branding choices shows the whole finished picture as a guest gets it - with stand-in pictures in the photo slots, your background color, your title and your logo, drawn to the right scale - so you can see how much of the picture the branding actually takes before you approve it. Above the picture, Show with layout lets you pick which of the built-in layouts (single, side by side, strip, grid, polaroid, motion) to see it in, so you can check your branding on exactly the layout your booth uses. Your own collage templates are checked under Place branding on your collage templates instead. The polaroid layout keeps its wide white foot whatever size you choose, since that is part of the polaroid look, but the title and logo inside it follow your choice.
Backdrop behind title and logo
On a collage template the title and logo are baked onto the artwork itself, and if they land over something busy - confetti, balloons, food - they can be hard to read. Backdrop behind title and logo decides how much is laid behind them:
- None - the title and logo sit straight on the artwork, exactly as they always have.
- Soft - a soft, feathered shadow behind them, so they lift off the picture without covering it. Gentle on your artwork, but it cannot promise the text stays easy to read on a busy design: a feathered shadow has no fixed color to hold the text against. If the template is lively right where the text sits, choose one of the next two.
- Plate (the standard) - a calm, rounded shape in your chosen background color behind them. It is only as big as the words themselves, so the rest of the area still shows the artwork. It always keeps the title readable, because once the background is known the color of the text can be picked to suit it.
- Full area - the same background color, but filling the whole box you set aside on the template, right into the corners. The clearest of them all. Choose it when you have drawn that box yourself under Place branding on your collage templates. If you have not touched the boxes, they are suggested automatically as a wide strip under the bottom photo, and Full area will lay a broad bar across your artwork - there, Plate is usually the right answer.
The built-in layouts already have their own plain strip at the foot and are not affected by this setting.
A dark logo on a dark frame
With None and Soft, the logo's shadow follows the color of the text, because that color is your answer to what the artwork looks like just there. Dark text (the standard) means the spot is light, so the logo gets the dark shadow it has always had; light text means the spot is dark, so the logo gets a light shadow that can actually be seen. With Plate, the plate's own color decides as before. We never look inside your logo file for colors - we only listen to what you have told us about the background.
Printing
The Print section lets guests print the finished picture on a printer connected to the machine.
- Enable printing (off by default) adds a Print button beside Done once a picture has been taken.
- Print automatically sends the picture to the printer by itself as soon as it is saved, without anyone pressing anything.
- Number of copies (1 to 5).
- Printer - pick one from the list of connected printers, or leave it on the system's default printer if you are unsure.
- Paper - what the picture is printed on. Follow the printer (the standard) uses exactly the paper the printer itself is set up for, which suits the photo printers a booth normally uses, and you usually never need to touch it. If prints come out the wrong size, choose the paper yourself instead: 10x15 cm, 13x18 cm, a 5x15 cm strip, A6 or A4. The picture is turned automatically to match the paper, so a wide picture comes out across the sheet and a tall one upright, and the whole picture is printed - nothing is cropped off the edges.
No printer box ever appears on the screen; the picture goes straight to the printer. A Motion picture cannot be printed, so the button is not offered for those, and if something goes wrong (no printer, printer switched off) the guest simply gets a calm message while the booth carries on undisturbed.
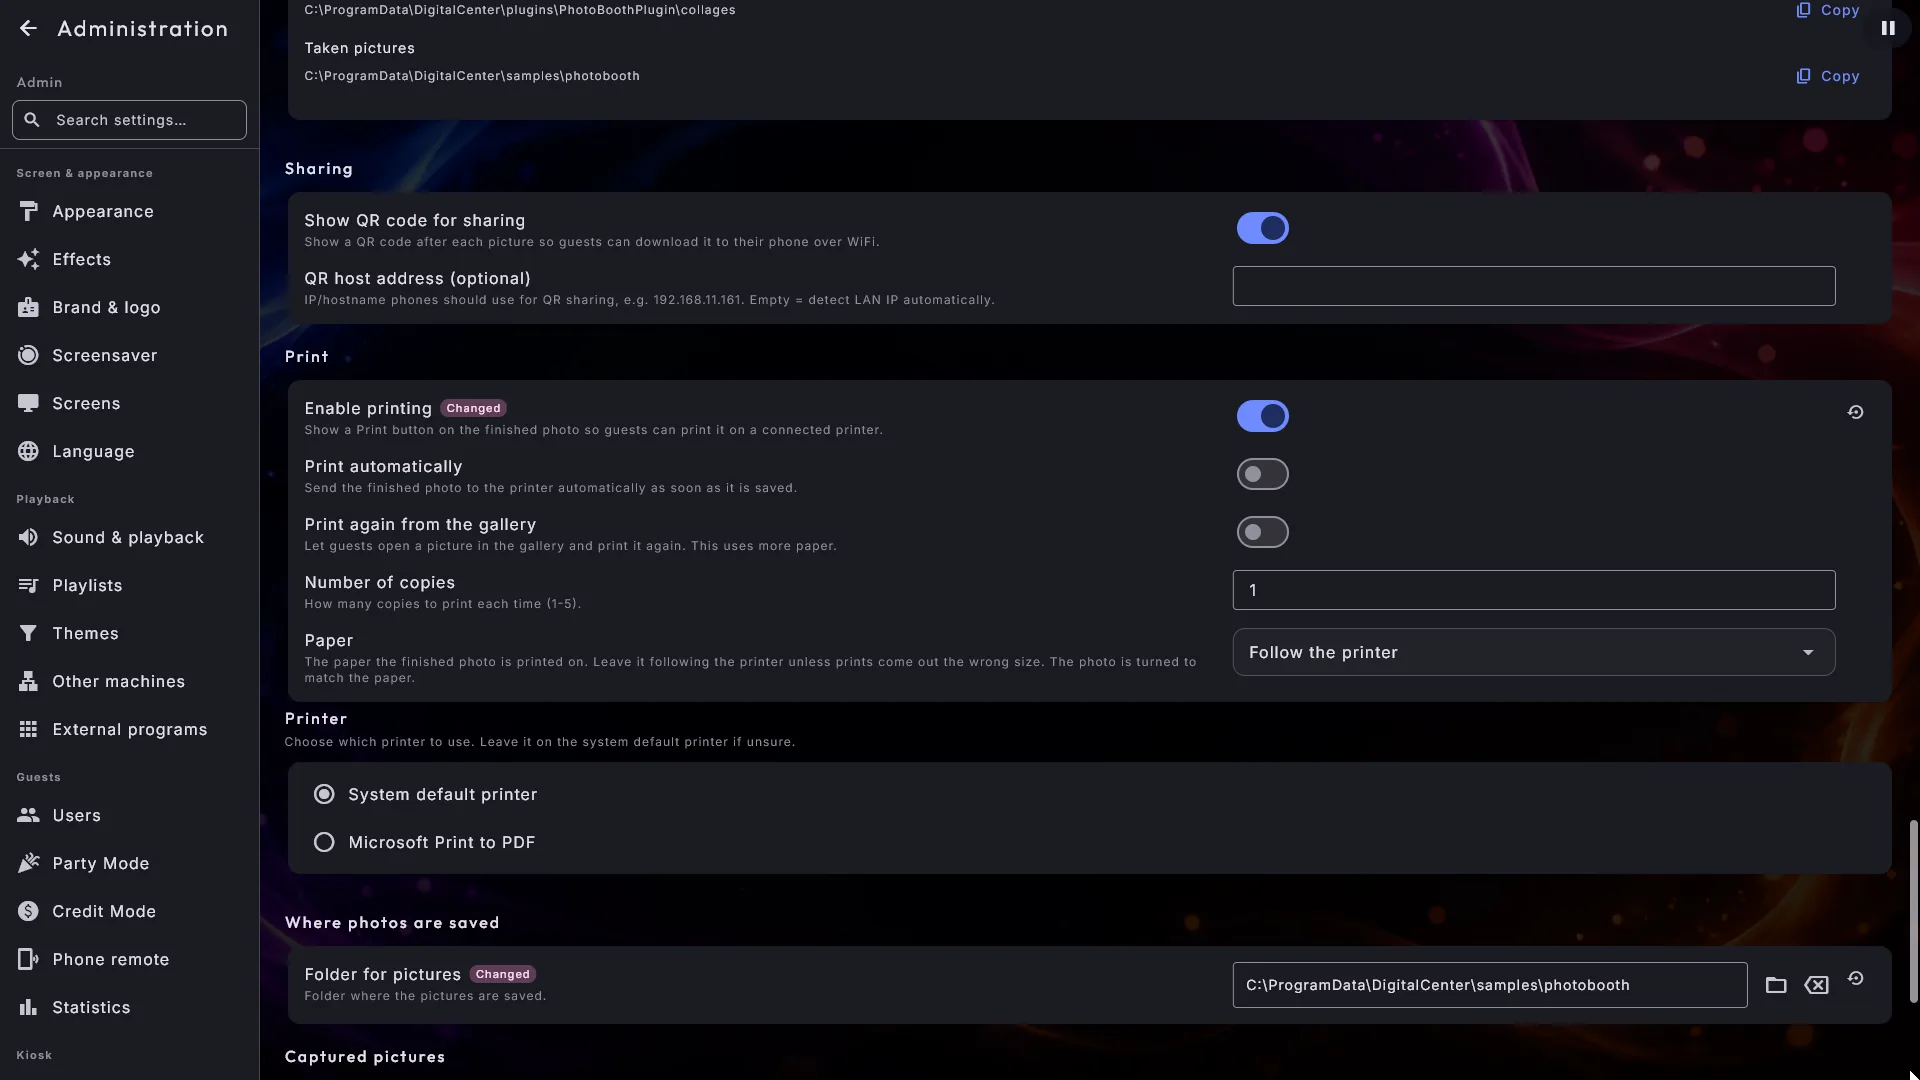
Printing a picture again. A separate switch, Print again from the gallery, lets a guest open a picture from the gallery along the bottom and send it to the printer once more. It is the answer to "could I have one for grandma too", and it is its own switch precisely because it can be used over and over: leave it off and each picture is printed only in the moment it is taken.
Sharing the pictures
With Show QR code for sharing on, a code appears next to the finished picture. A guest scans it with their phone on the same WiFi and the picture opens ready to save. It works entirely without an internet connection - only the local network is used.
The pictures also gather in a gallery along the bottom of the booth. Tap one to see it large with its own code, so a guest can fetch a picture from earlier in the evening.
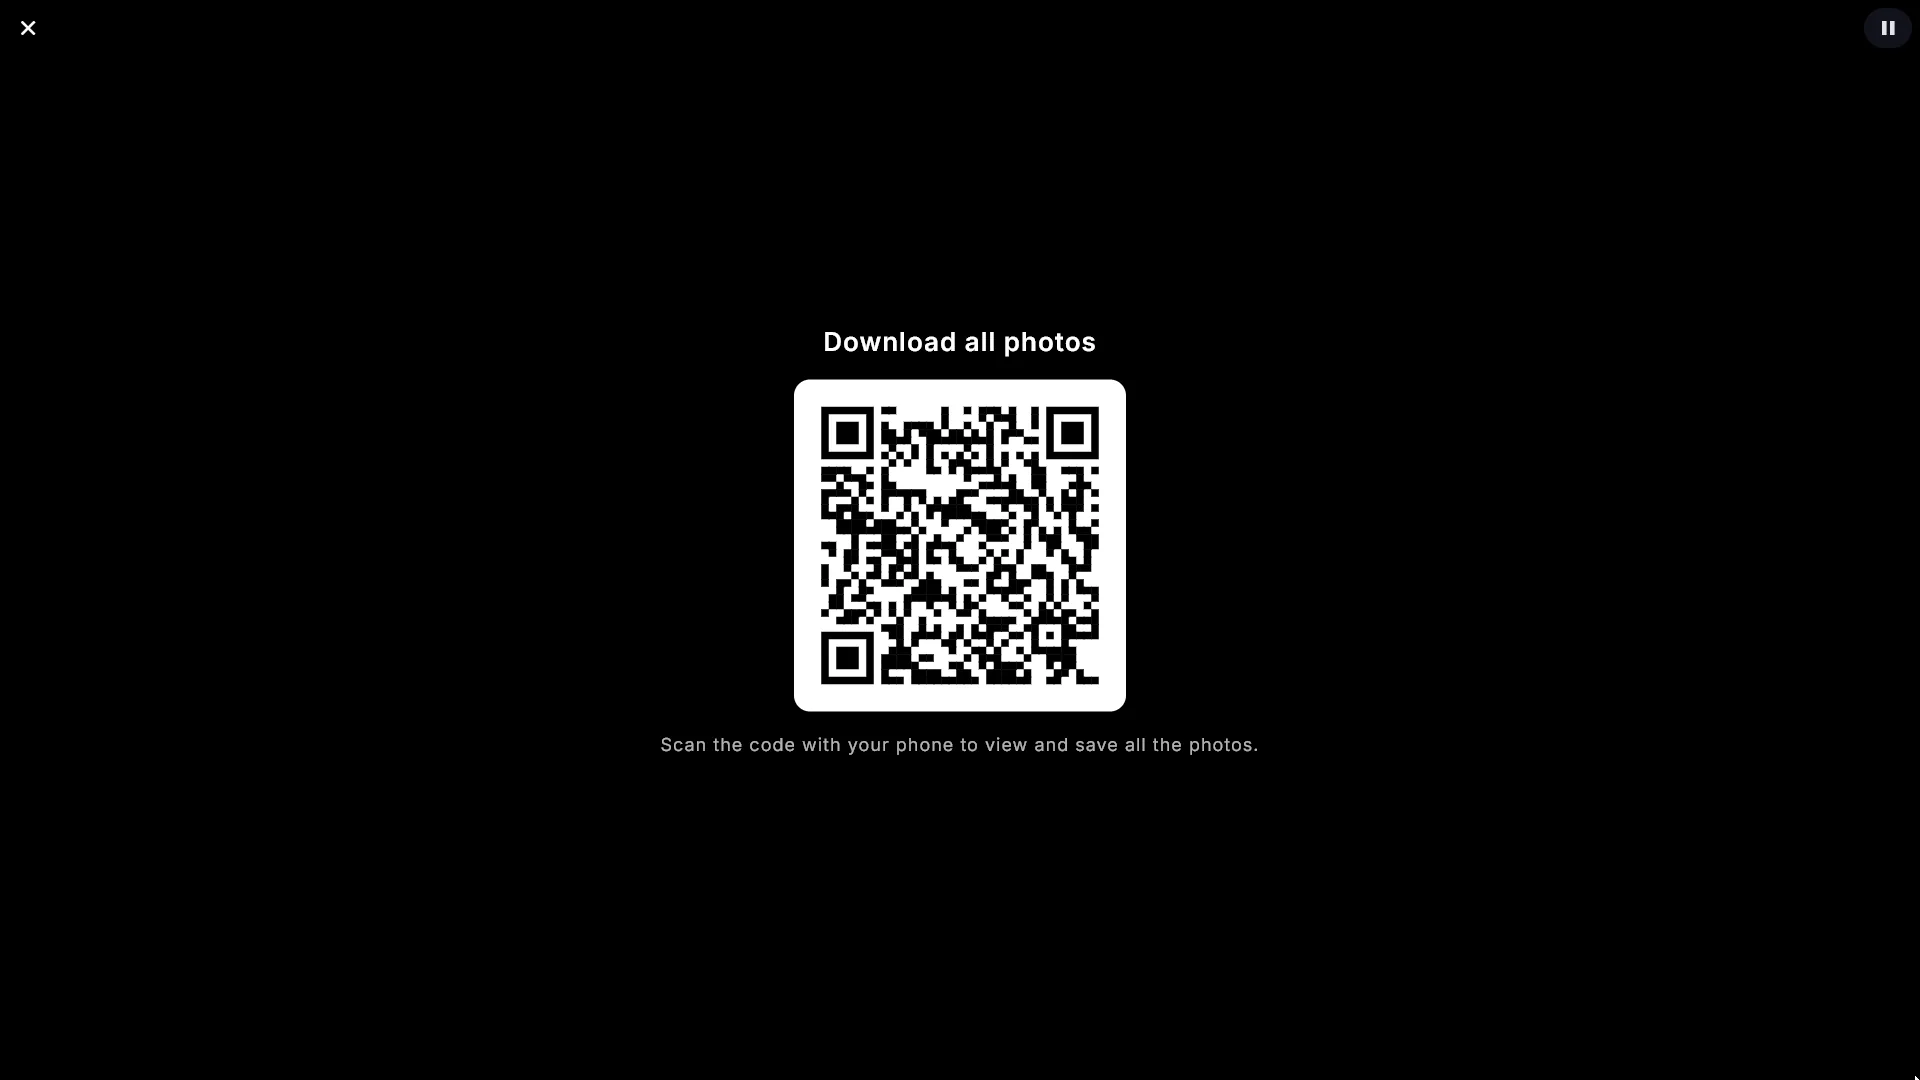
Rather than scanning one code per picture, a guest can take the lot at once: Download all photos next to the gallery shows a single large code, and scanning it opens a simple page listing the pictures in the gallery, each one ready to save. The button only appears when sharing is on and there is at least one picture.
If the phones cannot find the machine, QR host address lets you write the machine's address on the network by hand. Left empty, it is detected automatically, which is what you want in almost every case.
Only today's pictures
The gallery along the bottom of the booth - and the slideshow of Photo Booth pictures - shows only today's pictures. So the guests at one party never see the pictures from the party before, and you do not need to clear the folder between two events. That matters most if you hire the booth out.
You decide how much is shown with Show earlier pictures:
- Only today (the standard) - everything taken today.
- Only this session - only what has been taken since the booth was opened. The right choice if you have two events on the same day.
- All - the whole folder.
If there are no pictures to show yet, the booth shows three example pictures, so the gallery does not stand empty and look like a fault on a brand-new machine. They can be neither shared nor printed, and they disappear for good as soon as the booth has taken its first real picture.
Lights that follow the camera
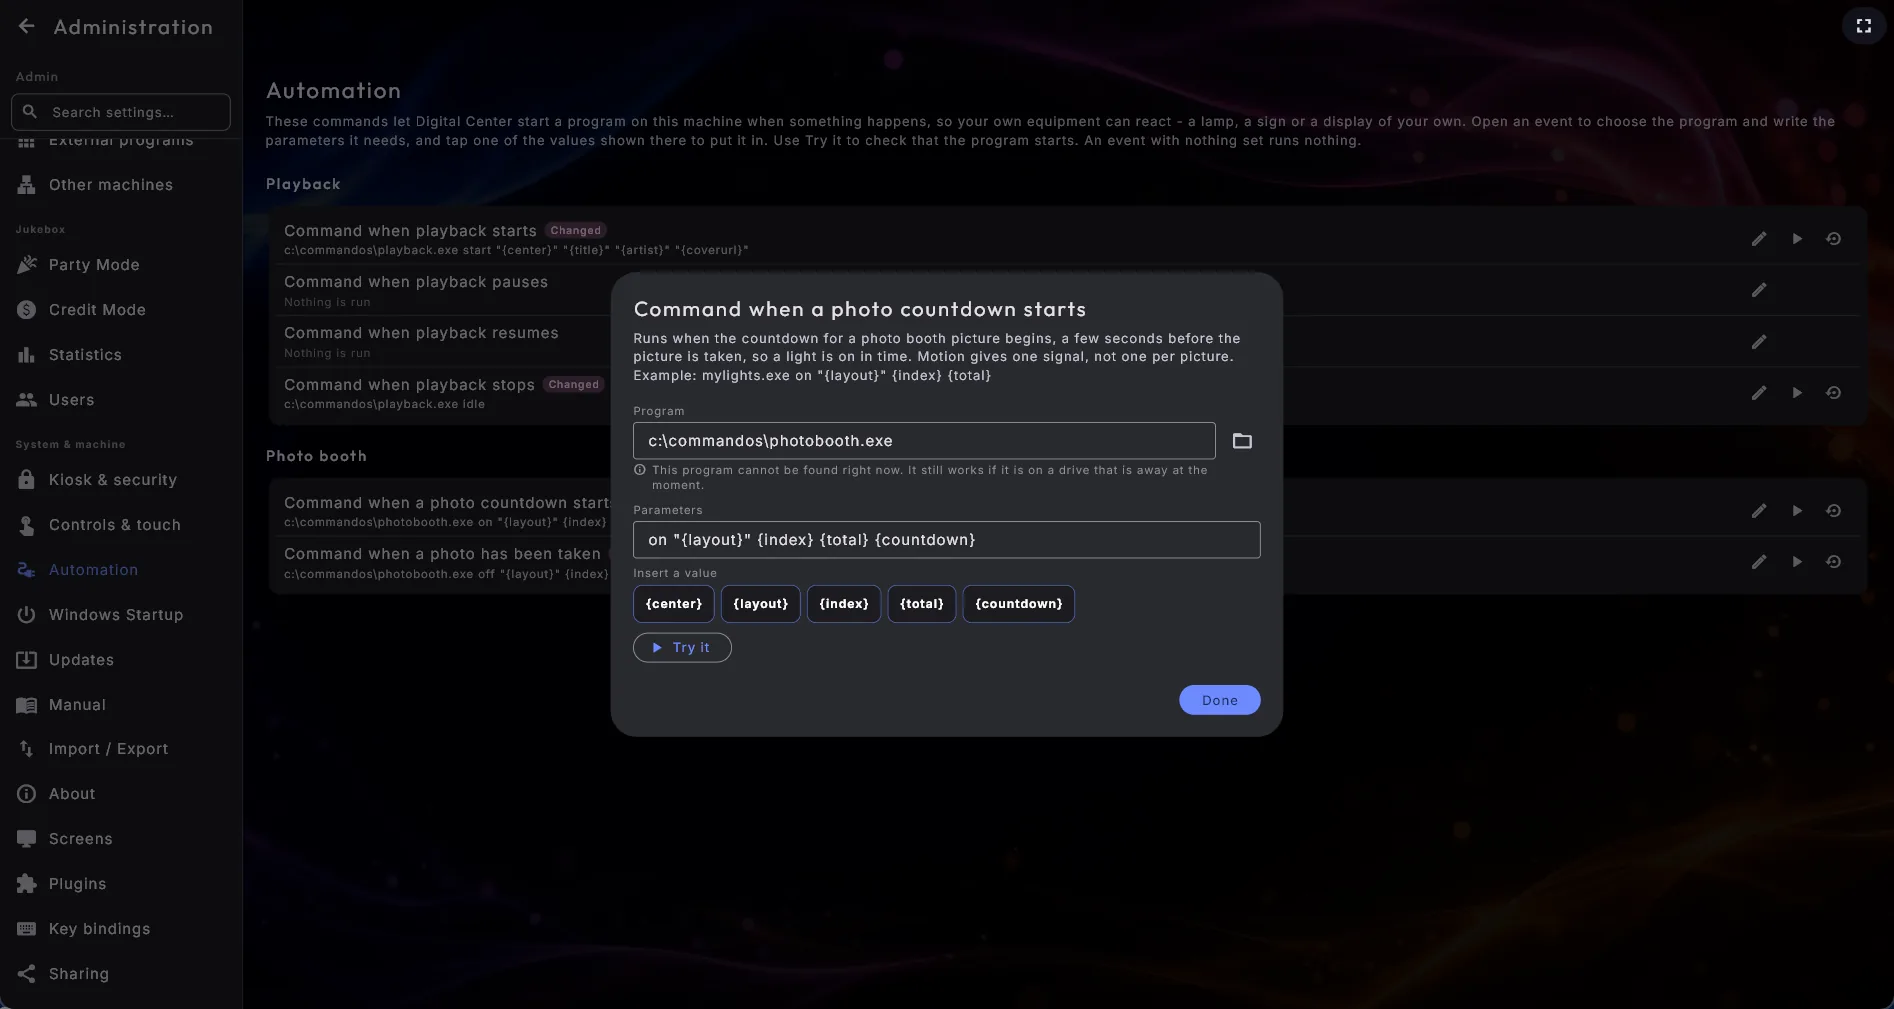
If the booth stands in a corner that needs its own light, Digital Center can switch your equipment on and off around every single picture. You set up the two commands under Administration → Automation, in the Photo booth group: open each one, choose the program, tap in the values it should pass on, and use Try it to check that it starts. The booth runs them as a pair: on when the countdown for a picture begins, off once that picture has been taken.
The light comes on with the countdown rather than at the shutter on purpose. Starting a program takes a moment, so a signal sent at the instant of the picture would arrive too late, while a signal a few seconds early is always in time. The guest can also see themselves in the light before the picture is taken.
A series of four pictures gives four on/off pairs, one per picture, and Motion
gives exactly one. If the light has been switched on it is always switched off again,
even if the guest walks away, the camera stops or the session ends unexpectedly.
Alongside {center} the commands can use {index} (which picture in the series),
{total}, {layout} (the layout or the collage template) and {countdown} (the
seconds before the shutter).
It can never hold up a picture
The commands are started quietly in the background and are never waited for. If a command fails, or the program it points at is missing, the picture is taken exactly as normal.
The camera and the picture itself
The rest of the Photo Booth settings are about the camera and where the pictures end up.
- Folder for pictures - where the finished pictures are saved.
- Countdown (seconds) - how long the booth counts down before the first picture, and Countdown for subsequent pictures for the ones after it in a multi-picture layout. The second one is usually shorter.
- Picture orientation - Landscape is wide; Portrait is a standing picture with the sides cropped away, which is what you want on a vertical screen.
- Rotate picture - None, 90° right, 180° or 90° left, for a camera mounted sideways or upside down.
- Mirror - how the picture is turned round. There are three choices:
- Mirror the view and the picture (the standard): both the camera view and the saved picture are mirrored, as when you look in a mirror.
- Do not mirror: neither the view nor the picture is mirrored.
- Mirror the view, save normally: the camera view acts as a mirror, so guests can easily step into place and hit the motif and the decorations, while the saved picture is turned the right way round, so any writing in it can be read. With this choice the booth moves the guest's decorations over to the right side of the person when the picture is saved, and a text sign can still be read.
- Picture quality - Standard is as before; High and Maximum give sharper pictures but need a good camera and a capable machine. Go back to Standard if pictures stop appearing.
Orientation, rotation and mirroring all show up immediately in the camera view, so you can see exactly what you are going to get. If the machine has more than one camera, the guest can pick which one to use at the booth. Under Cameras you choose which of them guests may use; each camera is listed by its own plain name.
Captured pictures
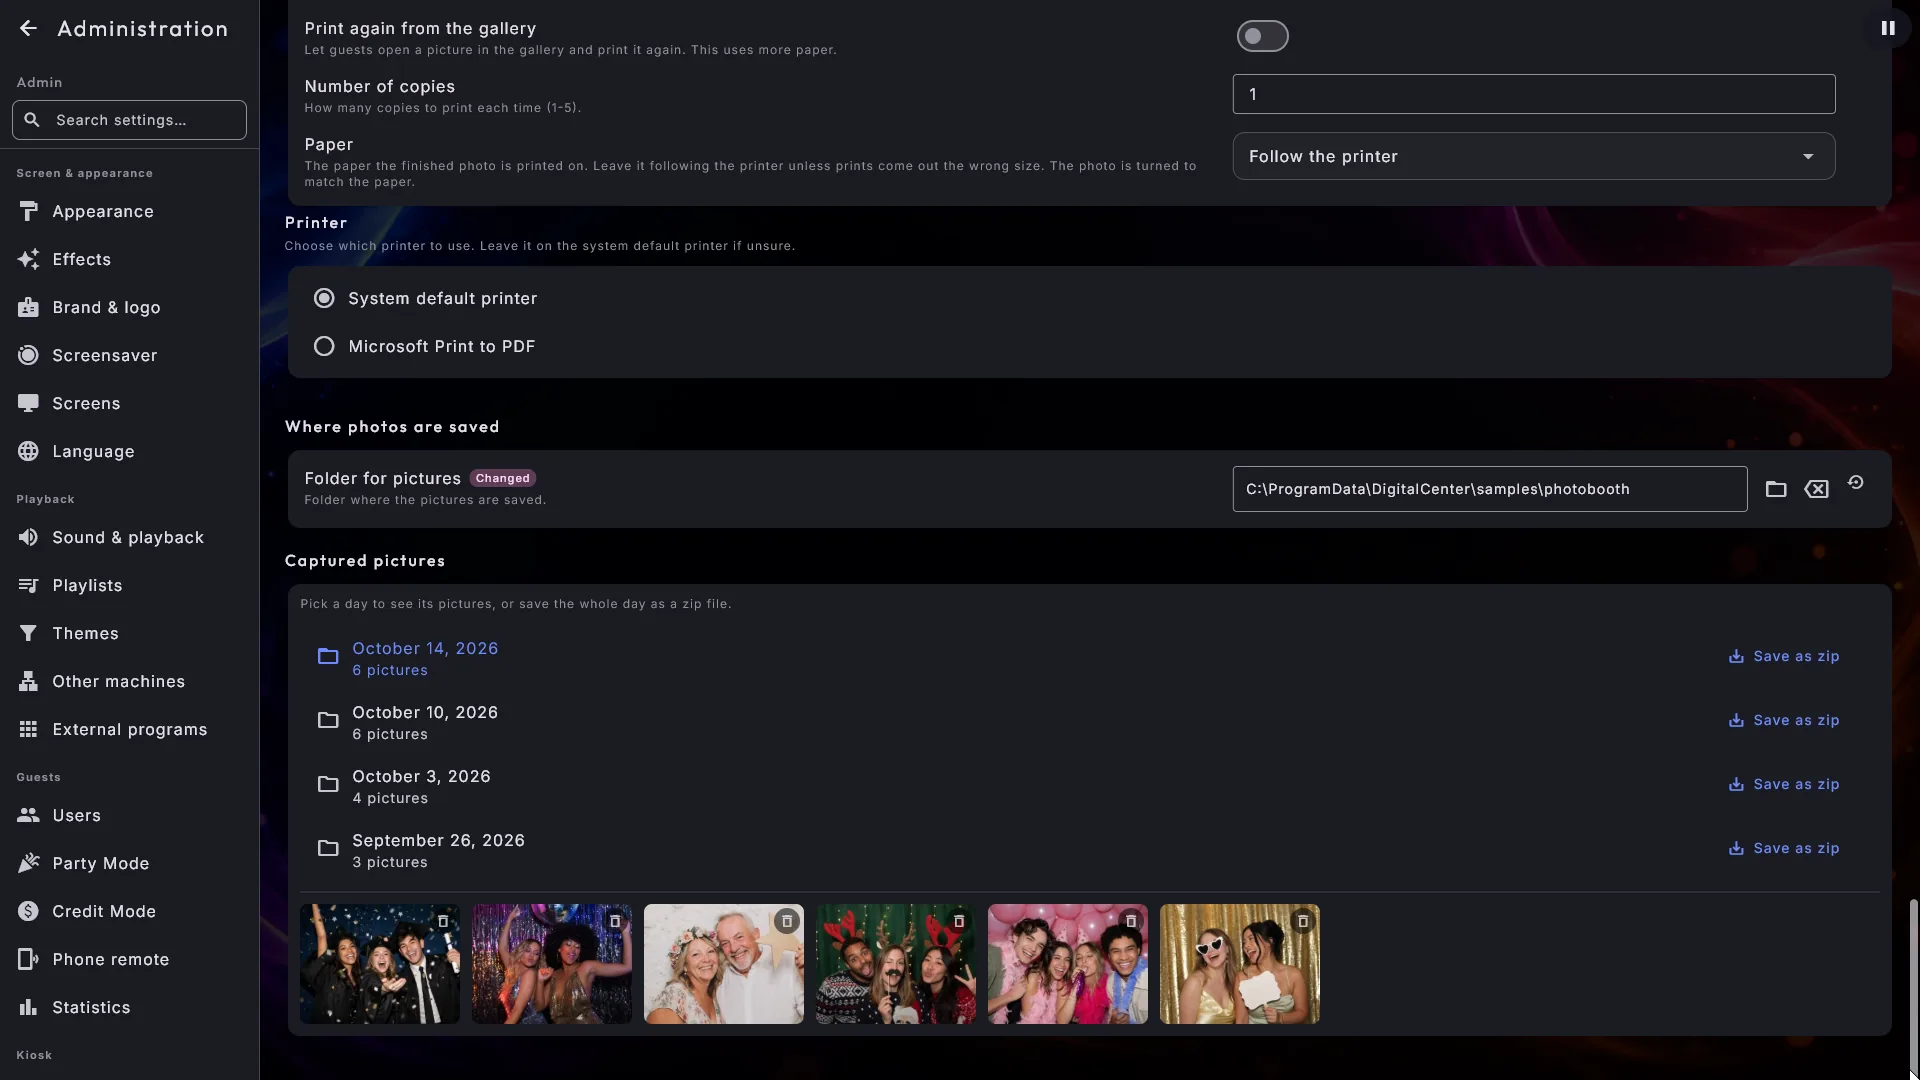
At the bottom of the Photo Booth settings page, Captured pictures lists the days the booth has been used, each with the number of pictures taken that day.
- Choose a day and its pictures are shown as small thumbnails. Tap a thumbnail and the picture opens large. The large view is only for looking - there is no code, no printing and no deleting there.
- To remove a single picture, use the small bin icon in the corner of its thumbnail. You are asked first: the question shows which picture it is and says that it cannot be undone, and nothing happens unless you actively say yes. The example pictures cannot be deleted.
- Next to each day is Save as zip. Choose a folder - a USB stick, for instance - and the whole day is packed into one file with the day's date in its name, ready to send to whoever hired the booth. You can follow along while it works ("Saving ... 60 of 148"). Nothing is ever deleted - the pictures stay exactly where they are.
- The Your own pictures section also shows the path to Taken pictures, with its own Copy button, if you would rather copy an evening by hand.
Pictures are deleted from Administration, not at the booth
The booth itself cannot delete pictures, and there is no settings button inside it - a guest must never be able to remove someone else's picture. Deleting is done from the thumbnails under Captured pictures, one picture at a time, and you are always asked to confirm first.